> ## Documentation Index
> Fetch the complete documentation index at: https://algolia.com/llms.txt
> Use this file to discover all available pages before exploring further.
# Client-side tools
> Run custom functions in your app to access user data, trigger UI updates, and perform authenticated actions.
export const Filter = () =>
filter
;
This is a **beta feature** according to [Algolia's Terms of Service ("Beta Services")](https://www.algolia.com/policies/terms/).
Runs custom functions in your app (frontend or backend) to access user data, trigger UI updates, and perform authenticated actions.
Client-side tools follow the [OpenAI Function Calling specification](https://platform.openai.com/docs/guides/function-calling).
For example, for the query "What's in my cart?",
the agent calls `get_user_cart` function in your app, retrieves the user's shopping cart data, and responds with personalized information about items, quantities, and total price.
 ## How client-side tools work
```mermaid theme={"system"}
sequenceDiagram
participant EndUser as user
participant Agent as Algolia Agent
participant App as Your app
EndUser->>Agent: Send message
Agent->>Agent: Determine client-side tool needed
Agent->>App: Return client-side tool call request
App->>App: Run tool locally
App->>Agent: Send tool result
Agent->>Agent: Process result
Agent->>EndUser: Respond with answer
```
* **user context access**: retrieve shopping cart contents, preferences, order history, and authentication tokens
* **Action execution**: add items to cart, apply a , update profiles, submit forms
* **UI interaction**: trigger UI updates, show or hide elements, refine search results dynamically
* **Security**: run in user's security context with proper authentication
* **Flexibility**: use existing frontend or backend APIs without additional infrastructure
* **Client-side context**: access local storage, session data, and other browser-specific states
**Security**: Runs in your app's security context. Agent Studio never stores credentials. Always validate authentication, sanitise inputs, and enforce access control. For more information, see [Client-side security patterns](/doc/guides/algolia-ai/agent-studio/how-to/tools/security#client-side-tools).
You must configure client-side tools in two places:
* **Agent Studio:** to define the tool schema.
* **Your frontend or backend code** to run the tool.
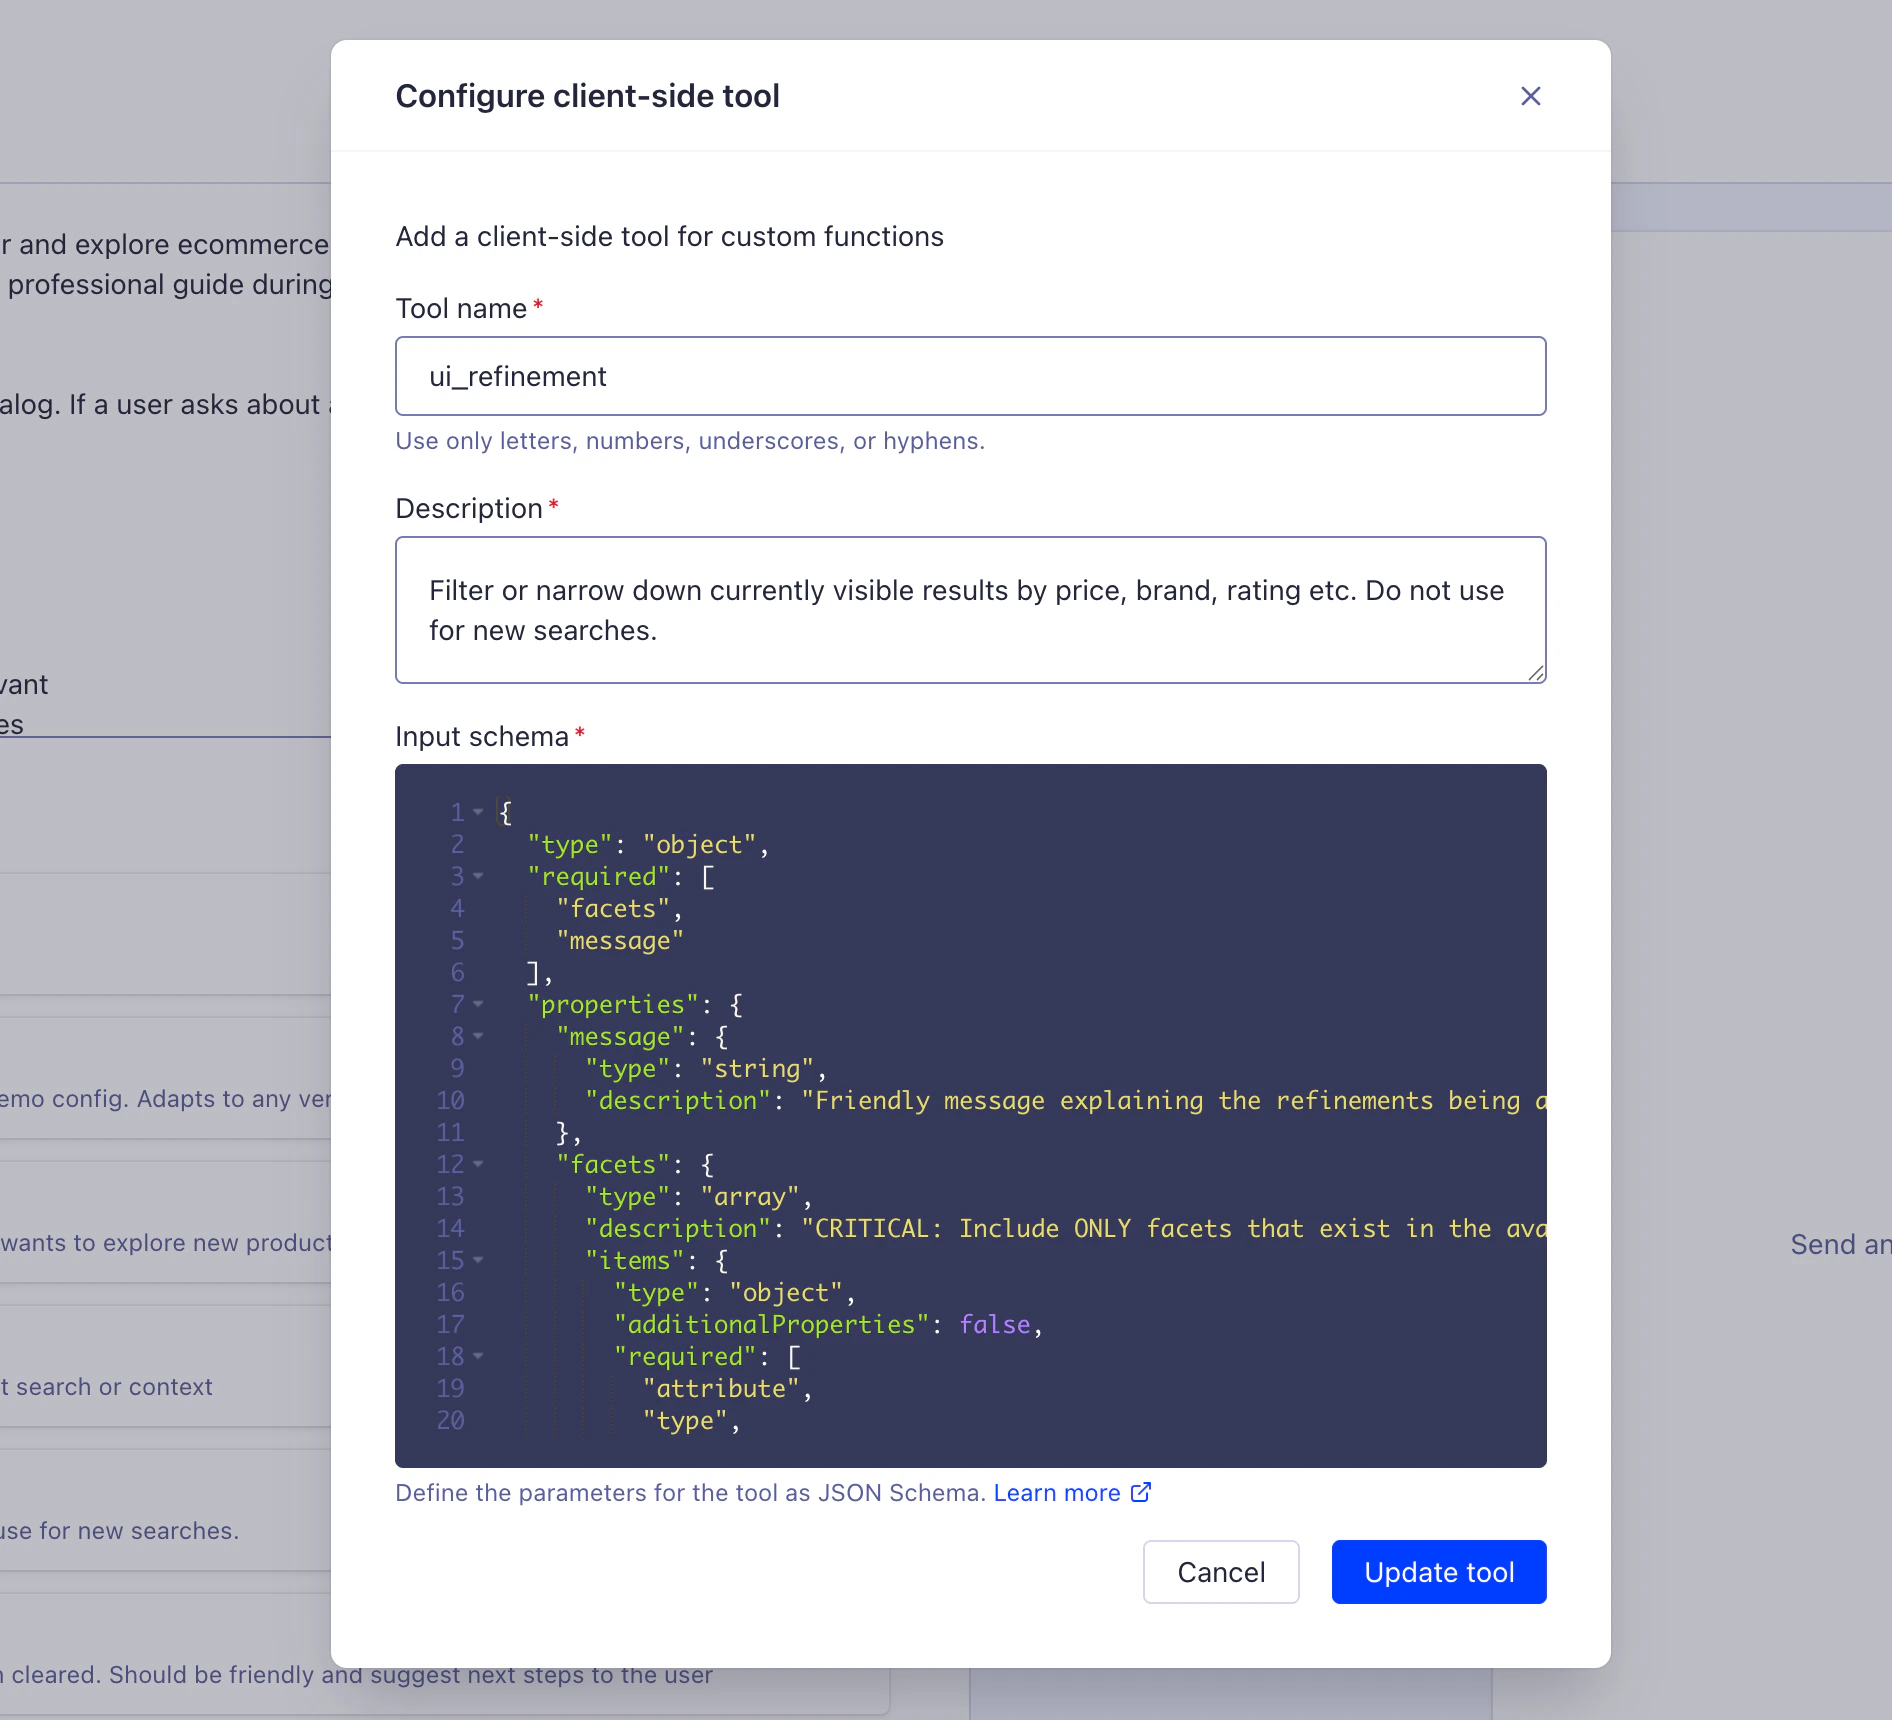
## Agent Studio configuration
Define your tools in your agent using JSON schema format.
For example:
```json JSON icon=braces theme={"system"}
{
"type": "function",
"function": {
"name": "get_user_cart",
"description": "Retrieves the user's shopping cart contents including items, quantities, and prices.",
"strict": true,
"parameters": {
"type": "object",
"properties": {},
"required": [],
"additionalProperties": false
}
}
}
```
```json JSON icon=braces theme={"system"}
{
"type": "function",
"function": {
"name": "add_to_cart",
"description": "Adds a product to the user's shopping cart. Use this when the user wants to purchase an item.",
"strict": true,
"parameters": {
"type": "object",
"properties": {
"productId": {
"type": "string",
"description": "The Algolia objectID of the product to add"
},
"quantity": {
"type": ["integer", "null"],
"description": "Number of items to add (defaults to 1 if not specified)",
"minimum": 1,
"maximum": 99
}
},
"required": ["productId", "quantity"],
"additionalProperties": false
}
}
}
```
### Required fields
* `type`: must be `"function"`
* `function.name`: function name (3-64 characters, alphanumeric and underscores only)
* `function.description`: clear explanation of what the tool does and when to use it
* `function.parameters`: JSON schema object
* `type`: must be `"object"`
* `properties`: object defining each parameter with type and description
* `required`: array of required parameter names (can be empty)
* `additionalProperties`: set to `false` for strict mode. If you're using strict mode:
* All fields in `properties` must be in `required`
* Use `["type", "null"]` for optional fields (for example, `"type": ["string", "null"]`)
* Always set `additionalProperties: false` for objects
* Use `enum` for restricted values
* Set `minimum` and `maximum` constraints for numbers
### Optional but recommended fields
* `function.strict`: set to `true` to ensure reliable schema adherence (recommended for production)
### JSON schema
```json JSON icon=braces theme={"system"}
{
"properties": {
"email": {
"type": "string",
"format": "email",
"description": "User's email address"
},
"priority": {
"type": "string",
"enum": ["low", "medium", "high"],
"default": "medium",
"description": "Priority level"
},
"quantity": {
"type": "integer",
"minimum": 1,
"maximum": 99,
"description": "Number of items (1-99)"
}
}
}
```
**Implementation steps:**
1. Define your tool using JSON schema (follows [OpenAI Function Calling](https://platform.openai.com/docs/guides/function-calling) format)
2. Add the tool to your agent with an API or using **Other tools** in the dashboard
## Frontend or backend code configuration
Run tools from your frontend or backend code.
For example:
```js JavaScript icon=code theme={"system"}
// Handle tool calls from Agent Studio
async function handleToolCall(toolCall) {
const { name, arguments: args } = toolCall.function;
const params = JSON.parse(args);
switch (name) {
case 'get_user_cart':
// Fetch current user's cart
const cart = await getUserCart(currentUserId);
return {
tool_call_id: toolCall.id,
output: JSON.stringify({
items: cart.items,
itemCount: cart.items.length,
total: cart.total
})
};
case 'add_to_cart':
// Add product to cart
await addToCart(
currentUserId,
params.productId,
params.quantity || 1
);
return {
tool_call_id: toolCall.id,
output: JSON.stringify({
success: true,
message: 'Product added to cart'
})
};
default:
throw new Error(`Unknown tool: ${name}`);
}
}
```
For more information about how to implement client-side tools with the InstantSearch Chat UI component,
see [Client-side tools integration](/doc/guides/algolia-ai/agent-studio/how-to/integration#tools).
```jsx JSX icon=code theme={"system"}
import { liteClient as algoliasearch } from 'algoliasearch/lite';
import { InstantSearch, Chat } from 'react-instantsearch';
const appID = "ALGOLIA_APPLICATION_ID";
const apiKey = "ALGOLIA_API_KEY";
const agentId = "AGENT_ID";
const searchClient = algoliasearch(appID, apiKey);
export function App() {
return (
{
// Fetch user's shopping cart
const cart = await getUserCart(currentUserId);
addToolResult({
output: {
items: cart.items,
itemCount: cart.items.length,
total: cart.total
}
});
}
},
add_to_cart: {
onToolCall: async ({ input, addToolResult }) => {
// Add product to cart
const { productId, quantity } = input;
await addToCart(currentUserId, productId, quantity || 1);
addToolResult({
output: {
success: true,
message: 'Product added to cart'
}
});
}
}
}}
/>
);
}
```
**Key points:**
* The `tools` prop keys (`get_user_cart`, `add_to_cart`) must match your agent's tool names
* `onToolCall` runs when the agent calls the tool
* `addToolResult` sends the output back to the agent
* `input` contains the parameters the agent passed to the tool
For more information about how to implement client-side tools with the InstantSearch Chat UI component,
see [Client-side tools integration](/doc/guides/algolia-ai/agent-studio/how-to/integration#tools).
## Advanced usage
### Strict mode
Strict mode ensures the LLM reliably adheres to your JSON Schema instead of using "best-effort" matching.
```json JSON icon=braces theme={"system"}
{
"function": {
"name": "update_cart",
"parameters": {
"type": "object",
"properties": {
"productId": {"type": "string"},
"quantity": {"type": "integer"}
},
"required": ["productId"]
}
}
}
```
Potential issues:
* LLM might omit optional fields unpredictably
* Field types may not match exactly
* Additional unexpected fields might be included
```json JSON icon=braces theme={"system"}
{
"function": {
"name": "update_cart",
"strict": true,
"parameters": {
"type": "object",
"properties": {
"productId": {"type": "string"},
"quantity": {"type": ["integer", "null"]}
},
"required": ["productId", "quantity"],
"additionalProperties": false
}
}
}
```
#### Strict mode requirements
* All fields in `properties` must be in `required`
* Use `["type", "null"]` for optional fields (for example, `"type": ["string", "null"]`)
* Set `additionalProperties: false` for all objects
* The LLM strictly follows the schema (no best-effort guessing)
#### Benefits of strict mode
* Predictable function calls every time
* Prevents schema drift
* Easier debugging (failures are schema violations, not interpretation issues)
* Recommended for production use
### Error handling patterns
Return structured errors that the agent can interpret and explain to users:
```json JSON icon=braces theme={"system"}
{
"success": true,
"data": {
"cartId": "cart_123",
"itemCount": 3,
"total": 149.97
}
}
```
```json theme={"system"}
{
"success": false,
"error": {
"code": "OUT_OF_STOCK",
"message": "This product is currently out of stock",
"productId": "abc123",
"suggestedAlternatives": ["def456", "ghi789"]
}
}
```
#### Common error codes
* `NOT_FOUND`: Resource doesn't exist
* `UNAUTHORIZED`: User lacks permissions
* `OUT_OF_STOCK`: Product unavailable
* `INVALID_QUANTITY`: Quantity exceeds limits
* `VALIDATION_ERROR`: Input validation failed
### Security
You must run client-side tools securely within your app.
Use the following patterns to validate users, sanitise inputs, and enforce access control.
#### Always validate authentication
```js JavaScript icon=code theme={"system"}
async function executeToolSecurely(toolCall, userSession) {
// Verify user is authenticated
if (!userSession.isAuthenticated) {
return JSON.stringify({
success: false,
error: {code: "UNAUTHORIZED", message: "User not authenticated"}
});
}
// Check authorisation
if (!hasPermission(userSession.userId, toolCall.function.name)) {
return JSON.stringify({
success: false,
error: {code: "FORBIDDEN", message: "Insufficient permissions"}
});
}
// Run with user context
return await executeTool(toolCall.function.name, args, userSession);
}
```
#### Sanitise all inputs
```js JavaScript icon=code theme={"system"}
function validateAndSanitize(args) {
const parsed = JSON.parse(args);
// Validate productId format
if (!/^[a-zA-Z0-9_-]+$/.test(parsed.productId)) {
throw new Error("Invalid productId format");
}
// Sanitise quantity
if (parsed.quantity < 1 || parsed.quantity > 99) {
throw new Error("Quantity must be between 1 and 99");
}
return parsed;
}
```
#### Rate limiting
```js JavaScript icon=code theme={"system"}
const rateLimiter = new RateLimiter({
tokensPerInterval: 10,
interval: "minute"
});
async function executeTool(toolCall, userId) {
if (!await rateLimiter.removeTokens(userId, 1)) {
return JSON.stringify({
success: false,
error: {code: "RATE_LIMIT", message: "Too many requests"}
});
}
// Run the tool
}
```
#### Don't expose sensitive data
```js JavaScript icon=code theme={"system"}
// Bad: returns full user object with sensitive fields
return JSON.stringify(user);
// Good: return only necessary fields
return JSON.stringify({
name: user.name,
email: user.email,
// Password, tokens, and so on are excluded
});
```
## See also
* [Tools overview](/doc/guides/algolia-ai/agent-studio/how-to/tools/overview)
* [Client-side tools integration](/doc/guides/algolia-ai/agent-studio/how-to/integration#tools)
* [Credentials](/doc/guides/algolia-ai/agent-studio/how-to/tools/security)
## How client-side tools work
```mermaid theme={"system"}
sequenceDiagram
participant EndUser as user
participant Agent as Algolia Agent
participant App as Your app
EndUser->>Agent: Send message
Agent->>Agent: Determine client-side tool needed
Agent->>App: Return client-side tool call request
App->>App: Run tool locally
App->>Agent: Send tool result
Agent->>Agent: Process result
Agent->>EndUser: Respond with answer
```
* **user context access**: retrieve shopping cart contents, preferences, order history, and authentication tokens
* **Action execution**: add items to cart, apply a , update profiles, submit forms
* **UI interaction**: trigger UI updates, show or hide elements, refine search results dynamically
* **Security**: run in user's security context with proper authentication
* **Flexibility**: use existing frontend or backend APIs without additional infrastructure
* **Client-side context**: access local storage, session data, and other browser-specific states
**Security**: Runs in your app's security context. Agent Studio never stores credentials. Always validate authentication, sanitise inputs, and enforce access control. For more information, see [Client-side security patterns](/doc/guides/algolia-ai/agent-studio/how-to/tools/security#client-side-tools).
You must configure client-side tools in two places:
* **Agent Studio:** to define the tool schema.
* **Your frontend or backend code** to run the tool.
## Agent Studio configuration
Define your tools in your agent using JSON schema format.
For example:
```json JSON icon=braces theme={"system"}
{
"type": "function",
"function": {
"name": "get_user_cart",
"description": "Retrieves the user's shopping cart contents including items, quantities, and prices.",
"strict": true,
"parameters": {
"type": "object",
"properties": {},
"required": [],
"additionalProperties": false
}
}
}
```
```json JSON icon=braces theme={"system"}
{
"type": "function",
"function": {
"name": "add_to_cart",
"description": "Adds a product to the user's shopping cart. Use this when the user wants to purchase an item.",
"strict": true,
"parameters": {
"type": "object",
"properties": {
"productId": {
"type": "string",
"description": "The Algolia objectID of the product to add"
},
"quantity": {
"type": ["integer", "null"],
"description": "Number of items to add (defaults to 1 if not specified)",
"minimum": 1,
"maximum": 99
}
},
"required": ["productId", "quantity"],
"additionalProperties": false
}
}
}
```
### Required fields
* `type`: must be `"function"`
* `function.name`: function name (3-64 characters, alphanumeric and underscores only)
* `function.description`: clear explanation of what the tool does and when to use it
* `function.parameters`: JSON schema object
* `type`: must be `"object"`
* `properties`: object defining each parameter with type and description
* `required`: array of required parameter names (can be empty)
* `additionalProperties`: set to `false` for strict mode. If you're using strict mode:
* All fields in `properties` must be in `required`
* Use `["type", "null"]` for optional fields (for example, `"type": ["string", "null"]`)
* Always set `additionalProperties: false` for objects
* Use `enum` for restricted values
* Set `minimum` and `maximum` constraints for numbers
### Optional but recommended fields
* `function.strict`: set to `true` to ensure reliable schema adherence (recommended for production)
### JSON schema
```json JSON icon=braces theme={"system"}
{
"properties": {
"email": {
"type": "string",
"format": "email",
"description": "User's email address"
},
"priority": {
"type": "string",
"enum": ["low", "medium", "high"],
"default": "medium",
"description": "Priority level"
},
"quantity": {
"type": "integer",
"minimum": 1,
"maximum": 99,
"description": "Number of items (1-99)"
}
}
}
```
**Implementation steps:**
1. Define your tool using JSON schema (follows [OpenAI Function Calling](https://platform.openai.com/docs/guides/function-calling) format)
2. Add the tool to your agent with an API or using **Other tools** in the dashboard
## Frontend or backend code configuration
Run tools from your frontend or backend code.
For example:
```js JavaScript icon=code theme={"system"}
// Handle tool calls from Agent Studio
async function handleToolCall(toolCall) {
const { name, arguments: args } = toolCall.function;
const params = JSON.parse(args);
switch (name) {
case 'get_user_cart':
// Fetch current user's cart
const cart = await getUserCart(currentUserId);
return {
tool_call_id: toolCall.id,
output: JSON.stringify({
items: cart.items,
itemCount: cart.items.length,
total: cart.total
})
};
case 'add_to_cart':
// Add product to cart
await addToCart(
currentUserId,
params.productId,
params.quantity || 1
);
return {
tool_call_id: toolCall.id,
output: JSON.stringify({
success: true,
message: 'Product added to cart'
})
};
default:
throw new Error(`Unknown tool: ${name}`);
}
}
```
For more information about how to implement client-side tools with the InstantSearch Chat UI component,
see [Client-side tools integration](/doc/guides/algolia-ai/agent-studio/how-to/integration#tools).
```jsx JSX icon=code theme={"system"}
import { liteClient as algoliasearch } from 'algoliasearch/lite';
import { InstantSearch, Chat } from 'react-instantsearch';
const appID = "ALGOLIA_APPLICATION_ID";
const apiKey = "ALGOLIA_API_KEY";
const agentId = "AGENT_ID";
const searchClient = algoliasearch(appID, apiKey);
export function App() {
return (
{
// Fetch user's shopping cart
const cart = await getUserCart(currentUserId);
addToolResult({
output: {
items: cart.items,
itemCount: cart.items.length,
total: cart.total
}
});
}
},
add_to_cart: {
onToolCall: async ({ input, addToolResult }) => {
// Add product to cart
const { productId, quantity } = input;
await addToCart(currentUserId, productId, quantity || 1);
addToolResult({
output: {
success: true,
message: 'Product added to cart'
}
});
}
}
}}
/>
);
}
```
**Key points:**
* The `tools` prop keys (`get_user_cart`, `add_to_cart`) must match your agent's tool names
* `onToolCall` runs when the agent calls the tool
* `addToolResult` sends the output back to the agent
* `input` contains the parameters the agent passed to the tool
For more information about how to implement client-side tools with the InstantSearch Chat UI component,
see [Client-side tools integration](/doc/guides/algolia-ai/agent-studio/how-to/integration#tools).
## Advanced usage
### Strict mode
Strict mode ensures the LLM reliably adheres to your JSON Schema instead of using "best-effort" matching.
```json JSON icon=braces theme={"system"}
{
"function": {
"name": "update_cart",
"parameters": {
"type": "object",
"properties": {
"productId": {"type": "string"},
"quantity": {"type": "integer"}
},
"required": ["productId"]
}
}
}
```
Potential issues:
* LLM might omit optional fields unpredictably
* Field types may not match exactly
* Additional unexpected fields might be included
```json JSON icon=braces theme={"system"}
{
"function": {
"name": "update_cart",
"strict": true,
"parameters": {
"type": "object",
"properties": {
"productId": {"type": "string"},
"quantity": {"type": ["integer", "null"]}
},
"required": ["productId", "quantity"],
"additionalProperties": false
}
}
}
```
#### Strict mode requirements
* All fields in `properties` must be in `required`
* Use `["type", "null"]` for optional fields (for example, `"type": ["string", "null"]`)
* Set `additionalProperties: false` for all objects
* The LLM strictly follows the schema (no best-effort guessing)
#### Benefits of strict mode
* Predictable function calls every time
* Prevents schema drift
* Easier debugging (failures are schema violations, not interpretation issues)
* Recommended for production use
### Error handling patterns
Return structured errors that the agent can interpret and explain to users:
```json JSON icon=braces theme={"system"}
{
"success": true,
"data": {
"cartId": "cart_123",
"itemCount": 3,
"total": 149.97
}
}
```
```json theme={"system"}
{
"success": false,
"error": {
"code": "OUT_OF_STOCK",
"message": "This product is currently out of stock",
"productId": "abc123",
"suggestedAlternatives": ["def456", "ghi789"]
}
}
```
#### Common error codes
* `NOT_FOUND`: Resource doesn't exist
* `UNAUTHORIZED`: User lacks permissions
* `OUT_OF_STOCK`: Product unavailable
* `INVALID_QUANTITY`: Quantity exceeds limits
* `VALIDATION_ERROR`: Input validation failed
### Security
You must run client-side tools securely within your app.
Use the following patterns to validate users, sanitise inputs, and enforce access control.
#### Always validate authentication
```js JavaScript icon=code theme={"system"}
async function executeToolSecurely(toolCall, userSession) {
// Verify user is authenticated
if (!userSession.isAuthenticated) {
return JSON.stringify({
success: false,
error: {code: "UNAUTHORIZED", message: "User not authenticated"}
});
}
// Check authorisation
if (!hasPermission(userSession.userId, toolCall.function.name)) {
return JSON.stringify({
success: false,
error: {code: "FORBIDDEN", message: "Insufficient permissions"}
});
}
// Run with user context
return await executeTool(toolCall.function.name, args, userSession);
}
```
#### Sanitise all inputs
```js JavaScript icon=code theme={"system"}
function validateAndSanitize(args) {
const parsed = JSON.parse(args);
// Validate productId format
if (!/^[a-zA-Z0-9_-]+$/.test(parsed.productId)) {
throw new Error("Invalid productId format");
}
// Sanitise quantity
if (parsed.quantity < 1 || parsed.quantity > 99) {
throw new Error("Quantity must be between 1 and 99");
}
return parsed;
}
```
#### Rate limiting
```js JavaScript icon=code theme={"system"}
const rateLimiter = new RateLimiter({
tokensPerInterval: 10,
interval: "minute"
});
async function executeTool(toolCall, userId) {
if (!await rateLimiter.removeTokens(userId, 1)) {
return JSON.stringify({
success: false,
error: {code: "RATE_LIMIT", message: "Too many requests"}
});
}
// Run the tool
}
```
#### Don't expose sensitive data
```js JavaScript icon=code theme={"system"}
// Bad: returns full user object with sensitive fields
return JSON.stringify(user);
// Good: return only necessary fields
return JSON.stringify({
name: user.name,
email: user.email,
// Password, tokens, and so on are excluded
});
```
## See also
* [Tools overview](/doc/guides/algolia-ai/agent-studio/how-to/tools/overview)
* [Client-side tools integration](/doc/guides/algolia-ai/agent-studio/how-to/integration#tools)
* [Credentials](/doc/guides/algolia-ai/agent-studio/how-to/tools/security)