> ## Documentation Index
> Fetch the complete documentation index at: https://algolia.com/llms.txt
> Use this file to discover all available pages before exploring further.
# MCP tools
> Connect your agent to Model Context Protocol (MCP) servers for external integrations.
export const DashboardLink = ({href = "dashboard", children}) => {
const base = "https://dashboard.algolia.com/";
const utmParams = "utm_source=docs&utm_medium=page_link";
const cleanHref = href.startsWith("/") ? href.slice(1) : href;
const separator = cleanHref.includes("?") ? "&" : "?";
const url = `${base}${cleanHref}${separator}${utmParams}`;
return {children};
};
export const Index = () =>
index
;
[MCP](https://modelcontextprotocol.io/) tools extend your agent's capabilities to enable integration with [Algolia MCP Server](/doc/guides/model-context-protocol) and third-party services (such as weather, CRM, and inventory systems), and custom APIs.
 * **External integrations**:
connect to weather APIs, CRM platforms, inventory systems, or payment processors
* **Algolia MCP Server**:
share your Algolia indices across multiple AI platforms with centralized configuration
* **Multi-tenant support**:
override authentication tokens at request time for per-user credentials
* **Tool filtering**:
filter, rename, and require approval for exposed tools
* **Secure storage**:
automatic credential encryption at rest
* **Local development**:
use `ngrok` to expose local MCP servers during development
* **Timeout protection**:
10-second timeout for reliable performance
Algolia encrypts credentials before storing them.
It also supports runtime header overrides, which lets you use different credentials in multi-tenant apps.
For more information, see [MCP security](/doc/guides/algolia-ai/agent-studio/how-to/tools/security#mcp-tools).
## MCP servers
* **Algolia MCP Server**:
a pre-configured server that exposes your Algolia indices across multiple AI platforms.
Create instances from the Algolia dashboard
MCP servers page.
For more information, see [Algolia MCP Server](/doc/guides/model-context-protocol)
* **Third-party MCP servers**:
connect to external services like weather APIs, CRM platforms, inventory systems, or custom APIs.
Browse the [official MCP registry](https://registry.modelcontextprotocol.io/) for pre-built servers.
MCP tools use the [Streamable HTTP](https://modelcontextprotocol.io/specification/2025-03-26/basic/transports#streamable-http) transport method.
STDIO and SSE aren't supported.
## Connect MCP tools to your agent
For Algolia MCP Server:
1. Go to the MCP servers page
2. Click **Create MCP server**
3. Select the indices you want to expose (for example, `products`, `articles`)
4. Add descriptions to help the AI choose the correct
5. Click **Save**
6. Copy the generated MCP server URL (format: `https://{APP_ID}.algolia.net/mcp/1/{UNIQUE_ID}/mcp`)
For more information, see [Algolia MCP Server](/doc/guides/model-context-protocol).
For external MCP servers:
* Find a server in the [official MCP registry](https://registry.modelcontextprotocol.io/)
* Build your own MCP server following the [MCP specification](https://modelcontextprotocol.io/)
* For local development, use [`ngrok`](https://ngrok.com/) to expose your local MCP server with a public URL:
```sh Command line icon=square-terminal theme={"system"}
ngrok http 3000
```
`ngrok` generates a public URL (for example, `https://abc123.ngrok.io`) that you can use in Agent Studio.
From the Agent Studio agent edit view in the Algolia dashboard:
1. Click **Add tool** > **MCP Tool**
2. Configure the MCP server connection:
* **Name**: unique identifier (no spaces, alphanumeric, underscores, and hyphens only)
* **URL**: your MCP server HTTP streaming endpoint
* Algolia MCP: `https://{APP_ID}.algolia.net/mcp/1/{UNIQUE_ID}/mcp`
* External: your MCP server URL (for example, `https://weather-api.example.com/mcp`)
* **Authorization token** (optional): JWT bearer token for authentication
* Algolia MCP: use the format `{APP_ID}:{SEARCH_API_KEY}`
* External APIs: your API key or token as provided by the service
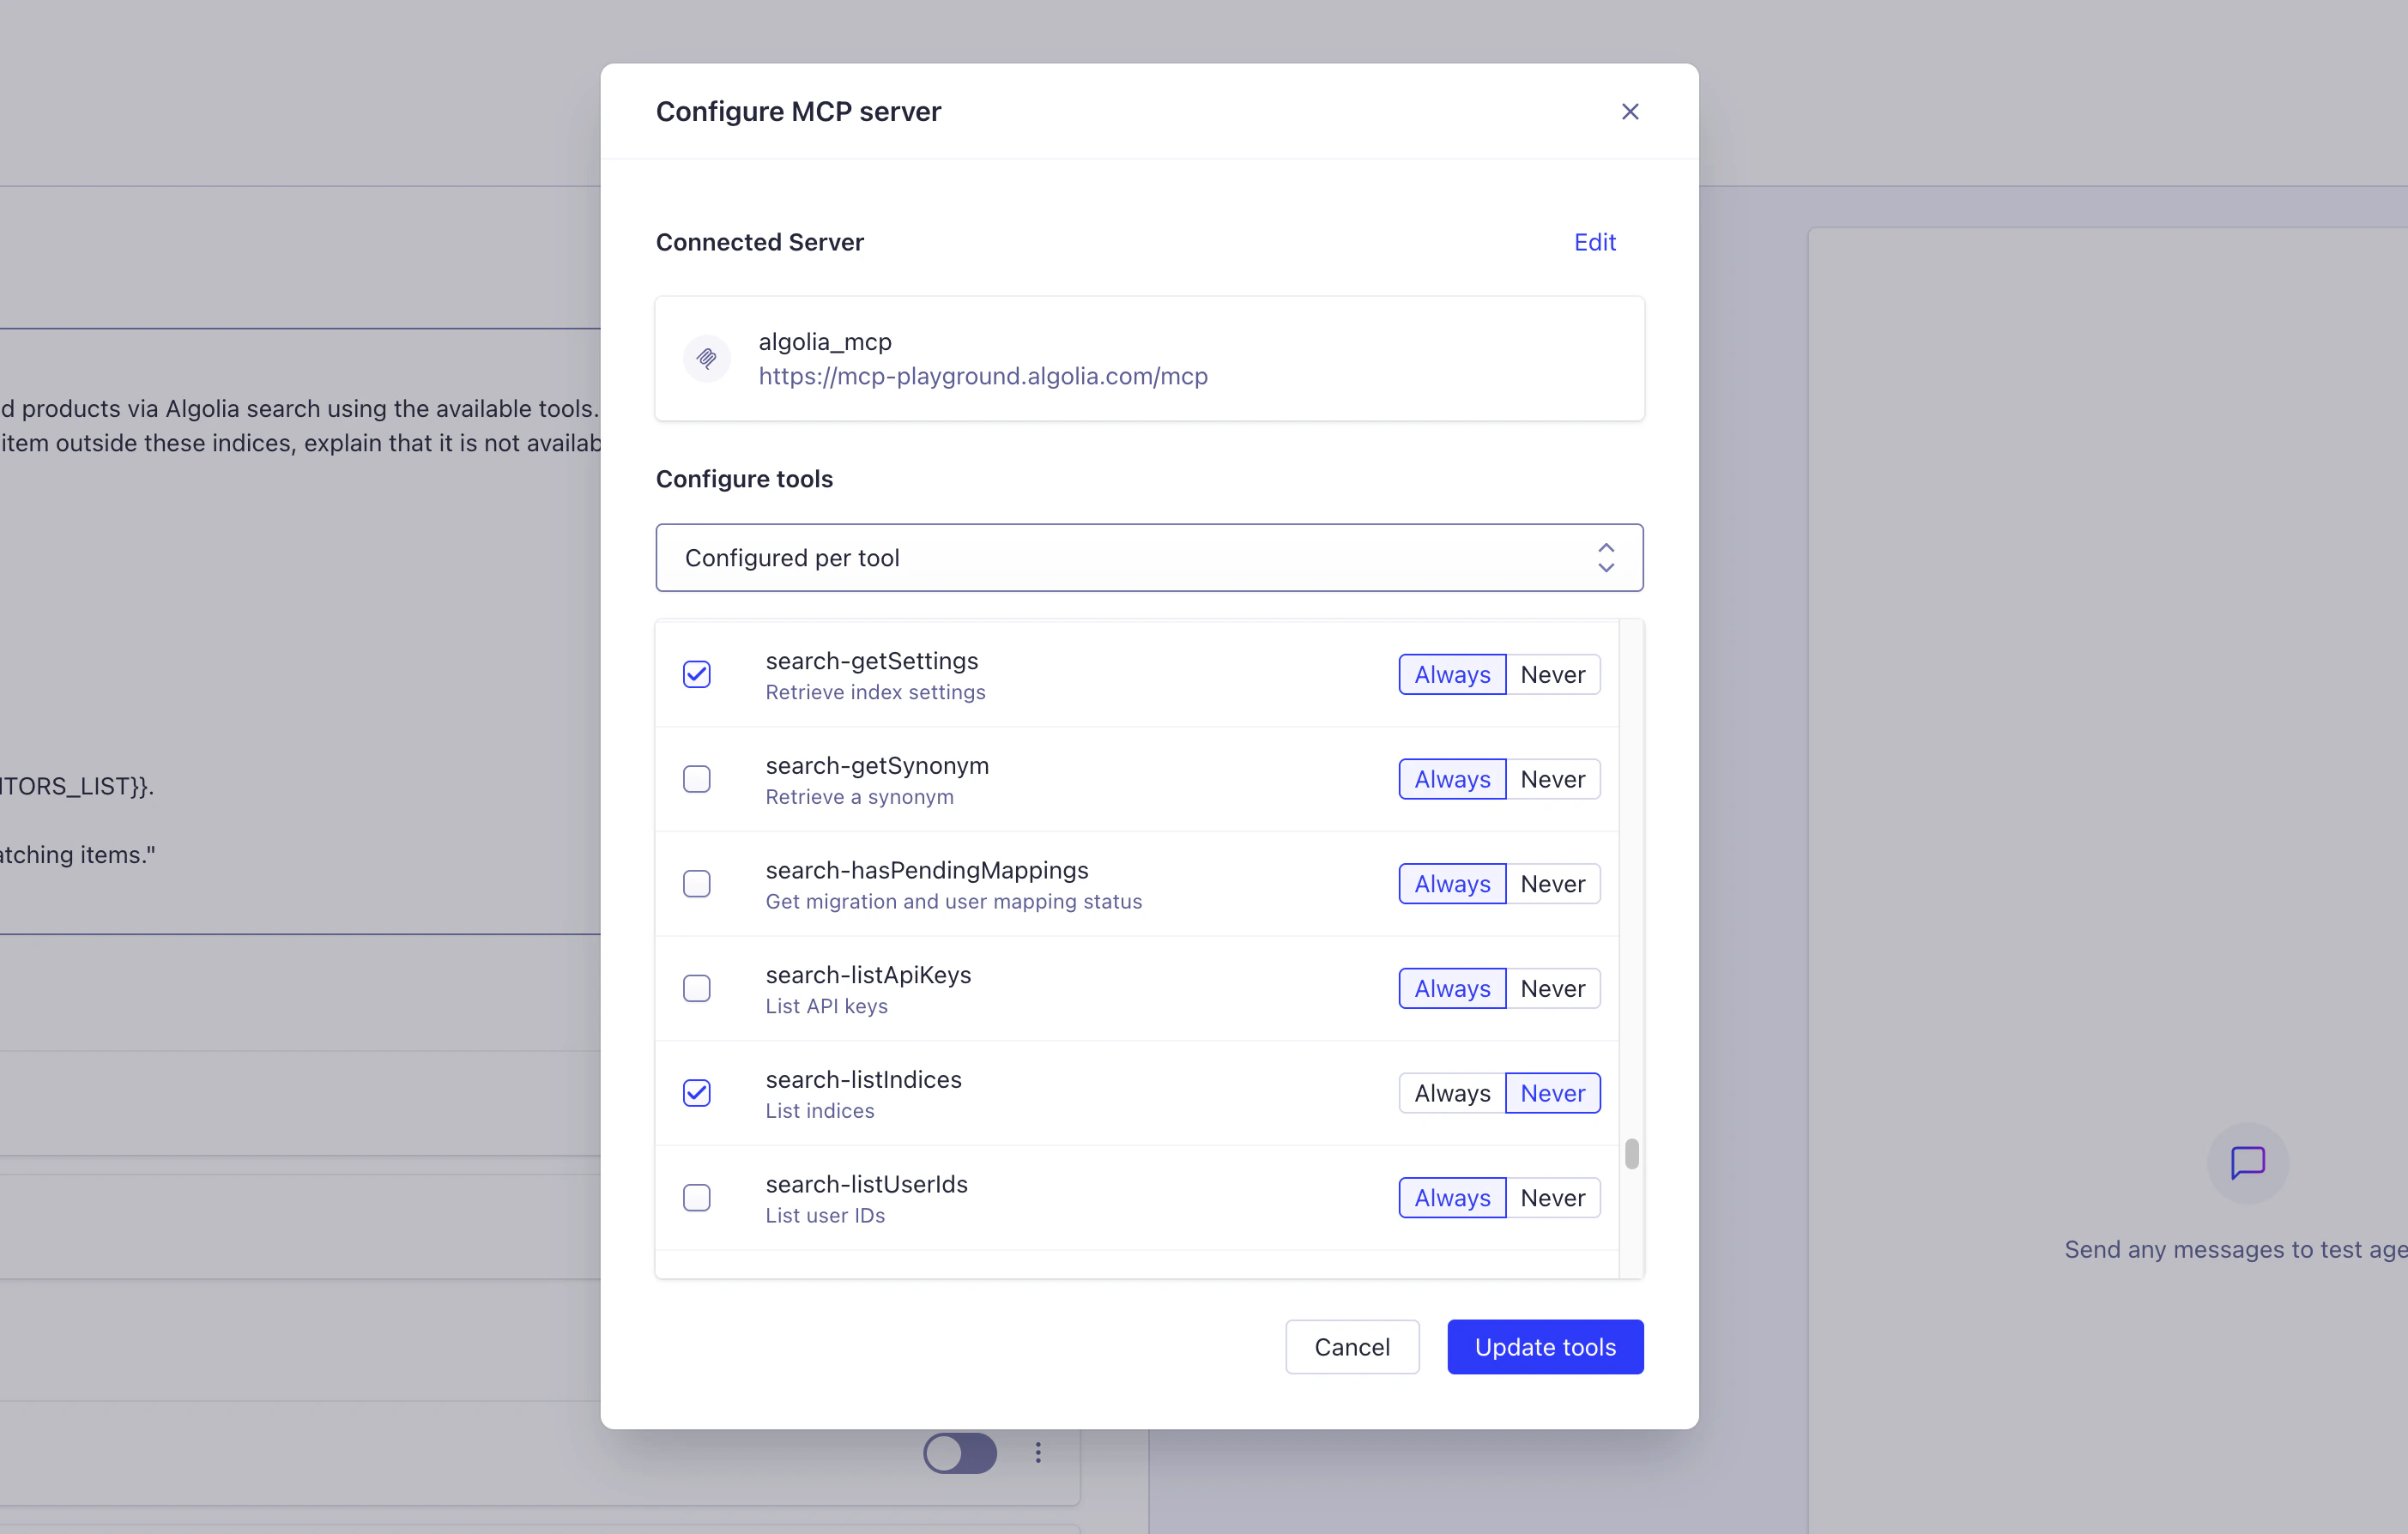
3. Click **Connect** to fetch available tools from the MCP server
Once connected, the dashboard displays all available tools from the MCP server:
1. **Select tools**: choose which tools to enable for your agent
* Select all tools with one click
* Select specific tools individually
2. **Set approval level**: configure how the agent uses these tools
* **Never require approval**: agent can call tools automatically (recommended for most use cases)
* **Always require approval**: user must approve each tool call before it runs (useful for sensitive operations).
This sets `requiresApproval: true` in the tool configuration.
3. Click **Add tools** to complete the configuration
Use tools like [`ngrok`](https://ngrok.com/) to expose your local MCP server during development.
This creates a public HTTPS URL that Agent Studio can connect to,
letting you test and debug your custom MCP server without deploying it to production.
JSON tool definition:
```json JSON icon=braces theme={"system"}
{
"type": "mcp_tools",
"name": "weather_service",
"url": "https://weather-api.example.com/mcp",
"transport": "streamable_http",
"headers": {
"Authorization": "Bearer EXTERNAL_API_KEY"
},
"allowedTools": {
"get_forecast": {
"alias": "check_weather"
},
"get_historical_data": true,
"admin_endpoint": false
}
}
```
### Required fields
* `type`:
must be `"mcp_tools"`
* `name`:
unique identifier for this MCP server (3-32 characters, start with letter, alphanumeric characters, underscores or hyphens, no spaces)
* `url`:
HTTP or HTTPS endpoint of the MCP server (in a valid URL format)
* `transport`:
must be `"streamable_http"` (STDIO and SSE not supported)
* `headers`:
dictionary of HTTP headers (use `{}` if no authentication needed, maximum of 10 entries)
### Optional fields
* `allowedTools`:
filter, rename, and set approval requirements for tools from the MCP server
* **Omit entirely**:
all tools from MCP server are enabled with original names
* **Specify object**:
only listed tools are enabled
* `true`: enable tool with original name
* `false`: block tool (same as omitting, but explicit)
* `{"alias": "new_name"}`: rename tool (3-32 characters, same naming rules as `name`)
* `{"requiresApproval": true}`: pause execution and require user approval before the tool runs
* `{"alias": "new_name", "requiresApproval": true}`: rename and require approval
### Tool filtering behavior
When `allowedTools` is specified, only explicitly listed tools with `true` or an alias are available.
Tools set to `false` or not mentioned are blocked.
For example:
```json JSON icon=braces theme={"system"}
{
"type": "mcp_tools",
"name": "algolia_mcp",
"url": "https://ALGOLIA_APPLICATION_ID.algolia.net/mcp/1/abc123/mcp",
"transport": "streamable_http",
"headers": {
"Authorization": "Bearer ALGOLIA_APPLICATION_ID:ALGOLIA_SEARCH_API_KEY"
}
}
```
```json JSON icon=braces theme={"system"}
{
"type": "mcp_tools",
"name": "weather_api",
"url": "https://weather-api.example.com/mcp",
"transport": "streamable_http",
"headers": {
"Authorization": "Bearer EXTERNAL_API_KEY"
},
"allowedTools": {
"get_forecast": true,
"get_alerts": { "alias": "weather_alerts" }
}
}
```
```txt theme={"system"}
Result: only `get_forecast` and `weather_alerts` (renamed from `get_alerts`) are available.
```
### Security notes
* Authorization headers are encrypted at rest
* JWT Bearer token authentication supported
* 10-second timeout for all MCP connections
* [Runtime header overrides](/doc/guides/algolia-ai/agent-studio/how-to/tools/security#mcp-runtime-header-overrides) available for multi-tenant scenarios.
For complete configuration details, see the [Agent Studio API reference](/doc/rest-api/agent-studio).
## Configure tool approval
Set `requiresApproval: true` on individual MCP tools to pause execution and prompt the user for approval before the tool runs.
The approval prompt shows the tool name, arguments, and description.
Use tool approval for operations that:
* Read or modify sensitive data (customer information, financial records, personal details)
* Change system configuration (update settings, modify indices)
* Perform destructive actions (delete records, clear data)
* Access restricted resources (admin endpoints, internal APIs)
### Configuration
```json JSON icon=braces theme={"system"}
{
"type": "mcp_tools",
"name": "algolia_mcp",
"url": "https://ALGOLIA_APPLICATION_ID.algolia.net/mcp/1/abc123/mcp",
"transport": "streamable_http",
"headers": {
"Authorization": "Bearer ALGOLIA_APPLICATION_ID:ALGOLIA_SEARCH_API_KEY"
},
"allowedTools": {
"search-search": true,
"search-listIndices": { "requiresApproval": true },
"search-getSettings": { "requiresApproval": true }
}
}
```
### How approval works
The approval flow requires two requests to the completions endpoint:
1. Send the user message
2. Receive the approval request
#### Send the user message
```sh Command line icon=square-terminal theme={"system"}
curl -X POST "https://$ALGOLIA_APPLICATION_ID.algolia.net/agent-studio/1/agents/$AGENT_ID/completions?compatibilityMode=ai-sdk-4&stream=true" \
-H 'Content-Type: application/json' \
-H "x-algolia-application-id: $ALGOLIA_APPLICATION_ID" \
-H "x-algolia-api-key: $ALGOLIA_API_KEY" \
-d '{
"id": "alg_cnv_abc123",
"messages": [{
"id": "msg_1",
"role": "user",
"content": "List my indices",
"parts": [{ "type": "text", "text": "List my indices" }]
}]
}'
```
#### Receive the approval request
When the agent attempts to call a tool that requires approval,
the stream pauses and returns an approval request.
The format depends on which AI SDK compatibility mode you're using:
```txt theme={"system"}
9:{"toolCallId":"call_xyz","toolName":"search-listIndices","args":{"page":0},"requiresApproval":true,"description":"List Algolia indices"}
e:{"finishReason":"tool-approval-required"}
d:{"finishReason":"tool-approval-required"}
```
The approval request uses stream code `9` and includes:
| Field | Description |
| ------------------ | ---------------------------------------------------------------- |
| `toolCallId` | Unique ID for this tool call — required in the approval response |
| `toolName` | Name of the tool requesting execution |
| `args` | Arguments the tool will be called with |
| `requiresApproval` | Always `true` for approval requests |
| `description` | Tool description to show the user |
The stream then ends with finish reason `tool-approval-required` (codes `e` and `d`).
```txt theme={"system"}
data: {"type":"data-tool-approval","data":{"toolCallId":"call_xyz","toolName":"search-listIndices","args":{"page":0},"description":"List Algolia indices"}}
data:
{"type":"finish-step"}
data:
{"type":"finish"}
```
The approval request is sent as a custom data event with `type: "data-tool-approval"` and includes:
| Field | Description |
| ------------- | ---------------------------------------------------------------- |
| `toolCallId` | Unique ID for this tool call — required in the approval response |
| `toolName` | Name of the tool requesting execution |
| `args` | Arguments the tool will be called with |
| `description` | Tool description to show the user |
The stream then completes with `finish-step` and `finish` events.
Display these details to the user with **Approve** and **Reject** options.
#### Submit the approval decision
Send a new request with the full conversation history and approval decisions:
```sh Command line icon=square-terminal theme={"system"}
curl -X POST "https://$ALGOLIA_APPLICATION_ID.algolia.net/agent-studio/1/agents/$AGENT_ID/completions?compatibilityMode=ai-sdk-4&stream=true" \
-H 'Content-Type: application/json' \
-H "x-algolia-application-id: $ALGOLIA_APPLICATION_ID" \
-H "x-algolia-api-key: $ALGOLIA_API_KEY" \
-d '{
"id": "alg_cnv_abc123",
"messages": [
{
"id": "msg_1",
"role": "user",
"content": "List my indices",
"parts": [{ "type": "text", "text": "List my indices" }]
},
{
"id": "msg_2",
"role": "assistant",
"content": "",
"parts": [{
"type": "tool-approval-request",
"toolCallId": "call_xyz",
"toolName": "search-listIndices",
"args": {"page": 0},
"description": "List Algolia indices"
}]
}
],
"toolApprovals": {
"call_xyz": { "approved": true, "timestamp": "2026-01-13T10:00:00Z" }
}
}'
```
The `messages` array must include the full conversation history,
including the pending approval request from step 2.
When you approve a tool, the server executes it and continues the conversation.
When you reject a tool, the agent receives an error and tells the user the action was declined.
To reject a tool, set `approved` to `false` (you still need to include the full `messages` array):
```json JSON icon=braces theme={"system"}
{
"id": "alg_cnv_abc123",
"messages": [
{
"id": "msg_1",
"role": "user",
"content": "List my indices",
"parts": [{ "type": "text", "text": "List my indices" }]
},
{
"id": "msg_2",
"role": "assistant",
"content": "",
"parts": [
{
"type": "tool-approval-request",
"toolCallId": "call_xyz",
"toolName": "search-listIndices",
"args": { "page": 0 }
}
]
}
],
"toolApprovals": {
"call_xyz": { "approved": false, "timestamp": "2026-01-13T10:00:00Z" }
}
}
```
### Approve multiple tools at once
When the agent calls multiple tools that require approval in one turn,
all requests appear in the same stream.
Submit all decisions in a single request with the full conversation history:
```json JSON icon=braces theme={"system"}
{
"id": "alg_cnv_abc123",
"messages": [
{
"role": "user",
"content": "Show my data",
"parts": [{ "type": "text", "text": "Show my data" }]
},
{
"role": "assistant",
"content": "",
"parts": [
{
"type": "tool-approval-request",
"toolCallId": "call_1",
"toolName": "search-listIndices",
"args": { "page": 0 }
},
{
"type": "tool-approval-request",
"toolCallId": "call_2",
"toolName": "search-getSettings",
"args": { "indexName": "products" }
}
]
}
],
"toolApprovals": {
"call_1": { "approved": true, "timestamp": "2026-01-13T10:00:00Z" },
"call_2": { "approved": false, "timestamp": "2026-01-13T10:00:00Z" }
}
}
```
The agent receives all results and tells the user which operations succeeded and which were declined.
## See also
* [Tools overview](/doc/guides/algolia-ai/agent-studio/how-to/tools/overview)
* [Algolia MCP Server](/doc/guides/model-context-protocol)
* [Credentials](/doc/guides/algolia-ai/agent-studio/how-to/tools/security)
* **External integrations**:
connect to weather APIs, CRM platforms, inventory systems, or payment processors
* **Algolia MCP Server**:
share your Algolia indices across multiple AI platforms with centralized configuration
* **Multi-tenant support**:
override authentication tokens at request time for per-user credentials
* **Tool filtering**:
filter, rename, and require approval for exposed tools
* **Secure storage**:
automatic credential encryption at rest
* **Local development**:
use `ngrok` to expose local MCP servers during development
* **Timeout protection**:
10-second timeout for reliable performance
Algolia encrypts credentials before storing them.
It also supports runtime header overrides, which lets you use different credentials in multi-tenant apps.
For more information, see [MCP security](/doc/guides/algolia-ai/agent-studio/how-to/tools/security#mcp-tools).
## MCP servers
* **Algolia MCP Server**:
a pre-configured server that exposes your Algolia indices across multiple AI platforms.
Create instances from the Algolia dashboard
MCP servers page.
For more information, see [Algolia MCP Server](/doc/guides/model-context-protocol)
* **Third-party MCP servers**:
connect to external services like weather APIs, CRM platforms, inventory systems, or custom APIs.
Browse the [official MCP registry](https://registry.modelcontextprotocol.io/) for pre-built servers.
MCP tools use the [Streamable HTTP](https://modelcontextprotocol.io/specification/2025-03-26/basic/transports#streamable-http) transport method.
STDIO and SSE aren't supported.
## Connect MCP tools to your agent
For Algolia MCP Server:
1. Go to the MCP servers page
2. Click **Create MCP server**
3. Select the indices you want to expose (for example, `products`, `articles`)
4. Add descriptions to help the AI choose the correct
5. Click **Save**
6. Copy the generated MCP server URL (format: `https://{APP_ID}.algolia.net/mcp/1/{UNIQUE_ID}/mcp`)
For more information, see [Algolia MCP Server](/doc/guides/model-context-protocol).
For external MCP servers:
* Find a server in the [official MCP registry](https://registry.modelcontextprotocol.io/)
* Build your own MCP server following the [MCP specification](https://modelcontextprotocol.io/)
* For local development, use [`ngrok`](https://ngrok.com/) to expose your local MCP server with a public URL:
```sh Command line icon=square-terminal theme={"system"}
ngrok http 3000
```
`ngrok` generates a public URL (for example, `https://abc123.ngrok.io`) that you can use in Agent Studio.
From the Agent Studio agent edit view in the Algolia dashboard:
1. Click **Add tool** > **MCP Tool**
2. Configure the MCP server connection:
* **Name**: unique identifier (no spaces, alphanumeric, underscores, and hyphens only)
* **URL**: your MCP server HTTP streaming endpoint
* Algolia MCP: `https://{APP_ID}.algolia.net/mcp/1/{UNIQUE_ID}/mcp`
* External: your MCP server URL (for example, `https://weather-api.example.com/mcp`)
* **Authorization token** (optional): JWT bearer token for authentication
* Algolia MCP: use the format `{APP_ID}:{SEARCH_API_KEY}`
* External APIs: your API key or token as provided by the service
3. Click **Connect** to fetch available tools from the MCP server
Once connected, the dashboard displays all available tools from the MCP server:
1. **Select tools**: choose which tools to enable for your agent
* Select all tools with one click
* Select specific tools individually
2. **Set approval level**: configure how the agent uses these tools
* **Never require approval**: agent can call tools automatically (recommended for most use cases)
* **Always require approval**: user must approve each tool call before it runs (useful for sensitive operations).
This sets `requiresApproval: true` in the tool configuration.
3. Click **Add tools** to complete the configuration
Use tools like [`ngrok`](https://ngrok.com/) to expose your local MCP server during development.
This creates a public HTTPS URL that Agent Studio can connect to,
letting you test and debug your custom MCP server without deploying it to production.
JSON tool definition:
```json JSON icon=braces theme={"system"}
{
"type": "mcp_tools",
"name": "weather_service",
"url": "https://weather-api.example.com/mcp",
"transport": "streamable_http",
"headers": {
"Authorization": "Bearer EXTERNAL_API_KEY"
},
"allowedTools": {
"get_forecast": {
"alias": "check_weather"
},
"get_historical_data": true,
"admin_endpoint": false
}
}
```
### Required fields
* `type`:
must be `"mcp_tools"`
* `name`:
unique identifier for this MCP server (3-32 characters, start with letter, alphanumeric characters, underscores or hyphens, no spaces)
* `url`:
HTTP or HTTPS endpoint of the MCP server (in a valid URL format)
* `transport`:
must be `"streamable_http"` (STDIO and SSE not supported)
* `headers`:
dictionary of HTTP headers (use `{}` if no authentication needed, maximum of 10 entries)
### Optional fields
* `allowedTools`:
filter, rename, and set approval requirements for tools from the MCP server
* **Omit entirely**:
all tools from MCP server are enabled with original names
* **Specify object**:
only listed tools are enabled
* `true`: enable tool with original name
* `false`: block tool (same as omitting, but explicit)
* `{"alias": "new_name"}`: rename tool (3-32 characters, same naming rules as `name`)
* `{"requiresApproval": true}`: pause execution and require user approval before the tool runs
* `{"alias": "new_name", "requiresApproval": true}`: rename and require approval
### Tool filtering behavior
When `allowedTools` is specified, only explicitly listed tools with `true` or an alias are available.
Tools set to `false` or not mentioned are blocked.
For example:
```json JSON icon=braces theme={"system"}
{
"type": "mcp_tools",
"name": "algolia_mcp",
"url": "https://ALGOLIA_APPLICATION_ID.algolia.net/mcp/1/abc123/mcp",
"transport": "streamable_http",
"headers": {
"Authorization": "Bearer ALGOLIA_APPLICATION_ID:ALGOLIA_SEARCH_API_KEY"
}
}
```
```json JSON icon=braces theme={"system"}
{
"type": "mcp_tools",
"name": "weather_api",
"url": "https://weather-api.example.com/mcp",
"transport": "streamable_http",
"headers": {
"Authorization": "Bearer EXTERNAL_API_KEY"
},
"allowedTools": {
"get_forecast": true,
"get_alerts": { "alias": "weather_alerts" }
}
}
```
```txt theme={"system"}
Result: only `get_forecast` and `weather_alerts` (renamed from `get_alerts`) are available.
```
### Security notes
* Authorization headers are encrypted at rest
* JWT Bearer token authentication supported
* 10-second timeout for all MCP connections
* [Runtime header overrides](/doc/guides/algolia-ai/agent-studio/how-to/tools/security#mcp-runtime-header-overrides) available for multi-tenant scenarios.
For complete configuration details, see the [Agent Studio API reference](/doc/rest-api/agent-studio).
## Configure tool approval
Set `requiresApproval: true` on individual MCP tools to pause execution and prompt the user for approval before the tool runs.
The approval prompt shows the tool name, arguments, and description.
Use tool approval for operations that:
* Read or modify sensitive data (customer information, financial records, personal details)
* Change system configuration (update settings, modify indices)
* Perform destructive actions (delete records, clear data)
* Access restricted resources (admin endpoints, internal APIs)
### Configuration
```json JSON icon=braces theme={"system"}
{
"type": "mcp_tools",
"name": "algolia_mcp",
"url": "https://ALGOLIA_APPLICATION_ID.algolia.net/mcp/1/abc123/mcp",
"transport": "streamable_http",
"headers": {
"Authorization": "Bearer ALGOLIA_APPLICATION_ID:ALGOLIA_SEARCH_API_KEY"
},
"allowedTools": {
"search-search": true,
"search-listIndices": { "requiresApproval": true },
"search-getSettings": { "requiresApproval": true }
}
}
```
### How approval works
The approval flow requires two requests to the completions endpoint:
1. Send the user message
2. Receive the approval request
#### Send the user message
```sh Command line icon=square-terminal theme={"system"}
curl -X POST "https://$ALGOLIA_APPLICATION_ID.algolia.net/agent-studio/1/agents/$AGENT_ID/completions?compatibilityMode=ai-sdk-4&stream=true" \
-H 'Content-Type: application/json' \
-H "x-algolia-application-id: $ALGOLIA_APPLICATION_ID" \
-H "x-algolia-api-key: $ALGOLIA_API_KEY" \
-d '{
"id": "alg_cnv_abc123",
"messages": [{
"id": "msg_1",
"role": "user",
"content": "List my indices",
"parts": [{ "type": "text", "text": "List my indices" }]
}]
}'
```
#### Receive the approval request
When the agent attempts to call a tool that requires approval,
the stream pauses and returns an approval request.
The format depends on which AI SDK compatibility mode you're using:
```txt theme={"system"}
9:{"toolCallId":"call_xyz","toolName":"search-listIndices","args":{"page":0},"requiresApproval":true,"description":"List Algolia indices"}
e:{"finishReason":"tool-approval-required"}
d:{"finishReason":"tool-approval-required"}
```
The approval request uses stream code `9` and includes:
| Field | Description |
| ------------------ | ---------------------------------------------------------------- |
| `toolCallId` | Unique ID for this tool call — required in the approval response |
| `toolName` | Name of the tool requesting execution |
| `args` | Arguments the tool will be called with |
| `requiresApproval` | Always `true` for approval requests |
| `description` | Tool description to show the user |
The stream then ends with finish reason `tool-approval-required` (codes `e` and `d`).
```txt theme={"system"}
data: {"type":"data-tool-approval","data":{"toolCallId":"call_xyz","toolName":"search-listIndices","args":{"page":0},"description":"List Algolia indices"}}
data:
{"type":"finish-step"}
data:
{"type":"finish"}
```
The approval request is sent as a custom data event with `type: "data-tool-approval"` and includes:
| Field | Description |
| ------------- | ---------------------------------------------------------------- |
| `toolCallId` | Unique ID for this tool call — required in the approval response |
| `toolName` | Name of the tool requesting execution |
| `args` | Arguments the tool will be called with |
| `description` | Tool description to show the user |
The stream then completes with `finish-step` and `finish` events.
Display these details to the user with **Approve** and **Reject** options.
#### Submit the approval decision
Send a new request with the full conversation history and approval decisions:
```sh Command line icon=square-terminal theme={"system"}
curl -X POST "https://$ALGOLIA_APPLICATION_ID.algolia.net/agent-studio/1/agents/$AGENT_ID/completions?compatibilityMode=ai-sdk-4&stream=true" \
-H 'Content-Type: application/json' \
-H "x-algolia-application-id: $ALGOLIA_APPLICATION_ID" \
-H "x-algolia-api-key: $ALGOLIA_API_KEY" \
-d '{
"id": "alg_cnv_abc123",
"messages": [
{
"id": "msg_1",
"role": "user",
"content": "List my indices",
"parts": [{ "type": "text", "text": "List my indices" }]
},
{
"id": "msg_2",
"role": "assistant",
"content": "",
"parts": [{
"type": "tool-approval-request",
"toolCallId": "call_xyz",
"toolName": "search-listIndices",
"args": {"page": 0},
"description": "List Algolia indices"
}]
}
],
"toolApprovals": {
"call_xyz": { "approved": true, "timestamp": "2026-01-13T10:00:00Z" }
}
}'
```
The `messages` array must include the full conversation history,
including the pending approval request from step 2.
When you approve a tool, the server executes it and continues the conversation.
When you reject a tool, the agent receives an error and tells the user the action was declined.
To reject a tool, set `approved` to `false` (you still need to include the full `messages` array):
```json JSON icon=braces theme={"system"}
{
"id": "alg_cnv_abc123",
"messages": [
{
"id": "msg_1",
"role": "user",
"content": "List my indices",
"parts": [{ "type": "text", "text": "List my indices" }]
},
{
"id": "msg_2",
"role": "assistant",
"content": "",
"parts": [
{
"type": "tool-approval-request",
"toolCallId": "call_xyz",
"toolName": "search-listIndices",
"args": { "page": 0 }
}
]
}
],
"toolApprovals": {
"call_xyz": { "approved": false, "timestamp": "2026-01-13T10:00:00Z" }
}
}
```
### Approve multiple tools at once
When the agent calls multiple tools that require approval in one turn,
all requests appear in the same stream.
Submit all decisions in a single request with the full conversation history:
```json JSON icon=braces theme={"system"}
{
"id": "alg_cnv_abc123",
"messages": [
{
"role": "user",
"content": "Show my data",
"parts": [{ "type": "text", "text": "Show my data" }]
},
{
"role": "assistant",
"content": "",
"parts": [
{
"type": "tool-approval-request",
"toolCallId": "call_1",
"toolName": "search-listIndices",
"args": { "page": 0 }
},
{
"type": "tool-approval-request",
"toolCallId": "call_2",
"toolName": "search-getSettings",
"args": { "indexName": "products" }
}
]
}
],
"toolApprovals": {
"call_1": { "approved": true, "timestamp": "2026-01-13T10:00:00Z" },
"call_2": { "approved": false, "timestamp": "2026-01-13T10:00:00Z" }
}
}
```
The agent receives all results and tells the user which operations succeeded and which were declined.
## See also
* [Tools overview](/doc/guides/algolia-ai/agent-studio/how-to/tools/overview)
* [Algolia MCP Server](/doc/guides/model-context-protocol)
* [Credentials](/doc/guides/algolia-ai/agent-studio/how-to/tools/security)