> ## Documentation Index
> Fetch the complete documentation index at: https://algolia.com/llms.txt
> Use this file to discover all available pages before exploring further.
# Get started with SwiftUI
> Build an InstantSearch iOS page from start to finish using SwiftUI.
export const SearchQuery = () =>
search query
;
export const Records = () =>
records
;
export const Filter = () =>
filter
;
export const Facet = () =>
facet
;
export const ApplicationID = () =>
application ID
;
export const APIKey = () =>
API key
;
export const Index = () =>
index
;
This guide describes how to start a SwiftUI project with InstantSearch iOS and create a full search experience from scratch.
This guide walks you through the steps needed to create a full InstantSearch Android experience from scratch.
It includes:
* A search box for users to type queries
* A list to display search results
* A list to results
* Statistics about the search
## Before you begin
To use InstantSearch, you need an Algolia account.
[Sign up](https://dashboard.algolia.com/users/sign_up) for a new account or use the following credentials
(which include a pre-loaded dataset of products appropriate for this guide):
* : `latency`
* Search : `1f6fd3a6fb973cb08419fe7d288fa4db`
- name: `bestbuy`
### Create a new project
In Xcode, create a new Project:
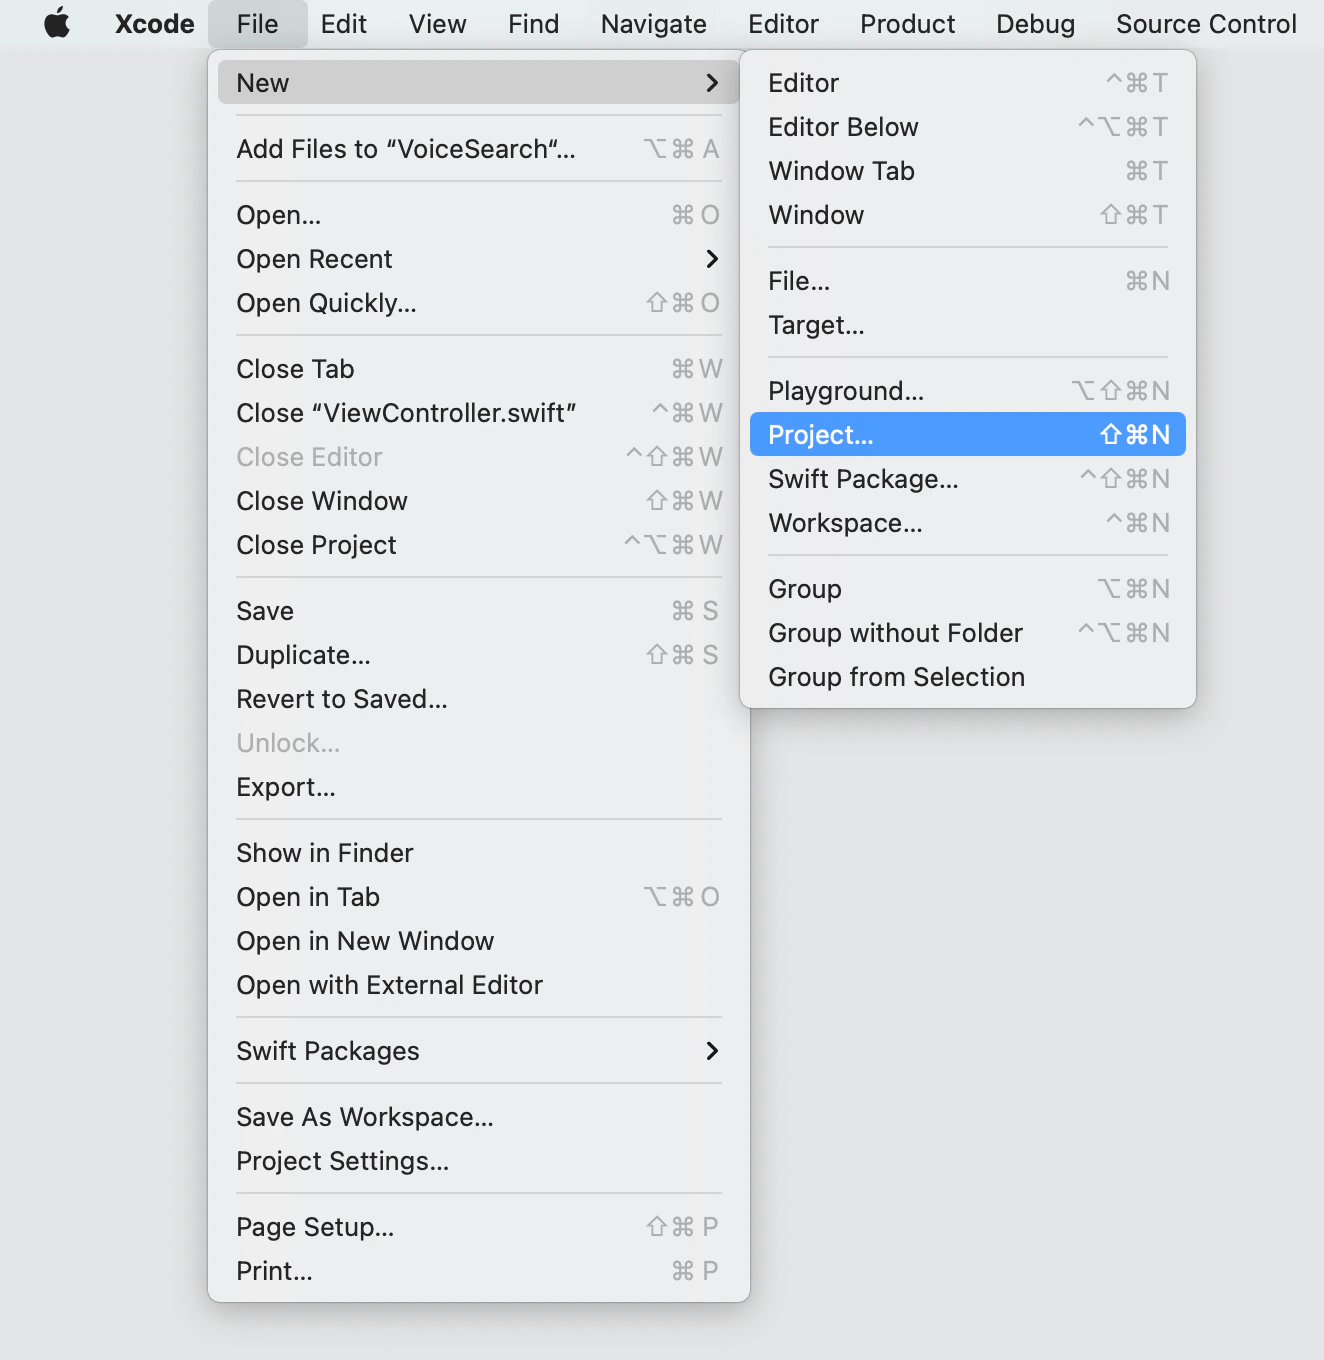
Open Xcode, and select `File -> New -> Project` in the menu bar.
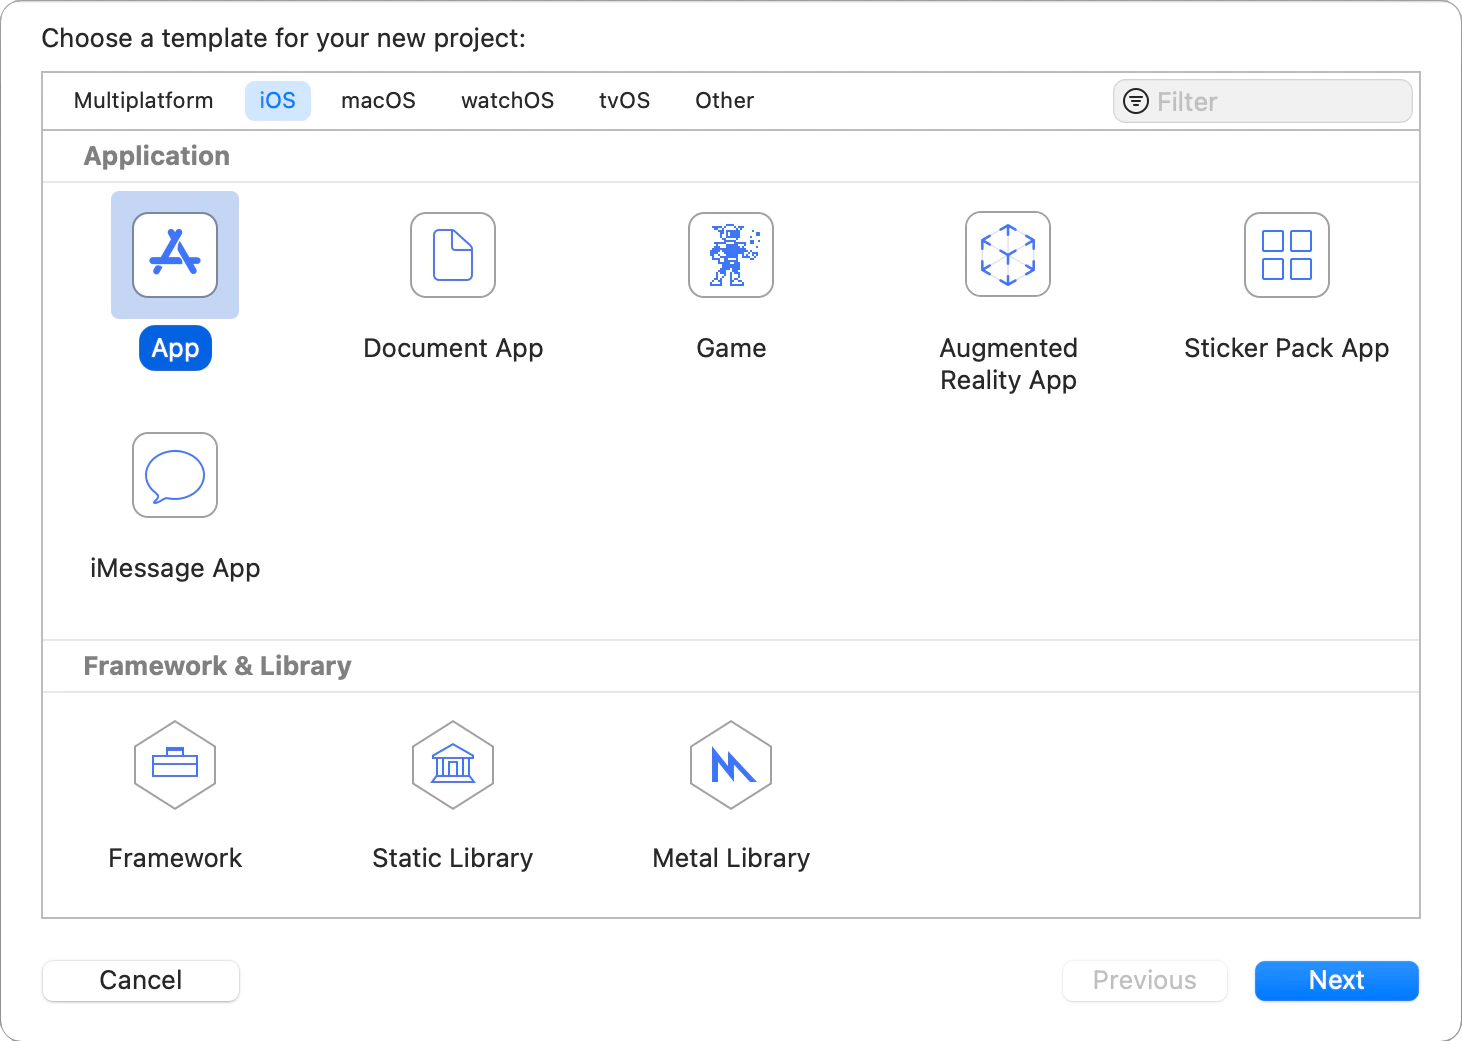
 Select `iOS -> App` template and click `Next`.
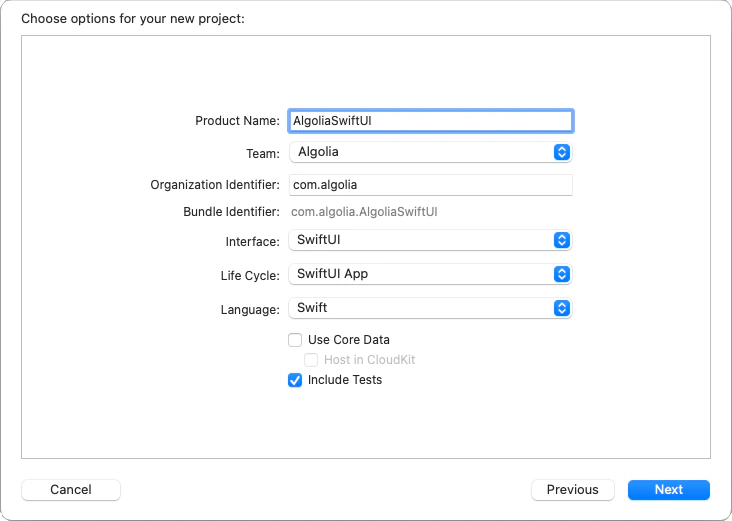
 Give your app a name.
Make sure that you have selected `SwiftUI` option in the `Interface` field and click `Next`.
Give your app a name.
Make sure that you have selected `SwiftUI` option in the `Interface` field and click `Next`.
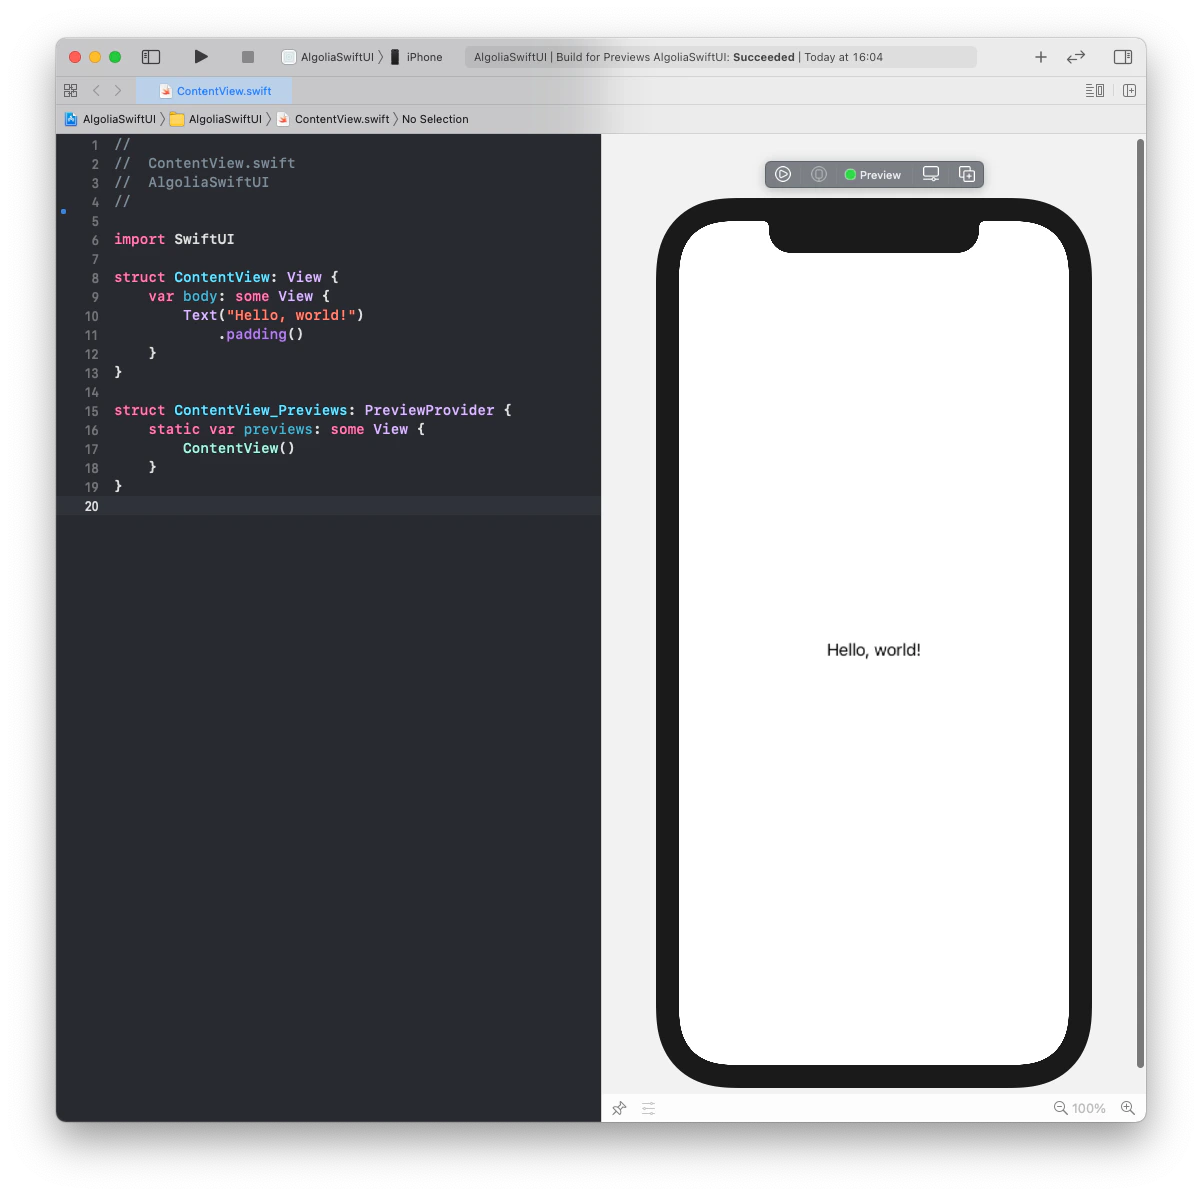
 You should see the `ContentView.swift` file opened with a `Hello World` project and the live preview canvas.
 ### Add project dependencies
This tutorial uses [Swift Package Manager](https://swift.org/package-manager) to integrate the InstantSearch library.
If you prefer to use another dependency manager (`Cocoapods`), check out the corresponding installation guides for [InstantSearch](https://github.com/algolia/instantsearch-ios#cocoapods).
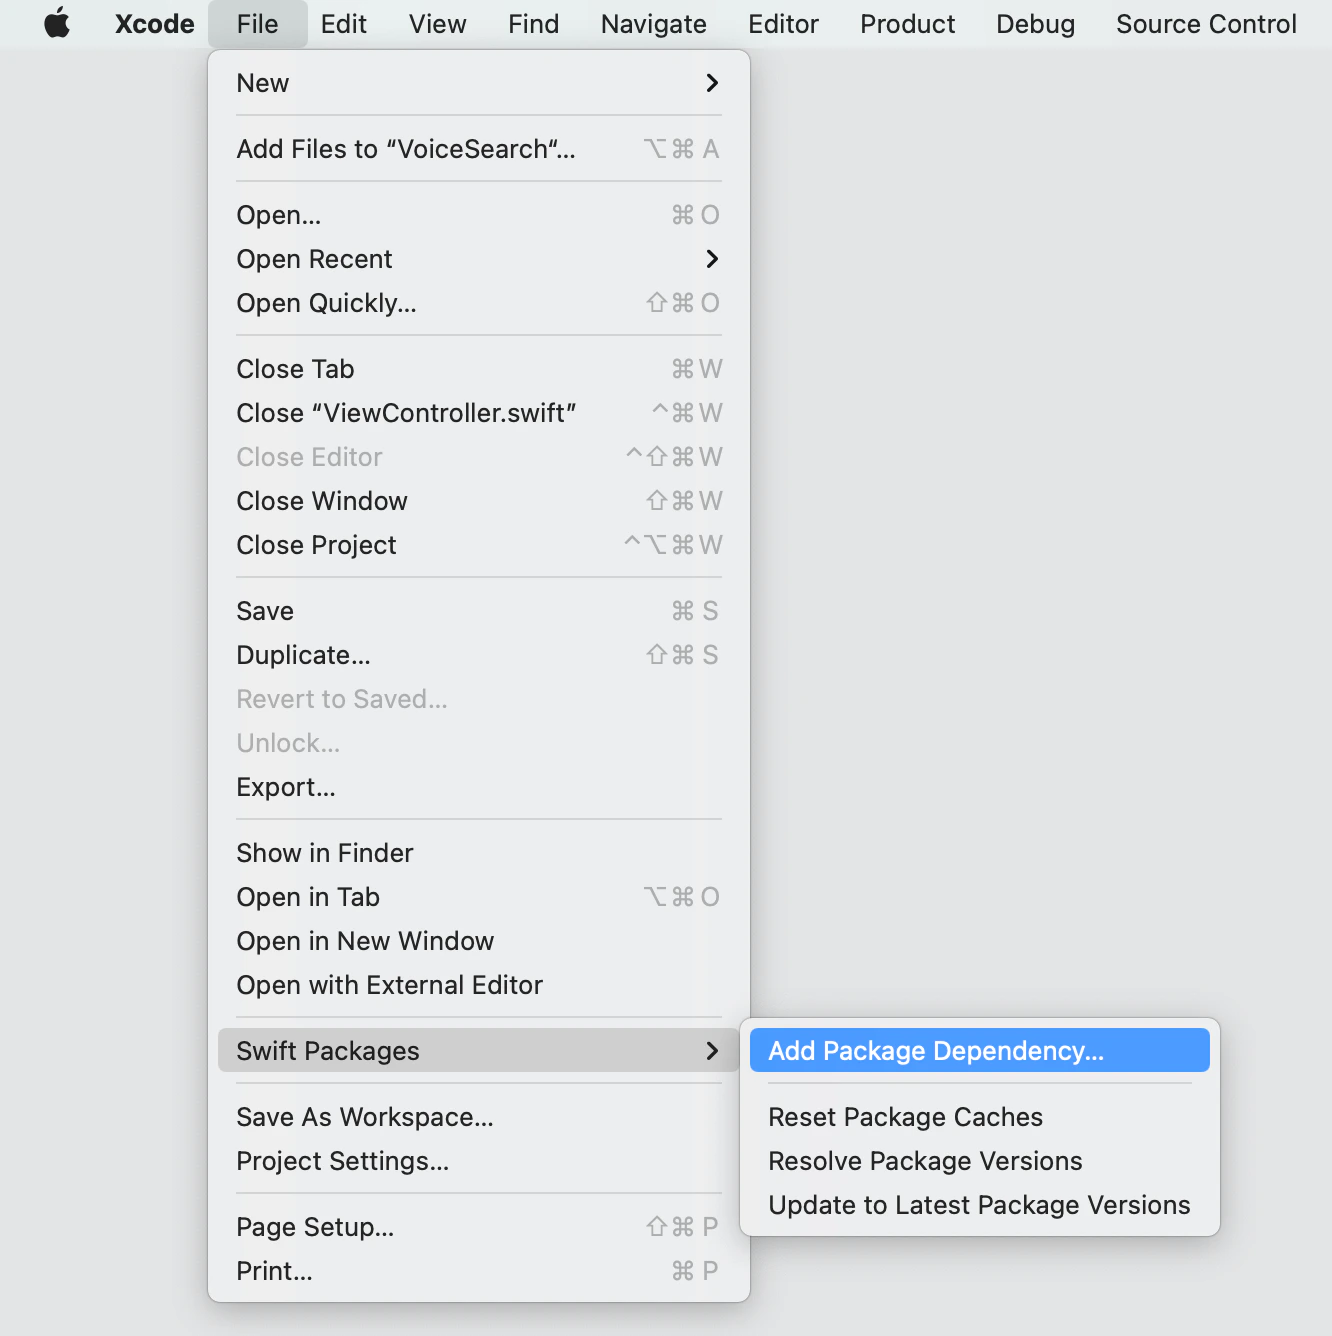
In the menu bar select `File -> Swift Packages -> Add Package Dependency`.
### Add project dependencies
This tutorial uses [Swift Package Manager](https://swift.org/package-manager) to integrate the InstantSearch library.
If you prefer to use another dependency manager (`Cocoapods`), check out the corresponding installation guides for [InstantSearch](https://github.com/algolia/instantsearch-ios#cocoapods).
In the menu bar select `File -> Swift Packages -> Add Package Dependency`.
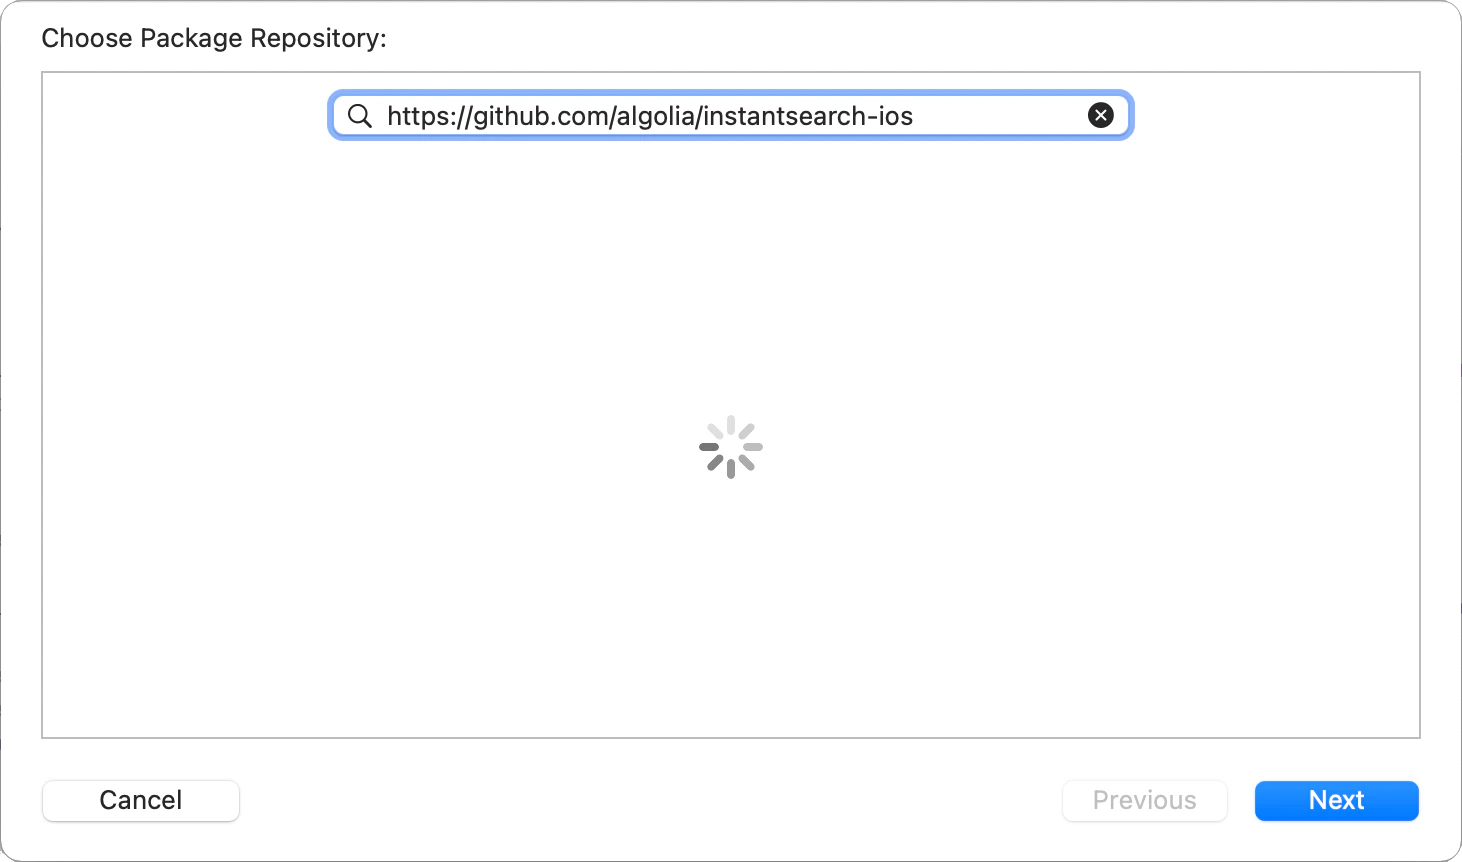
 Paste the GitHub link for the InstantSearch library: [`https://github.com/algolia/instantsearch-ios`](https://github.com/algolia/instantsearch-ios)
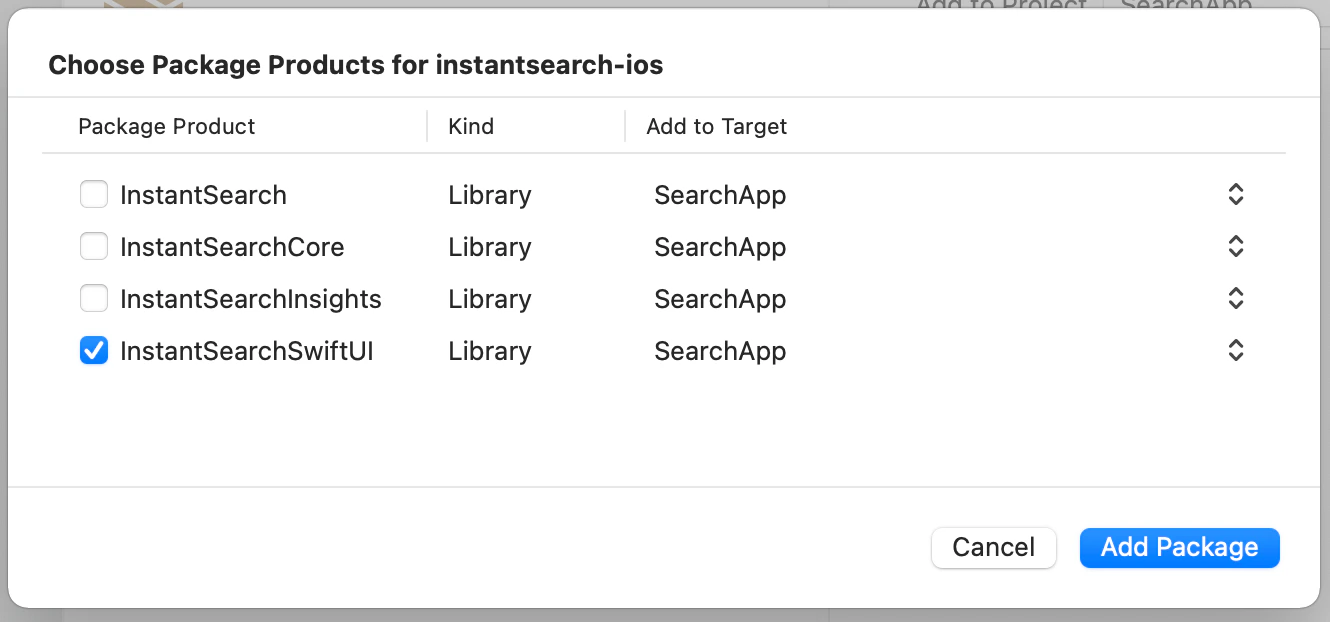
 Pick the latest library version on the next screen, and select the `InstantSearchSwiftUI` product from the following list:
 The InstantSearch dependency is installed and you're all set to work on your app.
## Implementation
Start by creating a classic search interface with search box and results list. In your Xcode project, open the `ContentView.swift` file and import the `InstantSearch` library.
```swift Swift icon=code theme={"system"}
import InstantSearchSwiftUI
```
### Define your record structure
Define a structure that represent in your index.
For simplicity's sake, the structure only provides the name of the product.
It must conform to the `Codable` protocol to work with InstantSearch.
Add the following structure definition to the `ContentView.swift` file:
```swift Swift icon=code theme={"system"}
struct StockItem: Codable {
let name: String
}
```
### Business logic
Add the `AlgoliaController` class containing the InstantSearch business logic components to the `ContentView.swift` file.
You need three components coupled with the corresponding UI controllers for the basic search experience:
* `HitsSearcher` performs search requests and obtains search results.
* `SearchBoxInteractor` handles a textual input and triggers search requests when needed.
* `HitsInteractor` stores hits and manages the pagination logic.
The `setupConnections` method establishes the connections between these components and their UI controllers to make them work together seamlessly.
```swift Swift icon=code theme={"system"}
class AlgoliaController {
let searcher: HitsSearcher
let searchBoxInteractor: SearchBoxInteractor
let searchBoxController: SearchBoxObservableController
let hitsInteractor: HitsInteractor
let hitsController: HitsObservableController
init() {
self.searcher = try! HitsSearcher(appID: "latency",
apiKey: "1f6fd3a6fb973cb08419fe7d288fa4db",
indexName: "bestbuy")
self.searchBoxInteractor = .init()
self.searchBoxController = .init()
self.hitsInteractor = .init()
self.hitsController = .init()
setupConnections()
}
func setupConnections() {
searchBoxInteractor.connectSearcher(searcher)
searchBoxInteractor.connectController(searchBoxController)
hitsInteractor.connectSearcher(searcher)
hitsInteractor.connectController(hitsController)
}
}
```
### UI
Add `SearchBoxObservableController` and `HitsObservableController` properties to the `ContentView` structure with an `@ObservedObject` property wrapper, so the view is automatically notified when the state of the search text or the hits list changed.
```swift Swift icon=code theme={"system"}
struct ContentView: View {
@ObservedObject var searchBoxController: SearchBoxObservableController
@ObservedObject var hitsController: HitsObservableController
var body: some View {
Text("Hello, world!")
.padding()
}
}
```
Add the `isEditing` property that binds the editing state of the search box.
```swift Swift icon=code theme={"system"}
struct ContentView: View {
@ObservedObject var searchBoxController: SearchBoxObservableController
@ObservedObject var hitsController: HitsObservableController
@State private var isEditing = false
var body: some View {
Text("Hello, world!")
.padding()
}
}
```
Replace the "Hello world!" text view with a vertical stack containing the `SearchBar` configured with `SearchBoxObservableController` properties and `isEditing` state binding.
```swift Swift icon=code theme={"system"}
var body: some View {
VStack(spacing: 7) {
SearchBar(text: $searchBoxController.query,
isEditing: $isEditing,
onSubmit: searchBoxController.submit)
}
}
```
From iOS 15, you can use the [`searchable`](https://developer.apple.com/documentation/swiftui/view-search) modifier to add a system search field.
Embed your search view into the `NavigationView` to ensure the search input field appears.
The body of your view will look as follows:
```swift Swift icon=code theme={"system"}
var body: some View {
VStack(spacing: 7) {
}.searchable(text: $searchBoxController.query)
}
```
The following steps rely on an explicit `SearchBar` view (as a more versatile approach).
Insert the `HitsList` component configured with `HitsObservableController` and a closure constructing the hit row.
The hit row is represented by a vertical stack with a text block presenting the name of the item and a `Divider`.
```swift Swift icon=code theme={"system"}
var body: some View {
VStack(spacing: 7) {
SearchBar(text: $searchBoxController.query,
isEditing: $isEditing,
onSubmit: searchBoxController.submit)
HitsList(hitsController) { hit, _ in
VStack(alignment: .leading, spacing: 10) {
Text(hit?.name ?? "")
.padding(.all, 10)
Divider()
}
}
}
}
```
Complete your search experience with a `noResults` trailing closure in the `HitsList`, that constructs the view presented in case of an empty result set, and add the `navigationBarTitle` string to show the navigation header on top of you search screen.
```swift Swift icon=code theme={"system"}
var body: some View {
VStack(spacing: 7) {
SearchBar(text: $searchBoxController.query,
isEditing: $isEditing,
onSubmit: searchBoxController.submit)
HitsList(hitsController) { (hit, _) in
VStack(alignment: .leading, spacing: 10) {
Text(hit?.name ?? "")
.padding(.all, 10)
Divider()
}
} noResults: {
Text("No Results")
.frame(maxWidth: .infinity, maxHeight: .infinity)
}
}
.navigationBarTitle("Algolia & SwiftUI")
}
```
Try out the search experience in the live preview.
Add a static instance of the `AlgoliaController` in the `PreviewProvider`.
Then, in the `previews` declaration, instantiate the `ContentView` with the UI controller references in the `AlgoliaController` class, and embed it in the `NavigationView`.
Launch the initial search inside the `onAppear` closure of the `NavigationView`.
The resulting `ContentView_Previews` structure content should look as follows:
```swift Swift icon=code theme={"system"}
struct ContentView_Previews: PreviewProvider {
static let algoliaController = AlgoliaController()
static var previews: some View {
NavigationView {
ContentView(searchBoxController: algoliaController.searchBoxController,
hitsController: algoliaController.hitsController)
}.onAppear {
algoliaController.searcher.search()
}
}
}
```
### Preview
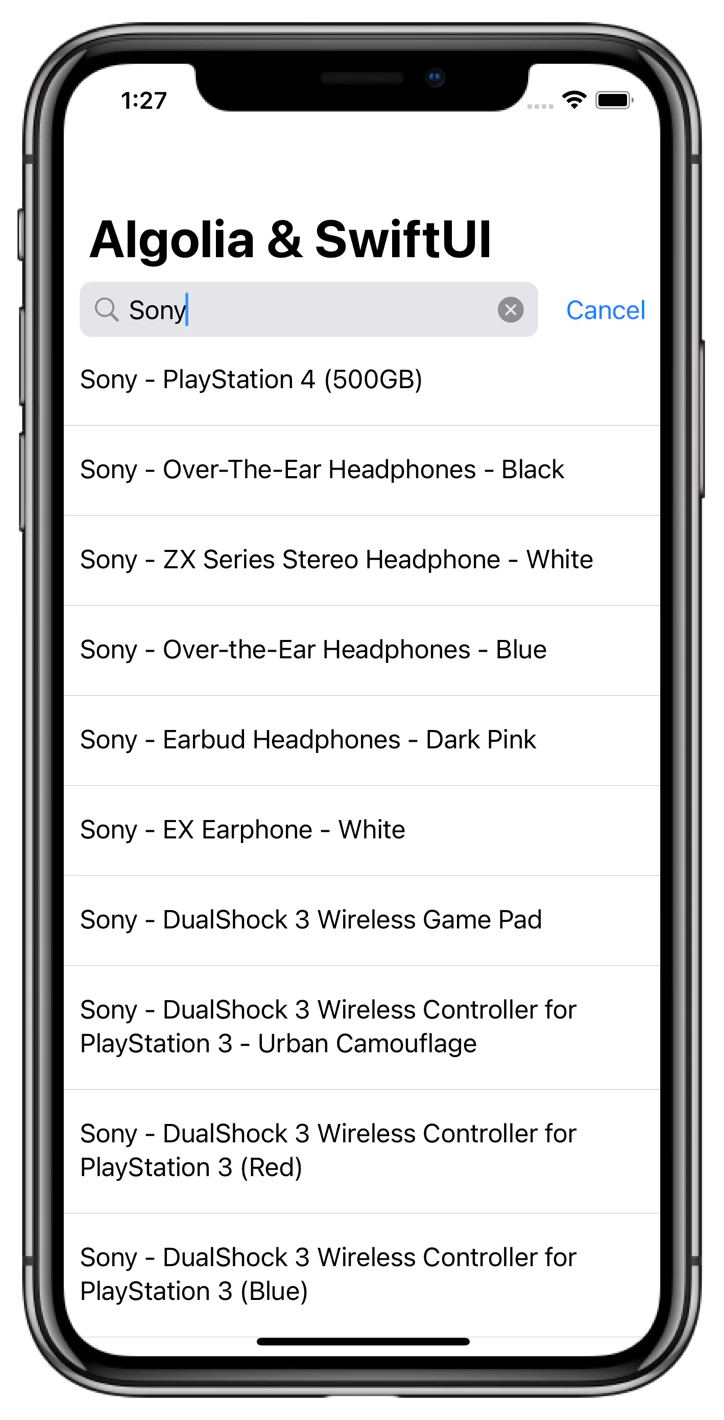
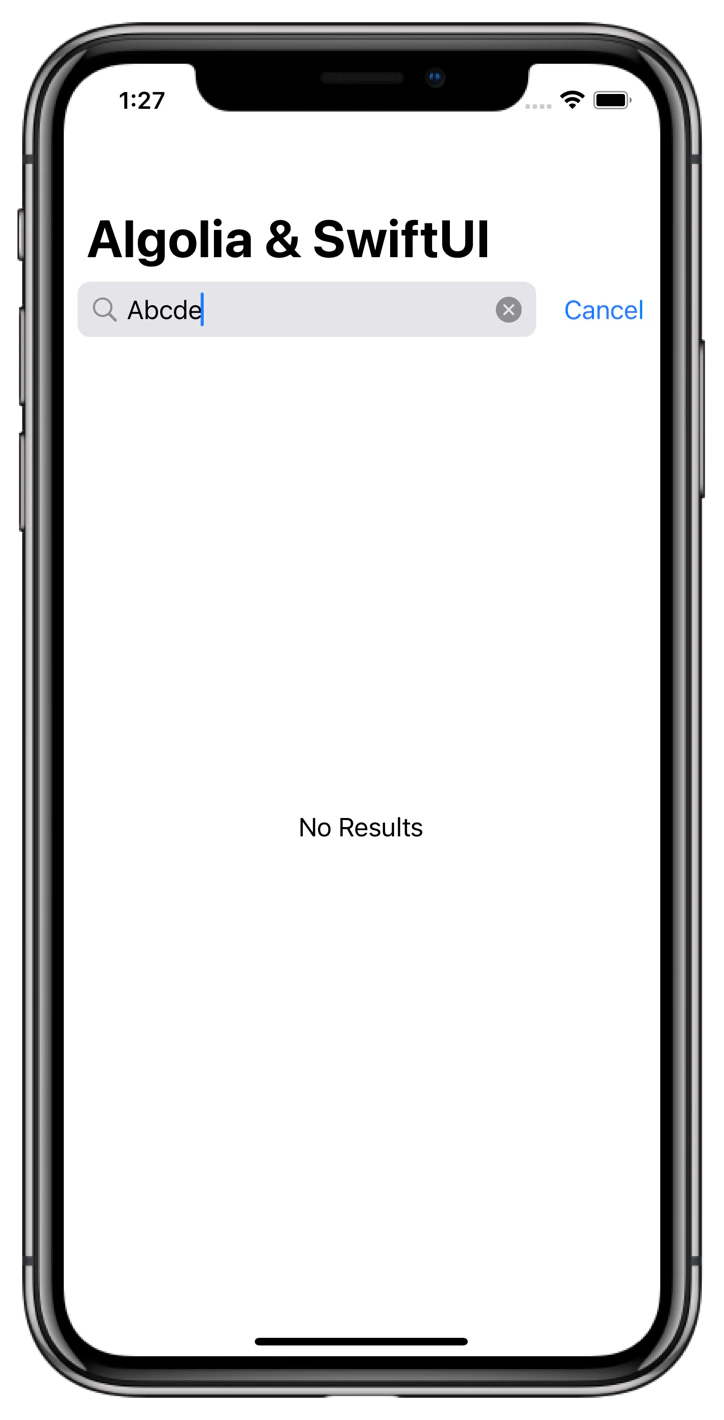
Launch your preview to see the basic search experience in action.
You should see that the results are changing on each key stroke.
The InstantSearch dependency is installed and you're all set to work on your app.
## Implementation
Start by creating a classic search interface with search box and results list. In your Xcode project, open the `ContentView.swift` file and import the `InstantSearch` library.
```swift Swift icon=code theme={"system"}
import InstantSearchSwiftUI
```
### Define your record structure
Define a structure that represent in your index.
For simplicity's sake, the structure only provides the name of the product.
It must conform to the `Codable` protocol to work with InstantSearch.
Add the following structure definition to the `ContentView.swift` file:
```swift Swift icon=code theme={"system"}
struct StockItem: Codable {
let name: String
}
```
### Business logic
Add the `AlgoliaController` class containing the InstantSearch business logic components to the `ContentView.swift` file.
You need three components coupled with the corresponding UI controllers for the basic search experience:
* `HitsSearcher` performs search requests and obtains search results.
* `SearchBoxInteractor` handles a textual input and triggers search requests when needed.
* `HitsInteractor` stores hits and manages the pagination logic.
The `setupConnections` method establishes the connections between these components and their UI controllers to make them work together seamlessly.
```swift Swift icon=code theme={"system"}
class AlgoliaController {
let searcher: HitsSearcher
let searchBoxInteractor: SearchBoxInteractor
let searchBoxController: SearchBoxObservableController
let hitsInteractor: HitsInteractor
let hitsController: HitsObservableController
init() {
self.searcher = try! HitsSearcher(appID: "latency",
apiKey: "1f6fd3a6fb973cb08419fe7d288fa4db",
indexName: "bestbuy")
self.searchBoxInteractor = .init()
self.searchBoxController = .init()
self.hitsInteractor = .init()
self.hitsController = .init()
setupConnections()
}
func setupConnections() {
searchBoxInteractor.connectSearcher(searcher)
searchBoxInteractor.connectController(searchBoxController)
hitsInteractor.connectSearcher(searcher)
hitsInteractor.connectController(hitsController)
}
}
```
### UI
Add `SearchBoxObservableController` and `HitsObservableController` properties to the `ContentView` structure with an `@ObservedObject` property wrapper, so the view is automatically notified when the state of the search text or the hits list changed.
```swift Swift icon=code theme={"system"}
struct ContentView: View {
@ObservedObject var searchBoxController: SearchBoxObservableController
@ObservedObject var hitsController: HitsObservableController
var body: some View {
Text("Hello, world!")
.padding()
}
}
```
Add the `isEditing` property that binds the editing state of the search box.
```swift Swift icon=code theme={"system"}
struct ContentView: View {
@ObservedObject var searchBoxController: SearchBoxObservableController
@ObservedObject var hitsController: HitsObservableController
@State private var isEditing = false
var body: some View {
Text("Hello, world!")
.padding()
}
}
```
Replace the "Hello world!" text view with a vertical stack containing the `SearchBar` configured with `SearchBoxObservableController` properties and `isEditing` state binding.
```swift Swift icon=code theme={"system"}
var body: some View {
VStack(spacing: 7) {
SearchBar(text: $searchBoxController.query,
isEditing: $isEditing,
onSubmit: searchBoxController.submit)
}
}
```
From iOS 15, you can use the [`searchable`](https://developer.apple.com/documentation/swiftui/view-search) modifier to add a system search field.
Embed your search view into the `NavigationView` to ensure the search input field appears.
The body of your view will look as follows:
```swift Swift icon=code theme={"system"}
var body: some View {
VStack(spacing: 7) {
}.searchable(text: $searchBoxController.query)
}
```
The following steps rely on an explicit `SearchBar` view (as a more versatile approach).
Insert the `HitsList` component configured with `HitsObservableController` and a closure constructing the hit row.
The hit row is represented by a vertical stack with a text block presenting the name of the item and a `Divider`.
```swift Swift icon=code theme={"system"}
var body: some View {
VStack(spacing: 7) {
SearchBar(text: $searchBoxController.query,
isEditing: $isEditing,
onSubmit: searchBoxController.submit)
HitsList(hitsController) { hit, _ in
VStack(alignment: .leading, spacing: 10) {
Text(hit?.name ?? "")
.padding(.all, 10)
Divider()
}
}
}
}
```
Complete your search experience with a `noResults` trailing closure in the `HitsList`, that constructs the view presented in case of an empty result set, and add the `navigationBarTitle` string to show the navigation header on top of you search screen.
```swift Swift icon=code theme={"system"}
var body: some View {
VStack(spacing: 7) {
SearchBar(text: $searchBoxController.query,
isEditing: $isEditing,
onSubmit: searchBoxController.submit)
HitsList(hitsController) { (hit, _) in
VStack(alignment: .leading, spacing: 10) {
Text(hit?.name ?? "")
.padding(.all, 10)
Divider()
}
} noResults: {
Text("No Results")
.frame(maxWidth: .infinity, maxHeight: .infinity)
}
}
.navigationBarTitle("Algolia & SwiftUI")
}
```
Try out the search experience in the live preview.
Add a static instance of the `AlgoliaController` in the `PreviewProvider`.
Then, in the `previews` declaration, instantiate the `ContentView` with the UI controller references in the `AlgoliaController` class, and embed it in the `NavigationView`.
Launch the initial search inside the `onAppear` closure of the `NavigationView`.
The resulting `ContentView_Previews` structure content should look as follows:
```swift Swift icon=code theme={"system"}
struct ContentView_Previews: PreviewProvider {
static let algoliaController = AlgoliaController()
static var previews: some View {
NavigationView {
ContentView(searchBoxController: algoliaController.searchBoxController,
hitsController: algoliaController.hitsController)
}.onAppear {
algoliaController.searcher.search()
}
}
}
```
### Preview
Launch your preview to see the basic search experience in action.
You should see that the results are changing on each key stroke.
 ### Add statistics
To make the search experience more user-friendly, you can give more context about the search results to your users.
You can do this with different InstantSearch modules.
This component shows the hit count and the request processing time.
This gives users a complete understanding of their search, without the need for extra interaction.
Then create a `StatsInteractor`, which extracts the metadata from the search response, and provides an interface to present it to users.
Add `StatsInteractor` and `StatsTextObservableController` to `AlgoliaController` and connect the `StatsInteractor` to the `Searcher` in the `setupConnections` method.
Complete the `setupConnections` method of the `PreviewProvider` with the connection between the `StatsInteractor` and the `StatsTextObservableController`.
```swift Swift icon=code theme={"system"}
class AlgoliaController {
let searcher: HitsSearcher
let searchBoxInteractor: SearchBoxInteractor
let searchBoxController: SearchBoxObservableController
let hitsInteractor: HitsInteractor
let hitsController: HitsObservableController
let statsInteractor: StatsInteractor
let statsController: StatsTextObservableController
init() {
self.searcher = try! HitsSearcher(appID: "latency",
apiKey: "1f6fd3a6fb973cb08419fe7d288fa4db",
indexName: "bestbuy")
self.searchBoxInteractor = .init()
self.hitsInteractor = .init()
self.statsInteractor = .init()
self.searchBoxController = .init()
self.hitsController = .init()
self.statsController = .init()
setupConnections()
}
func setupConnections() {
searchBoxInteractor.connectSearcher(searcher)
searchBoxInteractor.connectController(searchBoxController)
hitsInteractor.connectSearcher(searcher)
hitsInteractor.connectController(hitsController)
statsInteractor.connectSearcher(searcher)
statsInteractor.connectController(statsController)
}
}
```
The `StatsInteractor` receives the search statistics now, but doesn't display it yet.
Add `StatsTextObservableController` property to the `ContentView` and add the `Text` with its `stats` property into the stack in the middle of the `SearchBar` and the `HitsList`.
```swift Swift icon=code theme={"system"}
struct ContentView: View {
@ObservedObject var searchBoxController: SearchBoxObservableController
@ObservedObject var hitsController: HitsObservableController
@ObservedObject var statsController: StatsTextObservableController
@State private var isEditing = false
var body: some View {
VStack(spacing: 7) {
SearchBar(text: $searchBoxController.query,
isEditing: $isEditing,
onSubmit: searchBoxController.submit)
Text(statsController.stats)
.fontWeight(.medium)
HitsList(hitsController) { (hit, _) in
VStack(alignment: .leading, spacing: 10) {
Text(hit?.name ?? "")
.padding(.all, /*@START_MENU_TOKEN@*/10/*@END_MENU_TOKEN@*/)
Divider()
}
} noResults: {
Text("No Results")
.frame(maxWidth: .infinity, maxHeight: .infinity)
}
}
.navigationBarTitle("Algolia & SwiftUI")
}
}
```
Alter the `PreviewProvider` structure by adding a `StatsTextObservableController` in the `ContentView` initializer.
```swift Swift icon=code theme={"system"}
struct ContentView_Previews: PreviewProvider {
static let algoliaController = AlgoliaController()
static var previews: some View {
NavigationView {
ContentView(searchBoxController: algoliaController.searchBoxController,
hitsController: algoliaController.hitsController,
statsController: algoliaController.statsController)
}.onAppear {
algoliaController.searcher.search()
}
}
}
```
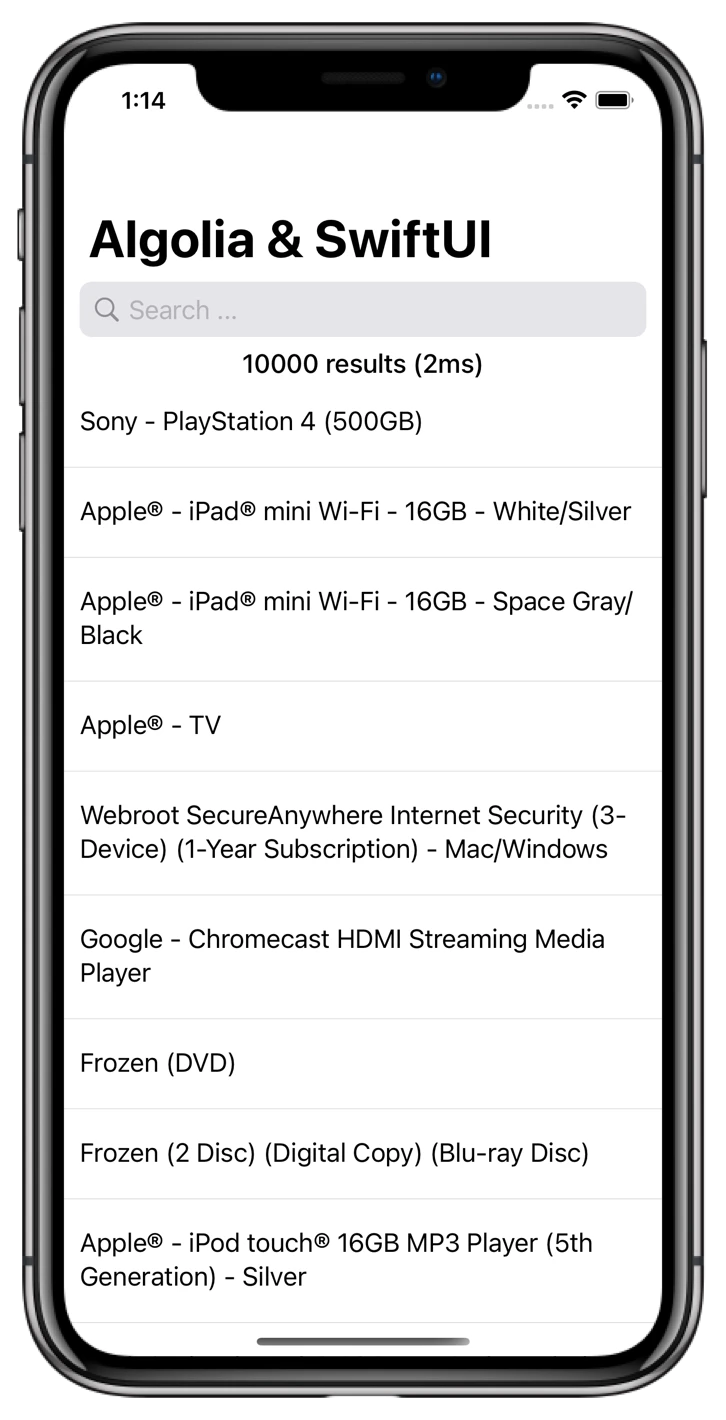
Update your live preview.
You should now see updated results *and* an updated hit count on each keystroke.
### Add statistics
To make the search experience more user-friendly, you can give more context about the search results to your users.
You can do this with different InstantSearch modules.
This component shows the hit count and the request processing time.
This gives users a complete understanding of their search, without the need for extra interaction.
Then create a `StatsInteractor`, which extracts the metadata from the search response, and provides an interface to present it to users.
Add `StatsInteractor` and `StatsTextObservableController` to `AlgoliaController` and connect the `StatsInteractor` to the `Searcher` in the `setupConnections` method.
Complete the `setupConnections` method of the `PreviewProvider` with the connection between the `StatsInteractor` and the `StatsTextObservableController`.
```swift Swift icon=code theme={"system"}
class AlgoliaController {
let searcher: HitsSearcher
let searchBoxInteractor: SearchBoxInteractor
let searchBoxController: SearchBoxObservableController
let hitsInteractor: HitsInteractor
let hitsController: HitsObservableController
let statsInteractor: StatsInteractor
let statsController: StatsTextObservableController
init() {
self.searcher = try! HitsSearcher(appID: "latency",
apiKey: "1f6fd3a6fb973cb08419fe7d288fa4db",
indexName: "bestbuy")
self.searchBoxInteractor = .init()
self.hitsInteractor = .init()
self.statsInteractor = .init()
self.searchBoxController = .init()
self.hitsController = .init()
self.statsController = .init()
setupConnections()
}
func setupConnections() {
searchBoxInteractor.connectSearcher(searcher)
searchBoxInteractor.connectController(searchBoxController)
hitsInteractor.connectSearcher(searcher)
hitsInteractor.connectController(hitsController)
statsInteractor.connectSearcher(searcher)
statsInteractor.connectController(statsController)
}
}
```
The `StatsInteractor` receives the search statistics now, but doesn't display it yet.
Add `StatsTextObservableController` property to the `ContentView` and add the `Text` with its `stats` property into the stack in the middle of the `SearchBar` and the `HitsList`.
```swift Swift icon=code theme={"system"}
struct ContentView: View {
@ObservedObject var searchBoxController: SearchBoxObservableController
@ObservedObject var hitsController: HitsObservableController
@ObservedObject var statsController: StatsTextObservableController
@State private var isEditing = false
var body: some View {
VStack(spacing: 7) {
SearchBar(text: $searchBoxController.query,
isEditing: $isEditing,
onSubmit: searchBoxController.submit)
Text(statsController.stats)
.fontWeight(.medium)
HitsList(hitsController) { (hit, _) in
VStack(alignment: .leading, spacing: 10) {
Text(hit?.name ?? "")
.padding(.all, /*@START_MENU_TOKEN@*/10/*@END_MENU_TOKEN@*/)
Divider()
}
} noResults: {
Text("No Results")
.frame(maxWidth: .infinity, maxHeight: .infinity)
}
}
.navigationBarTitle("Algolia & SwiftUI")
}
}
```
Alter the `PreviewProvider` structure by adding a `StatsTextObservableController` in the `ContentView` initializer.
```swift Swift icon=code theme={"system"}
struct ContentView_Previews: PreviewProvider {
static let algoliaController = AlgoliaController()
static var previews: some View {
NavigationView {
ContentView(searchBoxController: algoliaController.searchBoxController,
hitsController: algoliaController.hitsController,
statsController: algoliaController.statsController)
}.onAppear {
algoliaController.searcher.search()
}
}
}
```
Update your live preview.
You should now see updated results *and* an updated hit count on each keystroke.
 ### Filter your results
With your app, you can search more than 10,000 products. However, you don't want to scroll to the bottom of the list to find the exact product you're looking for. One can more accurately filter the results by making use of the `RefinementList` components. This section explains how to build a filter that allows to filter products by their category.
1. Add a `FilterState` component to the `AlgoliaController`. This component provides a convenient way to manage the state of your filters. Add the `manufacturer` refinement attribute.
2. Add the `FacetListInteractor`, which stores the list of facets retrieved with search results.
3. Add the connections between `HitsSearcher`, `FilterState` and `FacetListInteractor` in the `setupConnections` method.
Complete the `setupConnections` method of the `PreviewProvider` with the connection between the `FacetListInteractor` and the `FacetListObservableController`. To improve the user experience, the connection includes the `FacetListPresenter` parameter that pins the selected facets to the top of the list and uses facet count value as the second ranking criteria, so that the facets with the most hits show up higher.
```swift Swift icon=code expandable theme={"system"}
class AlgoliaController {
let searcher: HitsSearcher
let searchBoxInteractor: SearchBoxInteractor
let searchBoxController: SearchBoxObservableController
let hitsInteractor: HitsInteractor
let hitsController: HitsObservableController
let statsInteractor: StatsInteractor
let statsController: StatsTextObservableController
let filterState: FilterState
let facetListInteractor: FacetListInteractor
let facetListController: FacetListObservableController
init() {
self.searcher = try! HitsSearcher(appID: "latency",
apiKey: "1f6fd3a6fb973cb08419fe7d288fa4db",
indexName: "bestbuy")
self.searchBoxInteractor = .init()
self.searchBoxController = .init()
self.hitsInteractor = .init()
self.hitsController = .init()
self.statsInteractor = .init()
self.statsController = .init()
self.filterState = .init()
self.facetListInteractor = .init()
self.facetListController = .init()
setupConnections()
}
func setupConnections() {
searchBoxInteractor.connectSearcher(searcher)
searchBoxInteractor.connectController(searchBoxController)
hitsInteractor.connectSearcher(searcher)
hitsInteractor.connectController(hitsController)
statsInteractor.connectSearcher(searcher)
statsInteractor.connectController(statsController)
searcher.connectFilterState(filterState)
facetListInteractor.connectSearcher(searcher, with: "manufacturer")
facetListInteractor.connectFilterState(filterState, with: "manufacturer", operator: .or)
facetListInteractor.connectController(facetListController, with: FacetListPresenter(sortBy: [.isRefined, .count(order: .descending)]))
}
}
```
In the `ContentView` add a new state flag `isPresentingFacets`, which defines if the facet list is presented.
```swift Swift icon=code theme={"system"}
@State private var isPresentingFacets = false
```
Then declare a function that constructs the button which triggers the appearance of the facet list by toggling the `isPresentingFacets` flag.
```swift Swift icon=code theme={"system"}
private func facetsButton() -> some View {
Button(action: {
isPresentingFacets.toggle()
},
label: {
Image(systemName: "line.horizontal.3.decrease.circle")
.font(.title)
})
}
```
Add the `FacetListObservableController` to the `ContentView` and a `facets` function constructing the facet list view.
```swift Swift icon=code theme={"system"}
@ObservedObject var facetListController: FacetListObservableController
@ViewBuilder
private func facets() -> some View {
NavigationView {
FacetList(facetListController) { facet, isSelected in
VStack {
FacetRow(facet: facet, isSelected: isSelected)
Divider()
}
} noResults: {
Text("No facet found")
.frame(maxWidth: .infinity, maxHeight: .infinity)
}
.navigationBarTitle("Brand")
}
}
```
The resulting `ContentView` code should look as follows:
```swift Swift icon=code theme={"system"}
struct ContentView: View {
@ObservedObject var searchBoxController: SearchBoxObservableController
@ObservedObject var hitsController: HitsObservableController
@ObservedObject var statsController: StatsTextObservableController
@ObservedObject var facetListController: FacetListObservableController
@State private var isEditing = false
@State private var isPresentingFacets = false
var body: some View {
VStack(spacing: 7) {
SearchBar(text: $searchBoxController.query,
isEditing: $isEditing,
onSubmit: searchBoxController.submit)
Text(statsController.stats)
.fontWeight(.medium)
HitsList(hitsController) { (hit, _) in
VStack(alignment: .leading, spacing: 10) {
Text(hit?.name ?? "")
.padding(.all, /*@START_MENU_TOKEN@*/10/*@END_MENU_TOKEN@*/)
Divider()
}
} noResults: {
Text("No Results")
.frame(maxWidth: .infinity, maxHeight: .infinity)
}
}
.navigationBarTitle("Algolia & SwiftUI")
.navigationBarItems(trailing: facetsButton())
.sheet(isPresented: $isPresentingFacets, content: facets)
}
@ViewBuilder
private func facets() -> some View {
NavigationView {
FacetList(facetListController) { facet, isSelected in
VStack {
FacetRow(facet: facet, isSelected: isSelected)
Divider()
}
} noResults: {
Text("No facet found")
.frame(maxWidth: .infinity, maxHeight: .infinity)
}
.navigationBarTitle("Brand")
}
}
private func facetsButton() -> some View {
Button(action: {
isPresentingFacets.toggle()
},
label: {
Image(systemName: "line.horizontal.3.decrease.circle")
.font(.title)
})
}
}
```
Complete the initializer of the `ContentView` with the `FacetListObservableController`.
```swift Swift icon=code theme={"system"}
struct ContentView_Previews: PreviewProvider {
static let algoliaController = AlgoliaController()
static var previews: some View {
NavigationView {
ContentView(searchBoxController: algoliaController.searchBoxController,
hitsController: algoliaController.hitsController,
statsController: algoliaController.statsController,
facetListController: algoliaController.facetListController)
}.onAppear {
algoliaController.searcher.search()
}
}
}
```
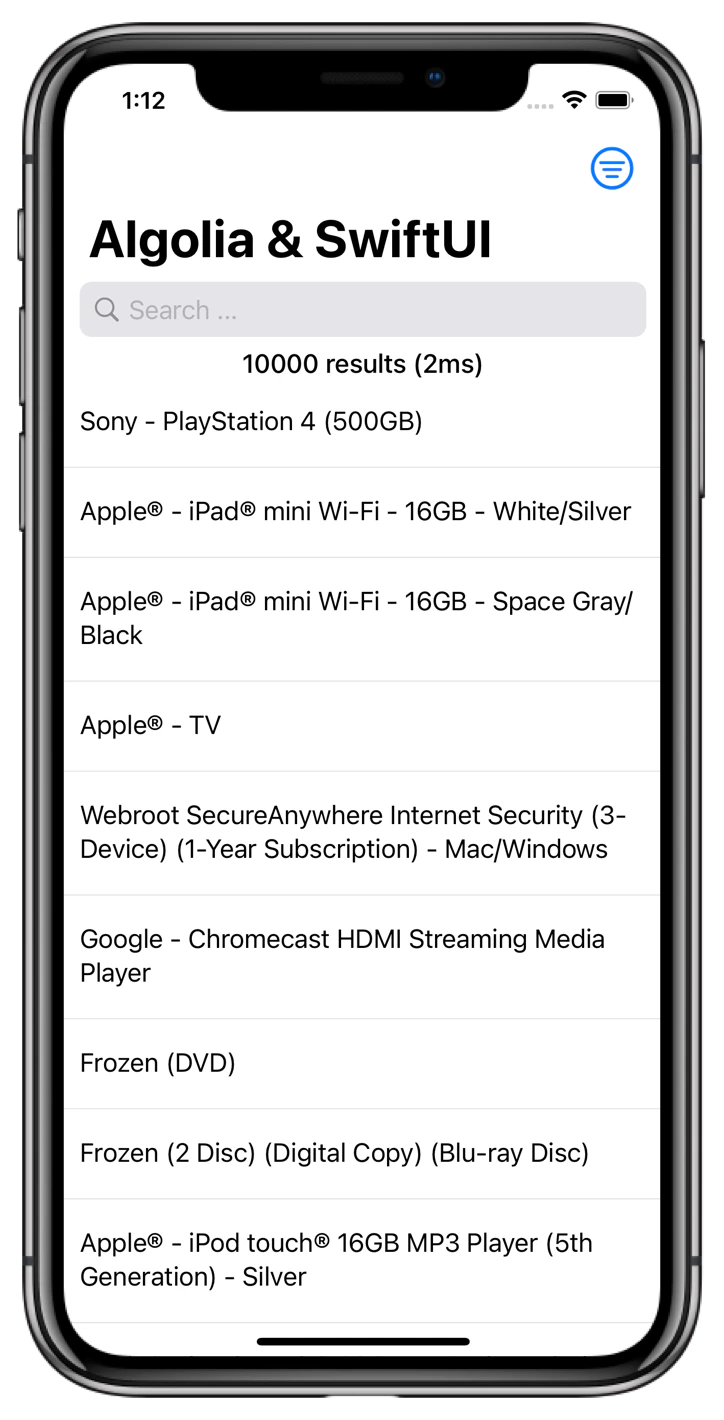
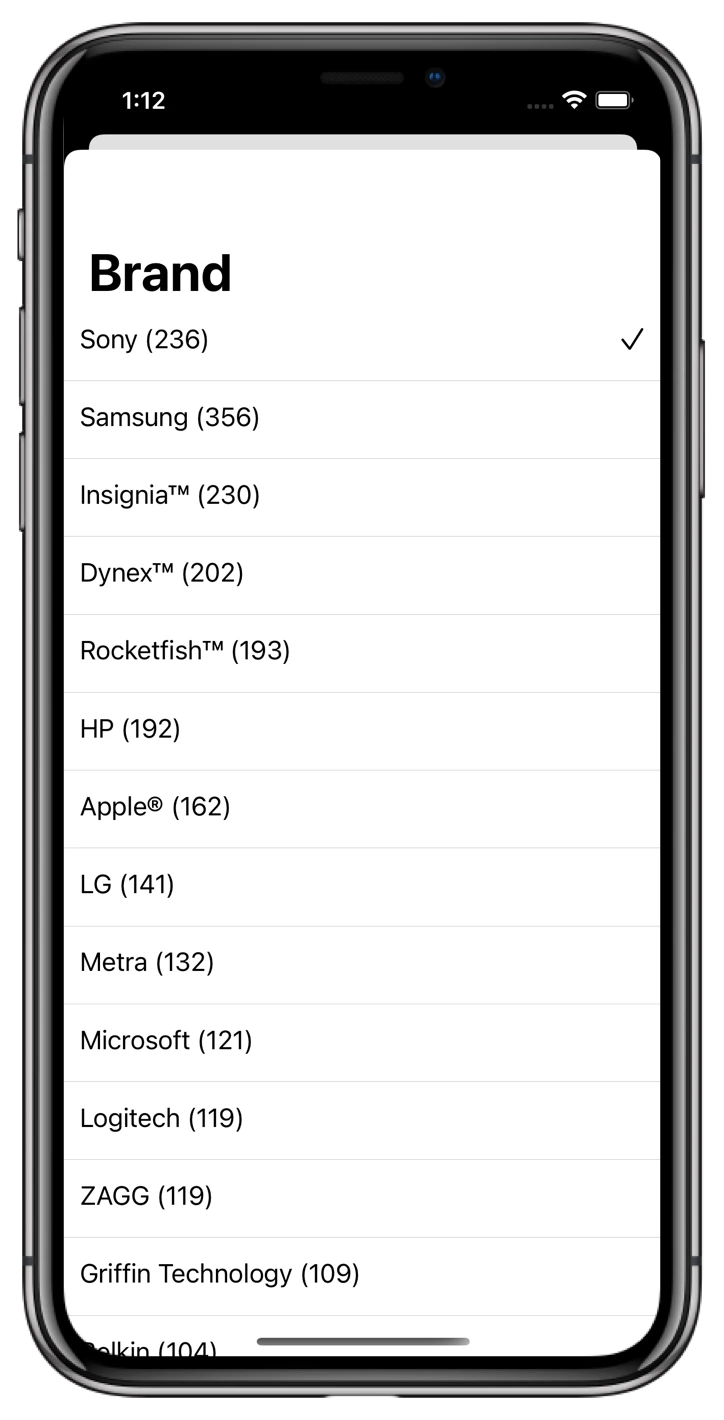
Update the live preview. Now you see a filter button on top right of your screen.
Click it to present the refinements list, select one or more refinements,
and then dismiss the refinements list by swiping it down to see the filtered result.
### Filter your results
With your app, you can search more than 10,000 products. However, you don't want to scroll to the bottom of the list to find the exact product you're looking for. One can more accurately filter the results by making use of the `RefinementList` components. This section explains how to build a filter that allows to filter products by their category.
1. Add a `FilterState` component to the `AlgoliaController`. This component provides a convenient way to manage the state of your filters. Add the `manufacturer` refinement attribute.
2. Add the `FacetListInteractor`, which stores the list of facets retrieved with search results.
3. Add the connections between `HitsSearcher`, `FilterState` and `FacetListInteractor` in the `setupConnections` method.
Complete the `setupConnections` method of the `PreviewProvider` with the connection between the `FacetListInteractor` and the `FacetListObservableController`. To improve the user experience, the connection includes the `FacetListPresenter` parameter that pins the selected facets to the top of the list and uses facet count value as the second ranking criteria, so that the facets with the most hits show up higher.
```swift Swift icon=code expandable theme={"system"}
class AlgoliaController {
let searcher: HitsSearcher
let searchBoxInteractor: SearchBoxInteractor
let searchBoxController: SearchBoxObservableController
let hitsInteractor: HitsInteractor
let hitsController: HitsObservableController
let statsInteractor: StatsInteractor
let statsController: StatsTextObservableController
let filterState: FilterState
let facetListInteractor: FacetListInteractor
let facetListController: FacetListObservableController
init() {
self.searcher = try! HitsSearcher(appID: "latency",
apiKey: "1f6fd3a6fb973cb08419fe7d288fa4db",
indexName: "bestbuy")
self.searchBoxInteractor = .init()
self.searchBoxController = .init()
self.hitsInteractor = .init()
self.hitsController = .init()
self.statsInteractor = .init()
self.statsController = .init()
self.filterState = .init()
self.facetListInteractor = .init()
self.facetListController = .init()
setupConnections()
}
func setupConnections() {
searchBoxInteractor.connectSearcher(searcher)
searchBoxInteractor.connectController(searchBoxController)
hitsInteractor.connectSearcher(searcher)
hitsInteractor.connectController(hitsController)
statsInteractor.connectSearcher(searcher)
statsInteractor.connectController(statsController)
searcher.connectFilterState(filterState)
facetListInteractor.connectSearcher(searcher, with: "manufacturer")
facetListInteractor.connectFilterState(filterState, with: "manufacturer", operator: .or)
facetListInteractor.connectController(facetListController, with: FacetListPresenter(sortBy: [.isRefined, .count(order: .descending)]))
}
}
```
In the `ContentView` add a new state flag `isPresentingFacets`, which defines if the facet list is presented.
```swift Swift icon=code theme={"system"}
@State private var isPresentingFacets = false
```
Then declare a function that constructs the button which triggers the appearance of the facet list by toggling the `isPresentingFacets` flag.
```swift Swift icon=code theme={"system"}
private func facetsButton() -> some View {
Button(action: {
isPresentingFacets.toggle()
},
label: {
Image(systemName: "line.horizontal.3.decrease.circle")
.font(.title)
})
}
```
Add the `FacetListObservableController` to the `ContentView` and a `facets` function constructing the facet list view.
```swift Swift icon=code theme={"system"}
@ObservedObject var facetListController: FacetListObservableController
@ViewBuilder
private func facets() -> some View {
NavigationView {
FacetList(facetListController) { facet, isSelected in
VStack {
FacetRow(facet: facet, isSelected: isSelected)
Divider()
}
} noResults: {
Text("No facet found")
.frame(maxWidth: .infinity, maxHeight: .infinity)
}
.navigationBarTitle("Brand")
}
}
```
The resulting `ContentView` code should look as follows:
```swift Swift icon=code theme={"system"}
struct ContentView: View {
@ObservedObject var searchBoxController: SearchBoxObservableController
@ObservedObject var hitsController: HitsObservableController
@ObservedObject var statsController: StatsTextObservableController
@ObservedObject var facetListController: FacetListObservableController
@State private var isEditing = false
@State private var isPresentingFacets = false
var body: some View {
VStack(spacing: 7) {
SearchBar(text: $searchBoxController.query,
isEditing: $isEditing,
onSubmit: searchBoxController.submit)
Text(statsController.stats)
.fontWeight(.medium)
HitsList(hitsController) { (hit, _) in
VStack(alignment: .leading, spacing: 10) {
Text(hit?.name ?? "")
.padding(.all, /*@START_MENU_TOKEN@*/10/*@END_MENU_TOKEN@*/)
Divider()
}
} noResults: {
Text("No Results")
.frame(maxWidth: .infinity, maxHeight: .infinity)
}
}
.navigationBarTitle("Algolia & SwiftUI")
.navigationBarItems(trailing: facetsButton())
.sheet(isPresented: $isPresentingFacets, content: facets)
}
@ViewBuilder
private func facets() -> some View {
NavigationView {
FacetList(facetListController) { facet, isSelected in
VStack {
FacetRow(facet: facet, isSelected: isSelected)
Divider()
}
} noResults: {
Text("No facet found")
.frame(maxWidth: .infinity, maxHeight: .infinity)
}
.navigationBarTitle("Brand")
}
}
private func facetsButton() -> some View {
Button(action: {
isPresentingFacets.toggle()
},
label: {
Image(systemName: "line.horizontal.3.decrease.circle")
.font(.title)
})
}
}
```
Complete the initializer of the `ContentView` with the `FacetListObservableController`.
```swift Swift icon=code theme={"system"}
struct ContentView_Previews: PreviewProvider {
static let algoliaController = AlgoliaController()
static var previews: some View {
NavigationView {
ContentView(searchBoxController: algoliaController.searchBoxController,
hitsController: algoliaController.hitsController,
statsController: algoliaController.statsController,
facetListController: algoliaController.facetListController)
}.onAppear {
algoliaController.searcher.search()
}
}
}
```
Update the live preview. Now you see a filter button on top right of your screen.
Click it to present the refinements list, select one or more refinements,
and then dismiss the refinements list by swiping it down to see the filtered result.
 ## Going further
Your users can enter a query, and your app shows them results as they type. It also provides a possibility to filter the results even further using `RefinementList`. This is a great start, but you can go even further and improve on that.
* Have a look at more [complex examples of apps built with InstantSearch](/doc/guides/building-search-ui/resources/demos/ios).
* Head to the InstantSearch [components page](/doc/api-reference/widgets/ios) to see other components that you could use.
## Going further
Your users can enter a query, and your app shows them results as they type. It also provides a possibility to filter the results even further using `RefinementList`. This is a great start, but you can go even further and improve on that.
* Have a look at more [complex examples of apps built with InstantSearch](/doc/guides/building-search-ui/resources/demos/ios).
* Head to the InstantSearch [components page](/doc/api-reference/widgets/ios) to see other components that you could use.