> ## Documentation Index
> Fetch the complete documentation index at: https://algolia.com/llms.txt
> Use this file to discover all available pages before exploring further.

# Get started with imperative UI

> Build an InstantSearch Android page from an empty Android project.

export const SearchQuery = () => <Tooltip tip="The text users enter into a search box. In the Search API, this corresponds to the query parameter. A search query is often used with filters, facets, and other parameters, but these aren't part of the query text itself.">
    search query
  </Tooltip>;

export const SearchRequest = () => <Tooltip tip="A search request is a single HTTP call to the Algolia Search API that can run one or more search operations. It can include multiple queries, for example, when querying several indices at once.">
    search request
  </Tooltip>;

export const Records = () => <Tooltip tip="A record is a searchable object in an Algolia index. Each record consists of named attributes." cta="Algolia records" href="/doc/guides/sending-and-managing-data/prepare-your-data#algolia-records">
    records
  </Tooltip>;

export const Filter = () => <Tooltip tip="A filter is a condition that limits which records Algolia returns. Filters often use one or more facet-value pairs, such as brand:Apple AND color:red. You can also filter by numeric values, dates, tags, booleans, or geographic constraints." cta="Filtering" href="/doc/guides/managing-results/refine-results/faceting">
    filter
  </Tooltip>;

export const Facet = () => <Tooltip tip="An attribute in your records that lets users filter or group results (for example, by color, brand, or price)." cta="Faceting" href="/doc/guides/managing-results/refine-results/faceting">
    facet
  </Tooltip>;

export const ApplicationID = () => <Tooltip tip="A unique alphanumeric string that identifies an Algolia application." cta="Application ID (dashboard)" href="https://dashboard.algolia.com/account/api-keys">
    application ID
  </Tooltip>;

export const APIKey = () => <Tooltip tip="An alphanumeric string that controls access to the Algolia APIs. It defines what actions are allowed, such as searching an index or adding new records." cta="API key" href="/doc/guides/security/api-keys">
    API key
  </Tooltip>;

export const Index = () => <Tooltip tip="An Algolia index is a searchable dataset that consists of records and configuration settings. These settings define how the records are searched and ranked.">
    index
  </Tooltip>;

<div className="not-prose algolia-flavor-switcher">
  <div className="afs-dropdown">
    <div className="afs-trigger" role="button" tabIndex="0" aria-haspopup="listbox">
      <span className="afs-current">Android</span>

      <svg className="afs-chevron lucide lucide-chevron-down" width="24" height="24" viewBox="0 0 24 24" fill="none" stroke="currentColor" strokeWidth="2" strokeLinecap="round" strokeLinejoin="round" aria-hidden="true">
        <path d="m6 9 6 6 6-6" />
      </svg>
    </div>

    <ul className="afs-menu" role="listbox">
      <li role="option" aria-selected="false"><a className="afs-option" href="/doc/guides/building-search-ui/getting-started/how-to/programmatically/ios"><span className="afs-option-name">iOS</span><span className="afs-option-lib">InstantSearch iOS</span></a></li>
      <li role="option" aria-selected="true"><a className="afs-option is-current" href="/doc/guides/building-search-ui/getting-started/how-to/programmatically/android"><span className="afs-option-name">Android</span><span className="afs-option-lib">InstantSearch Android</span></a></li>
    </ul>
  </div>
</div>

This guide walks you through the steps needed to create a full InstantSearch Android experience from scratch.

This guide walks you through the steps needed to create a full InstantSearch Android experience from scratch.

It includes:

* A search box for users to type queries
* A list to display search results
* A <Facet /> list to <Filter /> results
* Statistics about the search

## Before you begin

To use InstantSearch, you need an Algolia account.
[Sign up](https://dashboard.algolia.com/users/sign_up) for a new account or use the following credentials
(which include a pre-loaded dataset of products appropriate for this guide):

* <ApplicationID />: `latency`
* Search <APIKey />: `1f6fd3a6fb973cb08419fe7d288fa4db`

- <Index /> name: `instant_search`

### Create a new project and add InstantSearch Android

In Android Studio, create a new Project:

* On the Target screen, select **Phone and Tablet**
* On the Add an Activity screen, select **Empty Activity**

In your app's `build.gradle`, add the following dependency:

```groovy build.gradle icon=braces theme={"system"}
implementation 'com.algolia:instantsearch-android:4.+'
implementation 'com.algolia:instantsearch-android-paging3:4.+'
```

This guide uses InstantSearch Android with [Android Architecture Components](https://developer.android.com/topic/libraries/architecture), so you also need to add the following dependencies:

```groovy build.gradle icon=braces theme={"system"}
implementation 'androidx.lifecycle:lifecycle-viewmodel-ktx:2.+'
implementation 'androidx.lifecycle:lifecycle-livedata-ktx:2.+'
```

To perform network operations in your app, `AndroidManifest.xml` must include the following permissions:

```xml XML icon=code-xml theme={"system"}
<uses-permission android:name="android.permission.INTERNET" />
```

Setup [`kotlinx.serialization`](https://github.com/Kotlin/kotlinx.serialization#setup) by adding the serialization plugin to your `build.gradle`:

```groovy build.gradle icon=braces theme={"system"}
plugins {
  // ...
  id 'org.jetbrains.kotlin.plugin.serialization' version '2.2.0'
}
```

## Implementation

### Architecture overview

* `MainActivity`: This activity controls the displayed fragment.
* `MyViewModel`: A `ViewModel` from Android Architecture Components. The business logic lives here.
* `ProductFragment`: This fragment displays a list of search results in a `RecyclerView`, a `SearchView` input, and a `Stats` indicator.
* `FacetFragment`: This fragment displays a list of facets to filter your search results.

### Initialize a searcher

The central part of your search experience is the `Searcher`.
The `Searcher` performs a <SearchRequest /> and obtains search results.
Most InstantSearch components connected to the `Searcher`.

In this guide, you'll only target one index, so instantiate a `HitsSearcher` with the proper credentials.

Go to `MyViewModel.kt` file and add the following code:

```kotlin Kotlin icon=code theme={"system"}
class MyViewModel : ViewModel() {

    val searcher = HitsSearcher(
        applicationID = "latency",
        apiKey = "1f6fd3a6fb973cb08419fe7d288fa4db",
        indexName = "instant_search"
    )

    override fun onCleared() {
        super.onCleared()
        searcher.cancel()
    }
}
```

A `ViewModel` is a good place to put your data sources. This way, the data persists during orientation changes and you can share it across multiple fragments.

### Display results: `Hits`

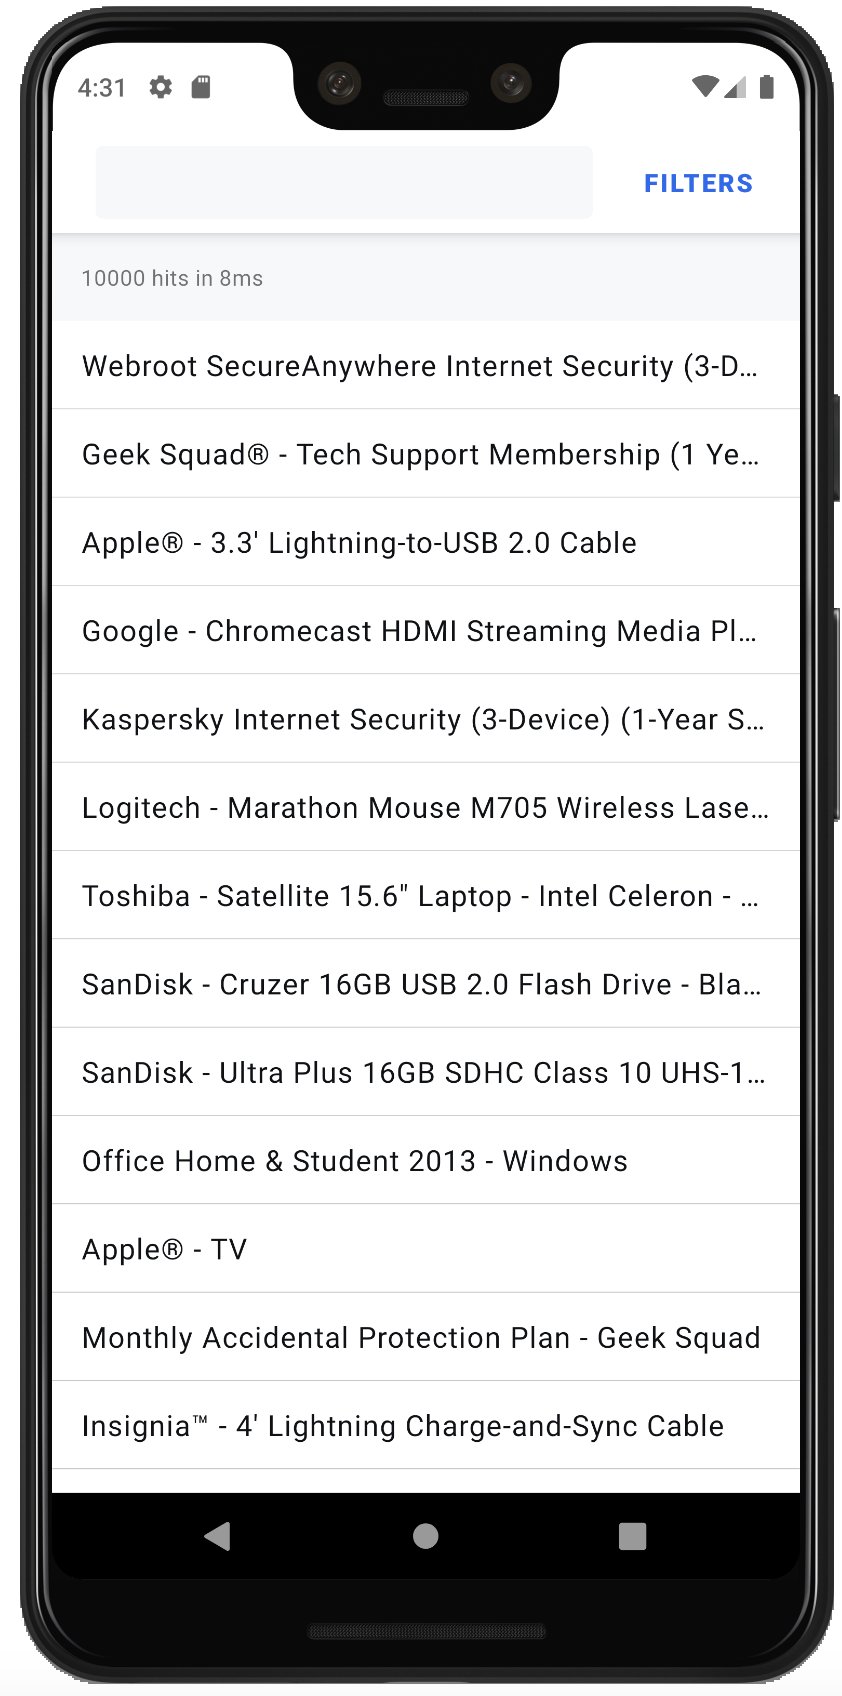
Suppose you want to display search results in a `RecyclerView`.
To simultaneously provide a good user experience and display thousands of products,
you can implement an infinite scrolling mechanism using the [Paging Library](https://developer.android.com/topic/libraries/architecture/paging) from Android Architecture Component.

<img src="https://mintcdn.com/algolia/BaxS3Doxn613Z9Q0/doc/guides/building-search-ui/getting-started/how-to/programmatically/product.png?fit=max&auto=format&n=BaxS3Doxn613Z9Q0&q=85&s=4aa831a3df9e1f4580184bbcb4c6797f" alt="Screenshot of a mobile app showing search results under 'Hits,' listing items like 'Webroot SecureAnywhere' and 'Apple® - 3.3' Lightning-to-USB 2.0 Cable' with a 'FILTERS' button." style={{maxWidth:"300px"}} className="no-shadow" width="842" height="1696" data-path="doc/guides/building-search-ui/getting-started/how-to/programmatically/product.png" />

To display your results:

<Steps>
  <Step title="Create the data source">
    Create a `LiveData` object, which holds a `PagedList` of `Product`.
    Create the `Product` data class which contains a single `name` field.

    ```kotlin Kotlin icon=code theme={"system"}
    @Serializable
    data class Product(
        val name: String
    )
    ```
  </Step>

  <Step title="Define the item layout">
    Create the `product_item.xml` file.

    ```xml XML icon=code-xml theme={"system"}
    <com.google.android.material.card.MaterialCardView
        xmlns:android="http://schemas.android.com/apk/res/android"
        xmlns:app="http://schemas.android.com/apk/res-auto"
        xmlns:tools="http://schemas.android.com/tools"
        android:layout_width="match_parent"
        android:layout_height="?attr/listPreferredItemHeightSmall"
        android:layout_marginBottom="0.5dp"
        app:cardCornerRadius="0dp"
        tools:layout_height="50dp">

        <TextView
            android:id="@+id/productName"
            android:layout_width="wrap_content"
            android:layout_height="wrap_content"
            android:layout_gravity="center_vertical"
            android:layout_marginStart="16dp"
            android:layout_marginEnd="16dp"
            android:ellipsize="end"
            android:maxLines="1"
            android:textAppearance="?attr/textAppearanceBody1"
            android:textSize="16sp"
            tools:text="@tools:sample/lorem/random" />

    </com.google.android.material.card.MaterialCardView>
    ```
  </Step>

  <Step title="Implement a ViewHolder">
    Create the `ProductViewHolder` to bind a `Product` item to a `RecyclerView.ViewHolder`.

    ```kotlin Kotlin icon=code theme={"system"}
    class ProductViewHolder(view: View) : RecyclerView.ViewHolder(view) {

        private val itemName = view.findViewById<TextView>(R.id.itemName)

        fun bind(product: Product) {
            itemName.text = product.name
        }
    }
    ```
  </Step>

  <Step title="Create an adapter">
    Create a `ProductAdapter` by extending `PagingDataAdapter`. The `ProductAdapter` binds products to the `ViewHolder`.

    ```kotlin Kotlin icon=code theme={"system"}
    class ProductAdapter : PagingDataAdapter<Product, ProductViewHolder>(ProductDiffUtil) {

        override fun onCreateViewHolder(parent: ViewGroup, viewType: Int): ProductViewHolder {
            return ProductViewHolder(parent.inflate(R.layout.list_item_small))
        }

        override fun onBindViewHolder(holder: ProductViewHolder, position: Int) {
            getItem(position)?.let { holder.bind(it) }
        }

        object ProductDiffUtil : DiffUtil.ItemCallback<Product>() {
            override fun areItemsTheSame(oldItem: Product, newItem: Product) = oldItem.objectID == newItem.objectID
            override fun areContentsTheSame(oldItem: Product, newItem: Product) = oldItem == newItem
        }
    }
    ```
  </Step>

  <Step title="Connect the searcher and paginator">
    In your `ViewModel` use a `Paginator` with your searcher:

    ```kotlin Kotlin icon=code theme={"system"}
    class MyViewModel : ViewModel() {

        // Searcher initialization
        // ...
        val paginator = Paginator(
            searcher = searcher,
            pagingConfig = PagingConfig(pageSize = 50, enablePlaceholders = false),
            transformer = { hit -> hit.deserialize(Product.serializer()) }
        )

        override fun onCleared() {
            super.onCleared()
            searcher.cancel()
        }
    }
    ```
  </Step>

  <Step title="Create the fragment layoutr">
    Now that your `ViewModel` has some data, you can create a simple `product_fragment.xml` with a `Toolbar` and a `RecyclerView` to display the products:

    ```xml XML icon=code theme={"system"}
    <?xml version="1.0" encoding="utf-8"?>
    <androidx.constraintlayout.widget.ConstraintLayout
        xmlns:android="http://schemas.android.com/apk/res/android"
        xmlns:app="http://schemas.android.com/apk/res-auto"
        android:layout_width="match_parent"
        android:layout_height="match_parent">

        <androidx.appcompat.widget.Toolbar
            android:id="@+id/toolbar"
            app:layout_constraintTop_toTopOf="parent"
            android:layout_width="0dp"
            app:layout_constraintEnd_toEndOf="parent"
            app:layout_constraintStart_toStartOf="parent"
            android:layout_height="?attr/actionBarSize"/>

        <androidx.recyclerview.widget.RecyclerView
            android:id="@+id/productList"
            app:layout_constraintTop_toBottomOf="@id/toolbar"
            app:layout_constraintEnd_toEndOf="parent"
            app:layout_constraintStart_toStartOf="parent"
            app:layout_constraintBottom_toBottomOf="parent"
            android:layout_width="0dp"
            android:layout_height="0dp"
            tools:listitem="@layout/product_item"/>

    </androidx.constraintlayout.widget.ConstraintLayout>
    ```
  </Step>

  <Step title="Observe and display results">
    In the `ProductFragment`, get a reference of `MyViewModel` using `activityViewModels()`.
    Then, observe the `LiveData` to update the `ProductAdapter` on every new page of products.
    Finally, configure the `RecyclerView` by setting its adapter and `LayoutManager`.

    ```kotlin Kotlin icon=code theme={"system"}
    class ProductFragment : Fragment(R.layout.fragment_product) {

        private val viewModel: MyViewModel by activityViewModels()
        private val connection = ConnectionHandler()

        override fun onViewCreated(view: View, savedInstanceState: Bundle?) {
            super.onViewCreated(view, savedInstanceState)

            val adapterProduct = ProductAdapter()
            viewModel.paginator.liveData.observe(viewLifecycleOwner) { pagingData ->
                adapterProduct.submitData(lifecycle, pagingData)
            }
            view.findViewById<RecyclerView>(R.id.productList).let {
                it.itemAnimator = null
                it.adapter = adapterProduct
                it.layoutManager = LinearLayoutManager(requireContext())
                it.autoScrollToStart(adapterProduct)
            }
        }

        override fun onDestroyView() {
            super.onDestroyView()
            connection.clear()
        }
    }
    ```

    To display the `ProductFragment`, update `activity_main.xml` to have a container for the fragments:

    ```xml XML icon=code theme={"system"}
    <?xml version="1.0" encoding="utf-8"?>
    <androidx.fragment.app.FragmentContainerView xmlns:android="http://schemas.android.com/apk/res/android"
        android:id="@+id/container"
        android:layout_width="match_parent"
        android:layout_height="match_parent" />
    ```

    Update `MainActivity` to display `ProductFragment`:

    ```kotlin Kotlin icon=code theme={"system"}
    class MainActivity : AppCompatActivity() {

        override fun onCreate(savedInstanceState: Bundle?) {
            super.onCreate(savedInstanceState)
            setContentView(R.layout.activity_main)
            showProductFragment()
        }

        fun showProductFragment() {
            supportFragmentManager.commit {
                replace<ProductFragment>(R.id.container)
            }
        }
    }
    ```

    You have now learned how to display search results in an infinite scrolling `RecyclerView`.
  </Step>
</Steps>

### Searching your data: `SearchBox`

To search your data, users need an input field. Any change in this field should trigger a new request, and then update the search results.

To achieve this, use a `SearchBoxConnector`. This takes a `Searcher` and connected to `Pagiantor` using `connectPaginator`.

```kotlin Kotlin icon=code theme={"system"}
class MyViewModel : ViewModel() {

    // Searcher initialization
    // Hits initialization
    // ...

    val searchBox = SearchBoxConnector(searcher)
    val connection = ConnectionHandler(searchBox)

    init {
        connection += searchBox.connectPaginator(paginator)
    }

    override fun onCleared() {
        super.onCleared()
        searcher.cancel()
        connection.clear()
    }
}
```

<Warning>
  Most InstantSearch components should be connected and disconnected in accordance to the [Android Lifecycle](https://developer.android.com/topic/libraries/architecture/lifecycle) to avoid memory leaks.
  A `ConnectionHandler` handles a set of `Connection` s for you: Each `+=` call with a component implementing the `Connection` interface will connect it and make it active. Whenever you want to free resources or deactivate a component, call the `disconnect` method.
</Warning>

You can now add a `SearchView` in your `Toolbar`:

```xml XML icon=code-xml theme={"system"}
<?xml version="1.0" encoding="utf-8"?>
<androidx.constraintlayout.widget.ConstraintLayout
    xmlns:android="http://schemas.android.com/apk/res/android"
    xmlns:app="http://schemas.android.com/apk/res-auto"
    android:layout_width="match_parent"
    android:layout_height="match_parent">

    <androidx.appcompat.widget.Toolbar
        android:id="@+id/toolbar"
        android:layout_width="0dp"
        android:layout_height="?attr/actionBarSize"
        app:layout_constraintEnd_toEndOf="parent"
        app:layout_constraintStart_toStartOf="parent"
        app:layout_constraintTop_toTopOf="parent">

        <androidx.constraintlayout.widget.ConstraintLayout
            android:layout_width="match_parent"
            android:layout_height="match_parent"
            android:clipChildren="false"
            android:clipToPadding="false">

            <androidx.appcompat.widget.SearchView
                android:id="@+id/searchView"
                android:layout_width="0dp"
                android:layout_height="0dp"
                android:focusable="false"
                app:iconifiedByDefault="false"
                app:layout_constraintBottom_toBottomOf="parent"
                app:layout_constraintEnd_toEndOf="parent"
                app:layout_constraintStart_toStartOf="parent"
                app:layout_constraintTop_toTopOf="parent" />

        </androidx.constraintlayout.widget.ConstraintLayout>

    </androidx.appcompat.widget.Toolbar>

    <androidx.recyclerview.widget.RecyclerView
        android:id="@+id/productList"
        android:layout_width="0dp"
        android:layout_height="0dp"
        app:layout_constraintBottom_toBottomOf="parent"
        app:layout_constraintEnd_toEndOf="parent"
        app:layout_constraintStart_toStartOf="parent"
        app:layout_constraintTop_toBottomOf="@id/toolbar"
        tools:listitem="@layout/product_item" />

</androidx.constraintlayout.widget.ConstraintLayout>
```

Connect the `SearchBoxViewAppCompat` to the `SearchBoxConnectorPagedList` stored in `MyViewModel` using a new `ConnectionHandler` that conforms to the `ProductFragment` lifecycle:

```kotlin Kotlin icon=code theme={"system"}
class ProductFragment : Fragment(R.layout.fragment_product) {

    private val viewModel: MyViewModel by activityViewModels()
    private val connection = ConnectionHandler()

    override fun onViewCreated(view: View, savedInstanceState: Bundle?) {
        super.onViewCreated(view, savedInstanceState)

        // Hits
        // ...

        val searchBoxView = SearchBoxViewAppCompat(searchView)
        connection += viewModel.searchBox.connectView(searchBoxView)
    }

    override fun onDestroyView() {
        super.onDestroyView()
        connection.clear()
    }
}
```

You can now build and run your app, and see a basic search experience. The results change with each key stroke.

### Displaying metadata: `Stats`

It's a good practice to show the number of hits that were returned for a search. You can use the `Stats` components to do this with minimal code.

Add a `StatsConnector` to your `MyViewModel`, and connect it with a `ConnectionHandler`.

```kotlin Kotlin icon=code theme={"system"}
class MyViewModel : ViewModel() {

    // Searcher initialization
    // Hits initialization
    // SearchBox initialization
    // ...

    val stats = StatsConnector(searcher)

    val connection = ConnectionHandler(searchBox, stats)

    override fun onCleared() {
        super.onCleared()
        searcher.cancel()
        connection.clear()
    }
}
```

Add a `TextView` to your `product_fragment.xml` file to display the stats.

```xml XML icon=code-xml theme={"system"}
<?xml version="1.0" encoding="utf-8"?>
<androidx.constraintlayout.widget.ConstraintLayout
    xmlns:android="http://schemas.android.com/apk/res/android"
    xmlns:app="http://schemas.android.com/apk/res-auto"
    xmlns:tools="http://schemas.android.com/tools"
    android:layout_width="match_parent"
    android:layout_height="match_parent">

    <androidx.appcompat.widget.Toolbar
        android:id="@+id/toolbar"
        android:layout_width="0dp"
        android:layout_height="?attr/actionBarSize"
        app:layout_constraintEnd_toEndOf="parent"
        app:layout_constraintStart_toStartOf="parent"
        app:layout_constraintTop_toTopOf="parent">

        <androidx.constraintlayout.widget.ConstraintLayout
            android:layout_width="match_parent"
            android:layout_height="match_parent"
            android:clipChildren="false"
            android:clipToPadding="false">

            <androidx.appcompat.widget.SearchView
                android:id="@+id/searchView"
                android:layout_width="0dp"
                android:layout_height="0dp"
                android:focusable="false"
                app:iconifiedByDefault="false"
                app:layout_constraintBottom_toBottomOf="parent"
                app:layout_constraintEnd_toEndOf="parent"
                app:layout_constraintStart_toStartOf="parent"
                app:layout_constraintTop_toTopOf="parent" />

        </androidx.constraintlayout.widget.ConstraintLayout>

    </androidx.appcompat.widget.Toolbar>

    <TextView
        android:id="@+id/stats"
        android:layout_width="0dp"
        android:layout_height="wrap_content"
        android:padding="16dp"
        android:textAppearance="@style/TextAppearance.MaterialComponents.Caption"
        app:layout_constraintEnd_toEndOf="parent"
        app:layout_constraintStart_toStartOf="parent"
        app:layout_constraintTop_toBottomOf="@+id/toolbar" />

    <androidx.recyclerview.widget.RecyclerView
        android:id="@+id/productList"
        android:layout_width="0dp"
        android:layout_height="0dp"
        app:layout_constraintBottom_toBottomOf="parent"
        app:layout_constraintEnd_toEndOf="parent"
        app:layout_constraintStart_toStartOf="parent"
        app:layout_constraintTop_toBottomOf="@id/stats"
        tools:listitem="@layout/product_item" />

</androidx.constraintlayout.widget.ConstraintLayout>
```

Next, connect the `StatsConnector` to a `StatsTextView` in your `ProductFragment`.

```kotlin Kotlin icon=code theme={"system"}
class ProductFragment : Fragment(R.layout.fragment_product) {

    private val viewModel: MyViewModel by activityViewModels()
    private val connection = ConnectionHandler()

    override fun onViewCreated(view: View, savedInstanceState: Bundle?) {
        super.onViewCreated(view, savedInstanceState)

        // Hits
        // SearchBox
        // ...

        val statsView = StatsTextView(view.findViewById(R.id.stats))
        connection += viewModel.stats.connectView(statsView, DefaultStatsPresenter())
    }

    override fun onDestroyView() {
        super.onDestroyView()
        connection.clear()
    }
}
```

You can now build and run your app and see your new search experience in action.

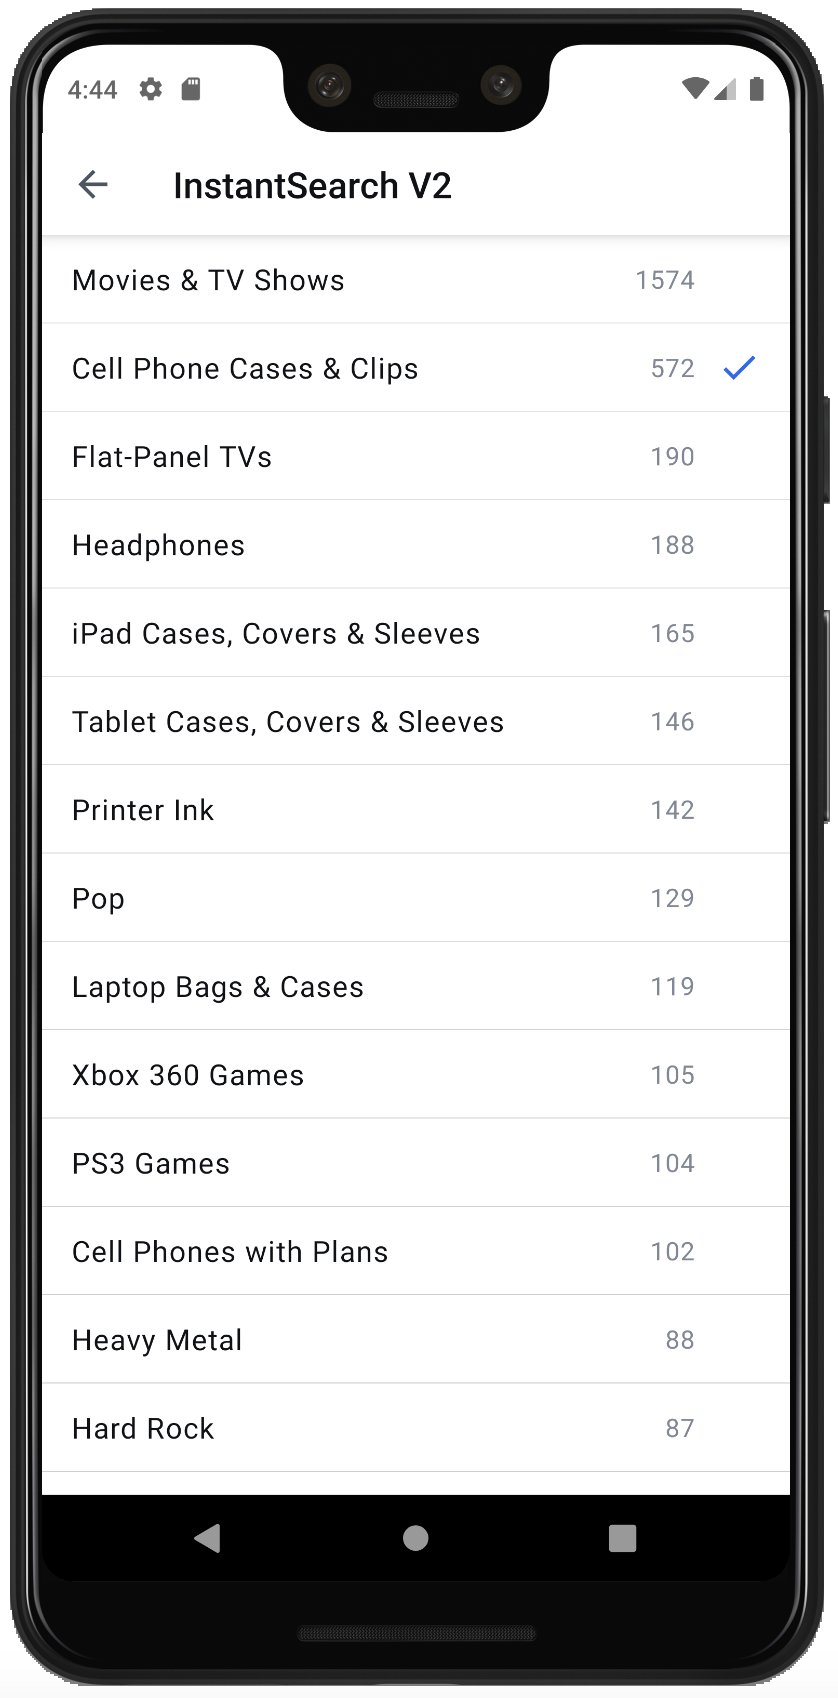
### Filter your data: `FacetList`

<img src="https://mintcdn.com/algolia/BaxS3Doxn613Z9Q0/doc/guides/building-search-ui/getting-started/how-to/programmatically/facet.png?fit=max&auto=format&n=BaxS3Doxn613Z9Q0&q=85&s=0683fea8c48e7d4670aef35339eb6b57" alt="Screenshot of a mobile interface showing a list of categories with counts, where 'Cell Phone Cases and Clips' is selected with a checkmark." style={{maxWidth:"300px"}} className="no-shadow" width="838" height="1698" data-path="doc/guides/building-search-ui/getting-started/how-to/programmatically/facet.png" />

Filtering search results helps your users find what they want. You can create a `FacetList` to filter products by category.

Create a drawable resource `ic_check.xml`. This resource displays checked filters.

```xml XML icon=code-xml theme={"system"}
<?xml version="1.0" encoding="utf-8"?>
<vector xmlns:android="http://schemas.android.com/apk/res/android"
    android:width="24dp"
    android:height="24dp"
    android:viewportWidth="24.0"
    android:viewportHeight="24.0">
    <path
        android:fillColor="#FF000000"
        android:pathData="M9,16.17L4.83,12l-1.42,1.41L9,19 21,7l-1.41,-1.41z"/>
</vector>
```

Create a `facet_item.xml` file. This is the layout for a `RecyclerView.ViewHolder`.

```xml XML icon=code-xml theme={"system"}
<com.google.android.material.card.MaterialCardView
    xmlns:android="http://schemas.android.com/apk/res/android"
    xmlns:app="http://schemas.android.com/apk/res-auto"
    xmlns:tools="http://schemas.android.com/tools"
    android:layout_width="match_parent"
    android:layout_height="?attr/listPreferredItemHeightSmall"
    android:layout_marginBottom="0.5dp"
    app:cardCornerRadius="0dp"
    tools:layout_height="50dp">

    <androidx.constraintlayout.widget.ConstraintLayout
        android:layout_width="match_parent"
        android:layout_height="match_parent">

        <ImageView
            android:id="@+id/icon"
            android:layout_width="wrap_content"
            android:layout_height="wrap_content"
            android:layout_marginEnd="12dp"
            android:src="@drawable/ic_check"
            android:tint="?attr/colorPrimary"
            android:visibility="invisible"
            app:layout_constrainedHeight="true"
            app:layout_constrainedWidth="true"
            app:layout_constraintBottom_toBottomOf="parent"
            app:layout_constraintEnd_toEndOf="parent"
            app:layout_constraintTop_toTopOf="parent"
            tools:visibility="visible" />

        <TextView
            android:id="@+id/facetCount"
            android:layout_width="wrap_content"
            android:layout_height="wrap_content"
            android:layout_marginEnd="8dp"
            android:ellipsize="end"
            android:gravity="end"
            android:maxLines="1"
            android:textAppearance="?attr/textAppearanceBody2"
            android:textColor="#818794"
            android:textSize="16sp"
            android:visibility="gone"
            app:layout_constrainedHeight="true"
            app:layout_constrainedWidth="true"
            app:layout_constraintBottom_toBottomOf="parent"
            app:layout_constraintEnd_toStartOf="@id/icon"
            app:layout_constraintTop_toTopOf="parent"
            tools:text="@tools:sample/lorem"
            tools:visibility="visible" />

        <TextView
            android:id="@+id/facetName"
            android:layout_width="0dp"
            android:layout_height="wrap_content"
            android:layout_marginStart="16dp"
            android:layout_marginEnd="16dp"
            android:ellipsize="end"
            android:maxLines="1"
            android:textAppearance="?attr/textAppearanceBody1"
            android:textSize="16sp"
            app:layout_constraintBottom_toBottomOf="parent"
            app:layout_constraintEnd_toStartOf="@id/facetCount"
            app:layout_constraintStart_toStartOf="parent"
            app:layout_constraintTop_toTopOf="parent"
            tools:text="@tools:sample/lorem/random" />

    </androidx.constraintlayout.widget.ConstraintLayout>

</com.google.android.material.card.MaterialCardView>
```

Implement the `FacetListViewHolder` and its `Factory`, so that later on it works with a `FacetListAdapter`.

```kotlin Kotlin icon=code theme={"system"}
import com.algolia.client.model.search.FacetHits

class MyFacetListViewHolder(view: View) : FacetListViewHolder(view) {

    override fun bind(facet: FacetHits, selected: Boolean, onClickListener: View.OnClickListener) {
        view.setOnClickListener(onClickListener)
        val facetCount = view.findViewById<TextView>(R.id.facetCount)
        facetCount.text = facet.count.toString()
        facetCount.visibility = View.VISIBLE
        view.findViewById<ImageView>(R.id.icon).visibility = if (selected) View.VISIBLE else View.INVISIBLE
        view.findViewById<TextView>(R.id.facetName).text = facet.value
    }

    object Factory : FacetListViewHolder.Factory {

        override fun createViewHolder(parent: ViewGroup): FacetListViewHolder {
            return MyFacetListViewHolder(parent.inflate(R.layout.list_facet_selectable))
        }
    }
}
```

You can use a new component to handle the filtering logic: the [`FilterState`](/doc/api-reference/widgets/filter-state/android).

Pass the `FilterState` to your `FacetListConnector`. The `FacetListConnector` needs an attribute: you should use `"categories"`.
Inject `MyFacetListViewHolder.Factory` into your `FacetListAdapter`. The `FacetListAdapter` is an out of the box `RecyclerView.Adapter` for a `FacetList`.

Connect the different parts together:

* The `Searcher` connects itself to the `FilterState`, and applies its filters with every search.
* The `FilterState` connects to your products `Paginator` to invalidate search results when new filter are applied.
* The `facetList` connects to its adapter.

```kotlin Kotlin icon=code theme={"system"}
class MyViewModel : ViewModel() {

    // Client, Searcher...
    // Products
    // Stats
    // ...

    val filterState = FilterState()
    val facetList = FacetListConnector(
        searcher = searcher,
        filterState = filterState,
        attribute = "categories",
        selectionMode = SelectionMode.Single
    )
    val facetPresenter = DefaultFacetListPresenter(
        sortBy = listOf(FacetSortCriterion.CountDescending, FacetSortCriterion.IsRefined),
        limit = 100
    )
    val connection = ConnectionHandler(searchBox, stats, facetList)

    init {
        // SearchBox
        // ..

        connection += searcher.connectFilterState(filterState)
        connection += filterState.connectPaginator(paginator)
    }

    override fun onCleared() {
        super.onCleared()
        searcher.cancel()
        connection.clear()
    }
}
```

To display your facets, create a `facet_fragment.xml` layout with a `RecyclerView`.

```xml XML icon=code-xml theme={"system"}
<?xml version="1.0" encoding="utf-8"?>
<androidx.constraintlayout.widget.ConstraintLayout xmlns:android="http://schemas.android.com/apk/res/android"
    xmlns:app="http://schemas.android.com/apk/res-auto"
    android:layout_width="match_parent"
    android:layout_height="match_parent"
    xmlns:tools="http://schemas.android.com/tools">

    <androidx.appcompat.widget.Toolbar
        android:id="@+id/toolbar"
        app:layout_constraintTop_toTopOf="parent"
        android:layout_width="0dp"
        app:layout_constraintEnd_toEndOf="parent"
        app:layout_constraintStart_toStartOf="parent"
        android:layout_height="?attr/actionBarSize"/>

    <androidx.recyclerview.widget.RecyclerView
        android:id="@+id/facetList"
        android:background="#FFFFFF"
        app:layout_constraintTop_toBottomOf="@id/toolbar"
        app:layout_constraintEnd_toEndOf="parent"
        app:layout_constraintStart_toStartOf="parent"
        app:layout_constraintBottom_toBottomOf="parent"
        android:layout_width="0dp"
        android:layout_height="0dp"
        tools:listitem="@layout/facet_item"/>

</androidx.constraintlayout.widget.ConstraintLayout>
```

Create a `FacetFragment` and configure your `RecyclerView` with its adapter and `LayoutManager`.

```kotlin Kotlin icon=code theme={"system"}
class FacetFragment : Fragment(R.layout.fragment_facet) {

    private val viewModel: MyViewModel by activityViewModels()
    private val connection = ConnectionHandler()

    override fun onViewCreated(view: View, savedInstanceState: Bundle?) {
        super.onViewCreated(view, savedInstanceState)

        val adapterFacet = FacetListAdapter(MyFacetListViewHolder.Factory)
        val facetList = view.findViewById<RecyclerView>(R.id.facetList)
        connection += viewModel.facetList.connectView(adapterFacet, viewModel.facetPresenter)

        facetList.let {
            it.adapter = adapterFacet
            it.layoutManager = LinearLayoutManager(requireContext())
            it.autoScrollToStart(adapterFacet)
        }
    }

    override fun onDestroyView() {
        super.onDestroyView()
        connection.clear()
    }
}
```

Add the code to switch to `FacetFragment` in `MainActivity` with "navigation up" support.

```kotlin Kotlin icon=code theme={"system"}
class MainActivity : AppCompatActivity() {

    val viewModel: MyViewModel by viewModels()

    override fun onCreate(savedInstanceState: Bundle?) {
        super.onCreate(savedInstanceState)
        setContentView(R.layout.activity_getting_started)
        showProductFragment()
    }

    private fun showFacetFragment() {
        supportFragmentManager.commit {
            add<FacetFragment>(R.id.container)
            addToBackStack("facet")
        }
    }

    private fun showProductFragment() {
        supportFragmentManager.commit {
            replace<ProductFragment>(R.id.container)
        }
    }

    override fun onSupportNavigateUp(): Boolean {
        if (supportFragmentManager.popBackStackImmediate()) return true
        return super.onSupportNavigateUp()
    }
}
```

Add a filters button in `product_fragment.xml`

```xml XML icon=code-xml theme={"system"}
<?xml version="1.0" encoding="utf-8"?>
<androidx.constraintlayout.widget.ConstraintLayout xmlns:android="http://schemas.android.com/apk/res/android"
    xmlns:app="http://schemas.android.com/apk/res-auto"
    xmlns:tools="http://schemas.android.com/tools"
    android:layout_width="match_parent"
    android:layout_height="match_parent">

    <androidx.appcompat.widget.Toolbar
        android:id="@+id/toolbar"
        android:layout_width="0dp"
        android:layout_height="?attr/actionBarSize"
        app:layout_constraintEnd_toEndOf="parent"
        app:layout_constraintStart_toStartOf="parent"
        app:layout_constraintTop_toTopOf="parent">

        <androidx.constraintlayout.widget.ConstraintLayout
            android:layout_width="match_parent"
            android:layout_height="match_parent"
            android:clipChildren="false"
            android:clipToPadding="false">

            <com.google.android.material.button.MaterialButton
                android:id="@+id/filters"
                style="@style/Widget.MaterialComponents.Button.TextButton"
                android:layout_width="wrap_content"
                android:layout_height="wrap_content"
                android:layout_marginStart="6dp"
                android:layout_marginEnd="12dp"
                android:text="Filters"
                android:textAppearance="@style/TextAppearance.MaterialComponents.Button"
                app:layout_constraintBottom_toBottomOf="parent"
                app:layout_constraintEnd_toEndOf="parent"
                app:layout_constraintStart_toEndOf="@id/searchView"
                app:layout_constraintTop_toTopOf="parent" />

            <androidx.appcompat.widget.SearchView
                android:id="@+id/searchView"
                android:layout_width="0dp"
                android:layout_height="0dp"
                android:focusable="false"
                app:iconifiedByDefault="false"
                app:layout_constraintBottom_toBottomOf="parent"
                app:layout_constraintEnd_toStartOf="@id/filters"
                app:layout_constraintStart_toStartOf="parent"
                app:layout_constraintTop_toTopOf="parent" />

        </androidx.constraintlayout.widget.ConstraintLayout>

    </androidx.appcompat.widget.Toolbar>

    <TextView
        android:id="@+id/stats"
        android:layout_width="0dp"
        android:layout_height="wrap_content"
        android:padding="16dp"
        android:textAppearance="@style/TextAppearance.MaterialComponents.Caption"
        app:layout_constraintEnd_toEndOf="parent"
        app:layout_constraintStart_toStartOf="parent"
        app:layout_constraintTop_toBottomOf="@+id/toolbar" />

    <androidx.recyclerview.widget.RecyclerView
        android:id="@+id/productList"
        android:layout_width="0dp"
        android:layout_height="0dp"
        app:layout_constraintBottom_toBottomOf="parent"
        app:layout_constraintEnd_toEndOf="parent"
        app:layout_constraintStart_toStartOf="parent"
        app:layout_constraintTop_toBottomOf="@id/stats"
        tools:listitem="@layout/product_item" />

</androidx.constraintlayout.widget.ConstraintLayout>
```

Add `displayFilters` and `navigateToFilters()` to `MyViewModel` to trigger filters display:

```kotlin Kotlin icon=code theme={"system"}
class MyViewModel : ViewModel() {

    // Client, Searcher...
    // Products
    // Stats
    // FilterState
    // ...

    private val _displayFilters = MutableLiveData<Unit>()
    val displayFilters: LiveData<Unit> get() = _displayFilters

    fun navigateToFilters() {
        _displayFilters.value = Unit
    }

    override fun onCleared() {
        super.onCleared()
        searcher.cancel()
        connection.clear()
    }
}
```

In `ProductFragment`, add a listener to the filters button to switch to `FacetFragment`:

```kotlin Kotlin icon=code theme={"system"}
class ProductFragment : Fragment() {

    private val connection = ConnectionHandler()

    override fun onCreateView(inflater: LayoutInflater, container: ViewGroup?, savedInstanceState: Bundle?): View? {
        return inflater.inflate(R.layout.product_fragment, container, false)
    }

    override fun onViewCreated(view: View, savedInstanceState: Bundle?) {
        super.onViewCreated(view, savedInstanceState)
        val viewModel = ViewModelProvider(requireActivity())[MyViewModel::class.java]

        // Hits
        // SearchBox
        // Stats
        // ...

        view.findViewById<Button>(R.id.filters).setOnClickListener {
            viewModel.navigateToFilters()
        }
    }

    override fun onDestroyView() {
        super.onDestroyView()
        connection.clear()
    }
}
```

Add navigation setup to display `FacetFragment`:

```kotlin Kotlin icon=code theme={"system"}
class MainActivity : AppCompatActivity() {

    val viewModel: MyViewModel by viewModels()

    override fun onCreate(savedInstanceState: Bundle?) {
        super.onCreate(savedInstanceState)
        setContentView(R.layout.activity_getting_started)
        showProductFragment()
        setupNavigation()
    }

    private fun showProductFragment() {
        supportFragmentManager.commit {
            replace<ProductFragment>(R.id.container)
        }
    }

    private fun setupNavigation() {
        viewModel.displayFilters.observe(this) {
            showFacetFragment()
        }
    }

    private fun showFacetFragment() {
        supportFragmentManager.commit {
            add<FacetFragment>(R.id.container)
            addToBackStack("facet")
        }
    }

    override fun onSupportNavigateUp(): Boolean {
        if (supportFragmentManager.popBackStackImmediate()) return true
        return super.onSupportNavigateUp()
    }
}
```

You can now build and run your app to see your advanced search experience.
This experience helps your users to filter search results and find what they're looking for.

### Improving the user experience: `Highlighting`

[Highlighting](/doc/guides/building-search-ui/ui-and-ux-patterns/highlighting-snippeting/js#highlighting) enhances the user experience by putting emphasis on the parts of the result that match the <SearchQuery />.
It's a visual indication of *why* a result is relevant to the query.

You can add highlighting by implementing the `Highlightable` interface on `Product`.
Define a `highlightedName` field to retrieve the highlighted value for the `name` attribute.

```kotlin Kotlin icon=code theme={"system"}
@Serializable
data class Product(
    val name: String,
    override val _highlightResult: JsonObject?
) : Highlightable {

    public val highlightedName: HighlightedString?
        get() = getHighlight("name")
}
```

Use the `.toSpannedString()` extension function to convert an `HighlightedString` into a `SpannedString` that can be assigned to a `TextView` to display the highlighted names.

```kotlin Kotlin icon=code theme={"system"}
class ProductViewHolder(view: View) : RecyclerView.ViewHolder(view) {

    private val itemName = view.findViewById<TextView>(R.id.itemName)

    fun bind(product: Product) {
        itemName.text = product.highlightedName?.toSpannedString() ?: product.name
    }
}
```

### Conclusion

You now have a fully working search experience: your users can search for products, refine their results, and understand the number of <Records /> returned and why they're relevant to the query.

<img src="https://mintcdn.com/algolia/BaxS3Doxn613Z9Q0/doc/guides/building-search-ui/getting-started/how-to/programmatically/highlight.png?fit=max&auto=format&n=BaxS3Doxn613Z9Q0&q=85&s=e37bcdc1e3b6a9a9ca3e50b5bf9157dd" alt="Screenshot of a mobile search with 'Hello' entered, showing results for 'Hello Kitty' products and a keyboard." style={{maxWidth:"300px"}} className="no-shadow" width="846" height="1704" data-path="doc/guides/building-search-ui/getting-started/how-to/programmatically/highlight.png" />

Find the full source code [in GitHub](https://github.com/algolia/instantsearch-android/tree/master/examples/android/src/main/kotlin/com/algolia/instantsearch/examples/android/guides/gettingstarted).

## Going further

This is only an introduction to what you can do with InstantSearch Android: check out [the widget showcase](https://github.com/algolia/instantsearch-android/tree/master/examples/android/src/main/kotlin/com/algolia/instantsearch/examples/android/showcase/androidview) to see more components.