> ## Documentation Index
> Fetch the complete documentation index at: https://algolia.com/llms.txt
> Use this file to discover all available pages before exploring further.
# Get started programmatically
> Build an InstantSearch page from an empty iOS project.
export const SearchQuery = () =>
search query
;
export const SearchRequest = () =>
search request
;
export const Records = () =>
records
;
export const Filter = () =>
filter
;
export const Facet = () =>
facet
;
export const ApplicationID = () =>
application ID
;
export const APIKey = () =>
API key
;
export const Index = () =>
index
;
This guide walks you through the steps needed to start a project with InstantSearch iOS.
Start from an empty iOS project, and create a full search experience from scratch.
This guide walks you through the steps needed to create a full InstantSearch Android experience from scratch.
It includes:
* A search box for users to type queries
* A list to display search results
* A list to results
* Statistics about the search
## Before you begin
To use InstantSearch, you need an Algolia account.
[Sign up](https://dashboard.algolia.com/users/sign_up) for a new account or use the following credentials
(which include a pre-loaded dataset of products appropriate for this guide):
* : `latency`
* Search : `1f6fd3a6fb973cb08419fe7d288fa4db`
- name: `bestbuy`
These credentials give access to a pre-loaded dataset of products appropriate for this guide.
### Create a new project
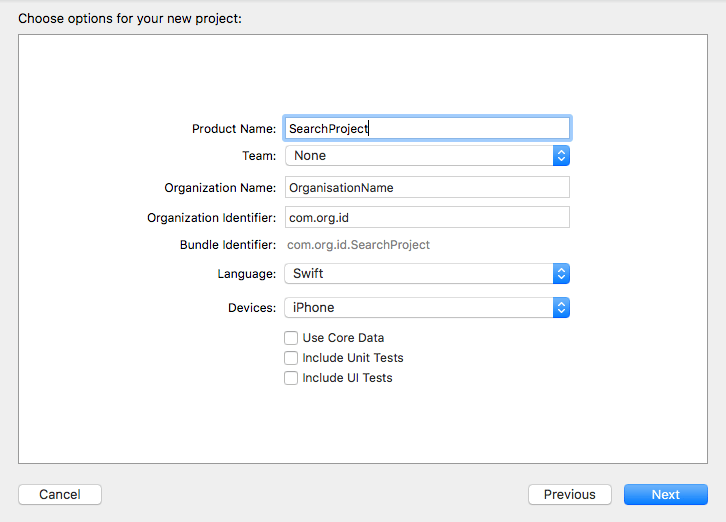
In Xcode, create a new project:
1. On the Template screen, select **Single View Application** and click **next**.
2. Specify your **Product Name**, select **Swift** as the language and **iPhone** for \*\*Devices##, and then create.
 ### Prepare your storyboard
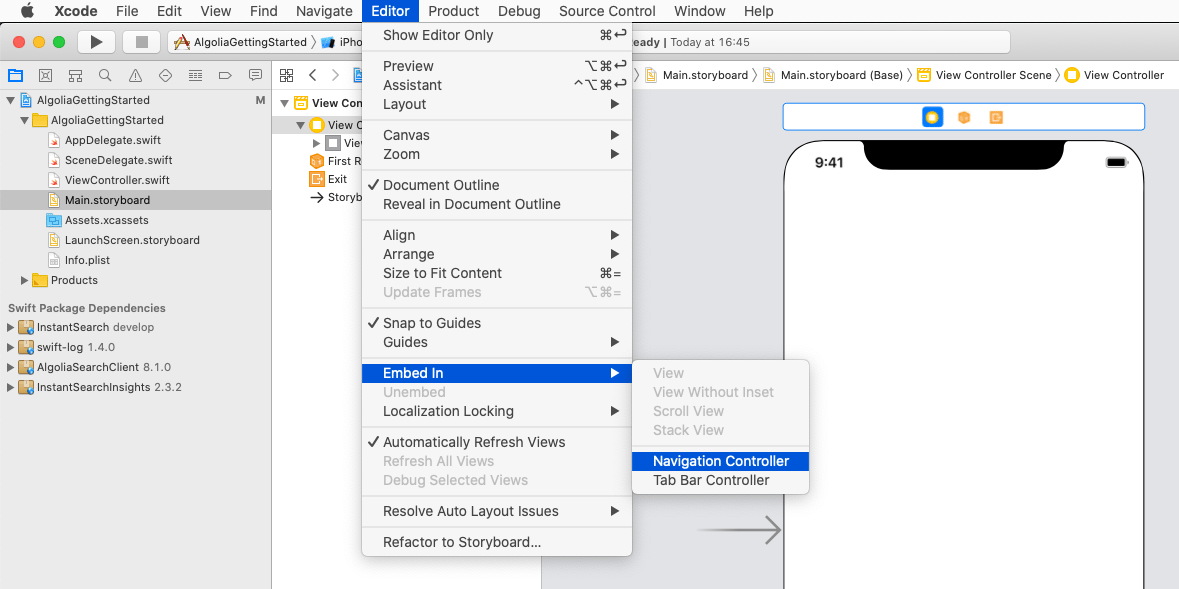
After generation, the project directly shows the main view controller.
Embed this into the Navigation Controller.
* Open `Main.storyboard`
* Select `ViewController` in the View Controller scene
* **Editor > Embed in > Navigation Controller**
### Prepare your storyboard
After generation, the project directly shows the main view controller.
Embed this into the Navigation Controller.
* Open `Main.storyboard`
* Select `ViewController` in the View Controller scene
* **Editor > Embed in > Navigation Controller**
 ### Add InstantSearch dependency
To add the InstantSearch package dependency to your Xcode project, you need a dependency manager.
This can be the Swift Package Manager, or CocoaPods.
### Swift Package Manager
* **Select File > Swift Packages > Add Package Dependency** and enter this repository URL: `https://github.com/algolia/instantsearch-ios`
* You can also go to your target's **General** pane, and in the **Frameworks, Libraries, and Embedded Content** section, click the `+` button, select **Add Other**, and choose **Add Package Dependency**.
* In the package products selection dialog, select both the **InstantSearch** and **InstantSearchCore** dependencies.
### CocoaPods
1. If you don't have CocoaPods installed on your machine, open your terminal and run `sudo gem install cocoapods`.
2. In your terminal, got to the root directory of your project and run the `pod init` command. This command generates a Podfile for you.
3. Open your Podfile and add `pod 'InstantSearch', '~> 8.0'` below your target.
4. In your terminal, run `pod update`.
5. Close your Xcode project. In your terminal, at the root of your project, run the `open projectName.xcworkspace` command (replacing `projectName` with the actual name of your project).
## Implementation
Xcode automatically generates a `ViewController.swift` file when you create a Single View Application. Open this file, and add the following import statement at the top.
```swift Swift icon=code theme={"system"}
import InstantSearch
```
### Define your record structure
Define a structure that represent the in your index.
For simplicity's sake, this structure only provides the name of the product.
The structure must conform to the `Codable` protocol to work properly with InstantSearch.
Add the following structure definition to the `ViewController.swift` file:
```swift Swift icon=code theme={"system"}
struct Item: Codable {
let name: String
}
```
### Declare hits view controller
In this tutorial search results view controller is represented by a `UITableViewController` which conforms to `HitsController` protocol. The following example binds the name of the fetched item to the cell's `textLabel` s text property.
```swift Swift icon=code theme={"system"}
class SearchResultsViewController: UITableViewController, HitsController {
var hitsSource: HitsInteractor
### Add InstantSearch dependency
To add the InstantSearch package dependency to your Xcode project, you need a dependency manager.
This can be the Swift Package Manager, or CocoaPods.
### Swift Package Manager
* **Select File > Swift Packages > Add Package Dependency** and enter this repository URL: `https://github.com/algolia/instantsearch-ios`
* You can also go to your target's **General** pane, and in the **Frameworks, Libraries, and Embedded Content** section, click the `+` button, select **Add Other**, and choose **Add Package Dependency**.
* In the package products selection dialog, select both the **InstantSearch** and **InstantSearchCore** dependencies.
### CocoaPods
1. If you don't have CocoaPods installed on your machine, open your terminal and run `sudo gem install cocoapods`.
2. In your terminal, got to the root directory of your project and run the `pod init` command. This command generates a Podfile for you.
3. Open your Podfile and add `pod 'InstantSearch', '~> 8.0'` below your target.
4. In your terminal, run `pod update`.
5. Close your Xcode project. In your terminal, at the root of your project, run the `open projectName.xcworkspace` command (replacing `projectName` with the actual name of your project).
## Implementation
Xcode automatically generates a `ViewController.swift` file when you create a Single View Application. Open this file, and add the following import statement at the top.
```swift Swift icon=code theme={"system"}
import InstantSearch
```
### Define your record structure
Define a structure that represent the in your index.
For simplicity's sake, this structure only provides the name of the product.
The structure must conform to the `Codable` protocol to work properly with InstantSearch.
Add the following structure definition to the `ViewController.swift` file:
```swift Swift icon=code theme={"system"}
struct Item: Codable {
let name: String
}
```
### Declare hits view controller
In this tutorial search results view controller is represented by a `UITableViewController` which conforms to `HitsController` protocol. The following example binds the name of the fetched item to the cell's `textLabel` s text property.
```swift Swift icon=code theme={"system"}
class SearchResultsViewController: UITableViewController, HitsController {
var hitsSource: HitsInteractor- ?
override func viewDidLoad() {
super.viewDidLoad()
tableView.register(UITableViewCell.self, forCellReuseIdentifier: "cell")
}
override func tableView(_ tableView: UITableView, numberOfRowsInSection section: Int) -> Int {
hitsSource?.numberOfHits() ?? 0
}
override func tableView(_ tableView: UITableView, cellForRowAt indexPath: IndexPath) -> UITableViewCell {
let cell = tableView.dequeueReusableCell(withIdentifier: "cell", for: indexPath)
cell.textLabel?.text = hitsSource?.hit(atIndex: indexPath.row)?.name
return cell
}
override func tableView(_ tableView: UITableView, didSelectRowAt indexPath: IndexPath) {
if let _ = hitsSource?.hit(atIndex: indexPath.row) {
// Handle hit selection
}
}
}
```
Refer to the [`HitsController`](/doc/api-reference/widgets/hits/ios#hitscontroller) documentation for more on integrating and customizing the [\`Hits'](/doc/api-reference/widgets/hits/ios) widget.
### Complete the view controller
To complete the main view controller of your app,
declare a `UISearchController`.
This [UIKit](https://developer.apple.com/documentation/uikit) component manages the display of search results based on interactions with a search box.
It provides a search box and only requires a search results controller as a parameter.
Add a `hitsViewController` field to the view controller, with the type declared in the previous step.
Pass it as the `searchResultsController` when creating the search controller.
```swift Swift icon=code theme={"system"}
class ViewController: UIViewController {
lazy var searchController = UISearchController(searchResultsController: hitsViewController)
let hitsViewController = SearchResultsViewController()
}
```
### Initialize a searcher
The central part of your search experience is the `Searcher`.
The `Searcher` performs a and obtains search results.
Most InstantSearch components connected to the `Searcher`.
To configure the searcher and link it to the interface:
1. **Instantiate the searcher.**
Create a `HitsSearcher` instance with the application ID, API key, and index name.
2. **Add the connector property.**
Add a `searchConnector` property to the view controller.
Connectors in InstantSearch establish links between components.
3. **Initialize the connector.**
Initialize the `SearchConnector` with the `Searcher`, `searchController`, `hitsInteractor`, and `hitsController` as parameters.
4. **Activate the connector and start the search.**
Call the connector's `connect()` method to activate it.
Add `searcher.search()` to the `viewDidLoad()` method to launch the first empty search request.
```swift Swift icon=code theme={"system"}
class ViewController: UIViewController {
lazy var searchController = UISearchController(searchResultsController: hitsViewController)
let hitsViewController = SearchResultsViewController()
let searcher = try! HitsSearcher(appID: "latency",
apiKey: "1f6fd3a6fb973cb08419fe7d288fa4db",
indexName: "bestbuy")
lazy var searchConnector = SearchConnector
- (searcher: searcher,
searchController: searchController,
hitsInteractor: .init(),
hitsController: hitsViewController)
override func viewDidLoad() {
super.viewDidLoad()
searchConnector.connect()
searcher.search()
}
}
```
While fully functional, the search logic isn't ready to use yet because the search isn't displayed.
Add a `setupUI` method to the view controller and call it from the `viewDidLoad` method.
Finally, override the `viewDidAppear` method,
and set search controller so that the search controller presents results immediately after the view controller appearance.
```swift Swift icon=code theme={"system"}
class ViewController: UIViewController {
lazy var searchController = UISearchController(searchResultsController: hitsViewController)
let hitsViewController = SearchResultsViewController()
let searcher = try! HitsSearcher(appID: "latency",
apiKey: "1f6fd3a6fb973cb08419fe7d288fa4db",
indexName: "bestbuy")
lazy var searchConnector = SearchConnector
- (searcher: searcher,
searchController: searchController,
hitsInteractor: .init(),
hitsController: hitsViewController)
override func viewDidLoad() {
super.viewDidLoad()
searchConnector.connect()
searcher.search()
setupUI()
}
override func viewDidAppear(_ animated: Bool) {
super.viewDidAppear(animated)
searchController.isActive = true
}
func setupUI() {
view.backgroundColor = .white
navigationItem.searchController = searchController
searchController.hidesNavigationBarDuringPresentation = false
searchController.showsSearchResultsController = true
searchController.automaticallyShowsCancelButton = false
}
}
```
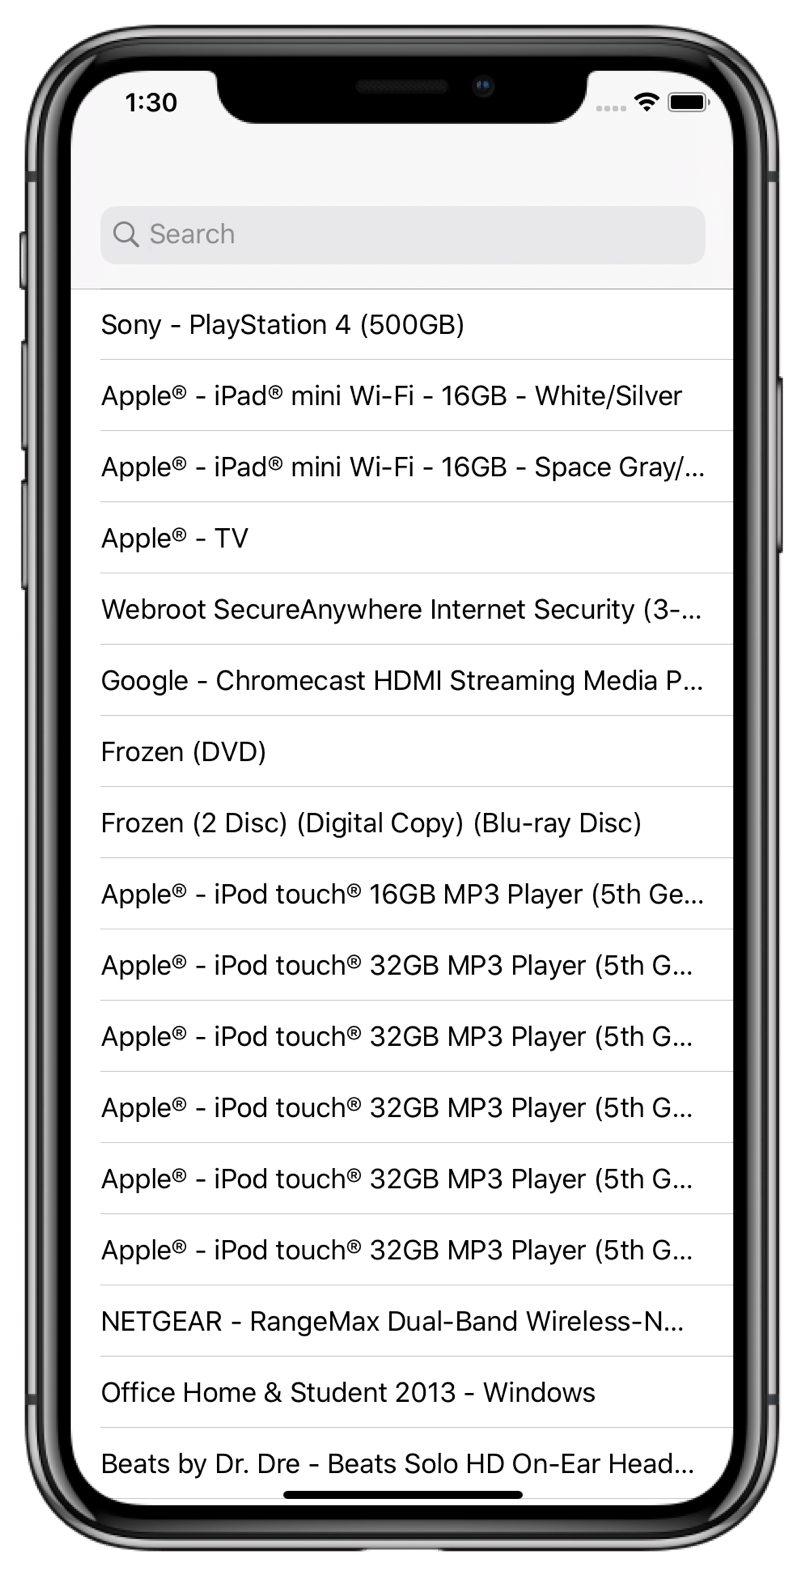
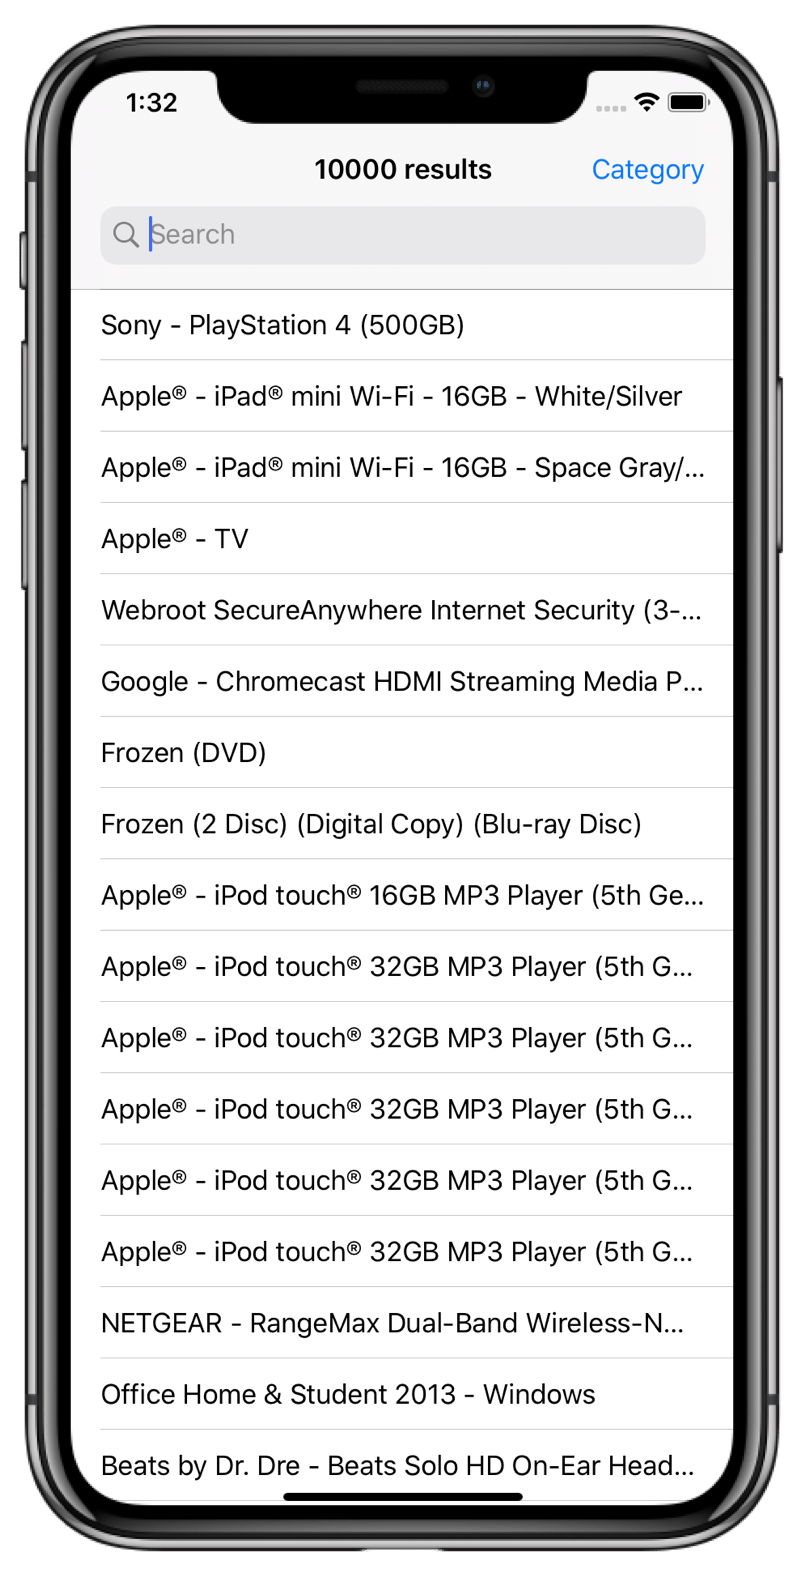
You can now build and run your app to see the basic search experience in action.
You should see that the results are changing on each key stroke.
 ### Adding statistics
To make the search experience more user-friendly, it would be appropriate to provide an additional feedback about the search results.
This is an opportunity to extend the search experience with different InstantSearch modules.
First, add a statistics component.
This component will show the hit count.
This gives users a complete understanding of their search, without the need for extra interaction.
Then, instantiate a `StatsInteractor`, which extracts the required metadata from the search response, and provides an interface to present it to users.
```swift Swift icon=code theme={"system"}
class ViewController: UIViewController {
lazy var searchController = UISearchController(searchResultsController: hitsViewController)
let hitsViewController = SearchResultsViewController()
let searcher = try! HitsSearcher(appID: "latency",
apiKey: "1f6fd3a6fb973cb08419fe7d288fa4db",
indexName: "bestbuy")
lazy var searchConnector = SearchConnector
### Adding statistics
To make the search experience more user-friendly, it would be appropriate to provide an additional feedback about the search results.
This is an opportunity to extend the search experience with different InstantSearch modules.
First, add a statistics component.
This component will show the hit count.
This gives users a complete understanding of their search, without the need for extra interaction.
Then, instantiate a `StatsInteractor`, which extracts the required metadata from the search response, and provides an interface to present it to users.
```swift Swift icon=code theme={"system"}
class ViewController: UIViewController {
lazy var searchController = UISearchController(searchResultsController: hitsViewController)
let hitsViewController = SearchResultsViewController()
let searcher = try! HitsSearcher(appID: "latency",
apiKey: "1f6fd3a6fb973cb08419fe7d288fa4db",
indexName: "bestbuy")
lazy var searchConnector = SearchConnector- (searcher: searcher,
searchController: searchController,
hitsInteractor: .init(),
hitsController: hitsViewController)
let statsInteractor = StatsInteractor()
override func viewDidLoad() {
super.viewDidLoad()
searchConnector.connect()
statsInteractor.connectSearcher(searcher)
searcher.search()
setupUI()
}
override func viewDidAppear(_ animated: Bool) {
super.viewDidAppear(animated)
searchController.isActive = true
}
func setupUI() {
view.backgroundColor = .white
navigationItem.searchController = searchController
searchController.hidesNavigationBarDuringPresentation = false
searchController.showsSearchResultsController = true
searchController.automaticallyShowsCancelButton = false
}
}
```
The `StatsInteractor` receives the search statistics now, but it isn't displayed anywhere yet. To keep the example simple, the hits count will be presented as the title of the view controller.
This is probably not the best place to show this in the app interface but this prevents putting to much layout-related code in this guide.
The `StatsInteractor` presents its data in a component that implements the `StatsTextController` protocol.
Make the view controller conform to this protocol by adding an extension.
Now, the view controller can be connected to the `StatsInteractor` with the corresponding method.
Add this connection in the `viewDidLoad` method.
```swift Swift icon=code theme={"system"}
class ViewController: UIViewController {
lazy var searchController = UISearchController(searchResultsController: hitsTableViewController)
let hitsTableViewController = SearchResultsViewController()
let searcher = try! HitsSearcher(appID: "latency",
apiKey: "1f6fd3a6fb973cb08419fe7d288fa4db",
indexName: "bestbuy")
lazy var searchConnector = SearchConnector
- (searcher: searcher,
searchController: searchController,
hitsInteractor: .init(),
hitsController: hitsTableViewController)
let statsInteractor = StatsInteractor()
override func viewDidLoad() {
super.viewDidLoad()
searchConnector.connect()
statsInteractor.connectSearcher(searcher)
statsInteractor.connectController(self)
searcher.search()
setupUI()
}
override func viewDidAppear(_ animated: Bool) {
super.viewDidAppear(animated)
searchController.isActive = true
}
func setupUI() {
view.backgroundColor = .white
navigationItem.searchController = searchController
searchController.hidesNavigationBarDuringPresentation = false
searchController.showsSearchResultsController = true
searchController.automaticallyShowsCancelButton = false
}
}
extension ViewController: StatsTextController {
func setItem(_ item: String?) {
title = item
}
}
```
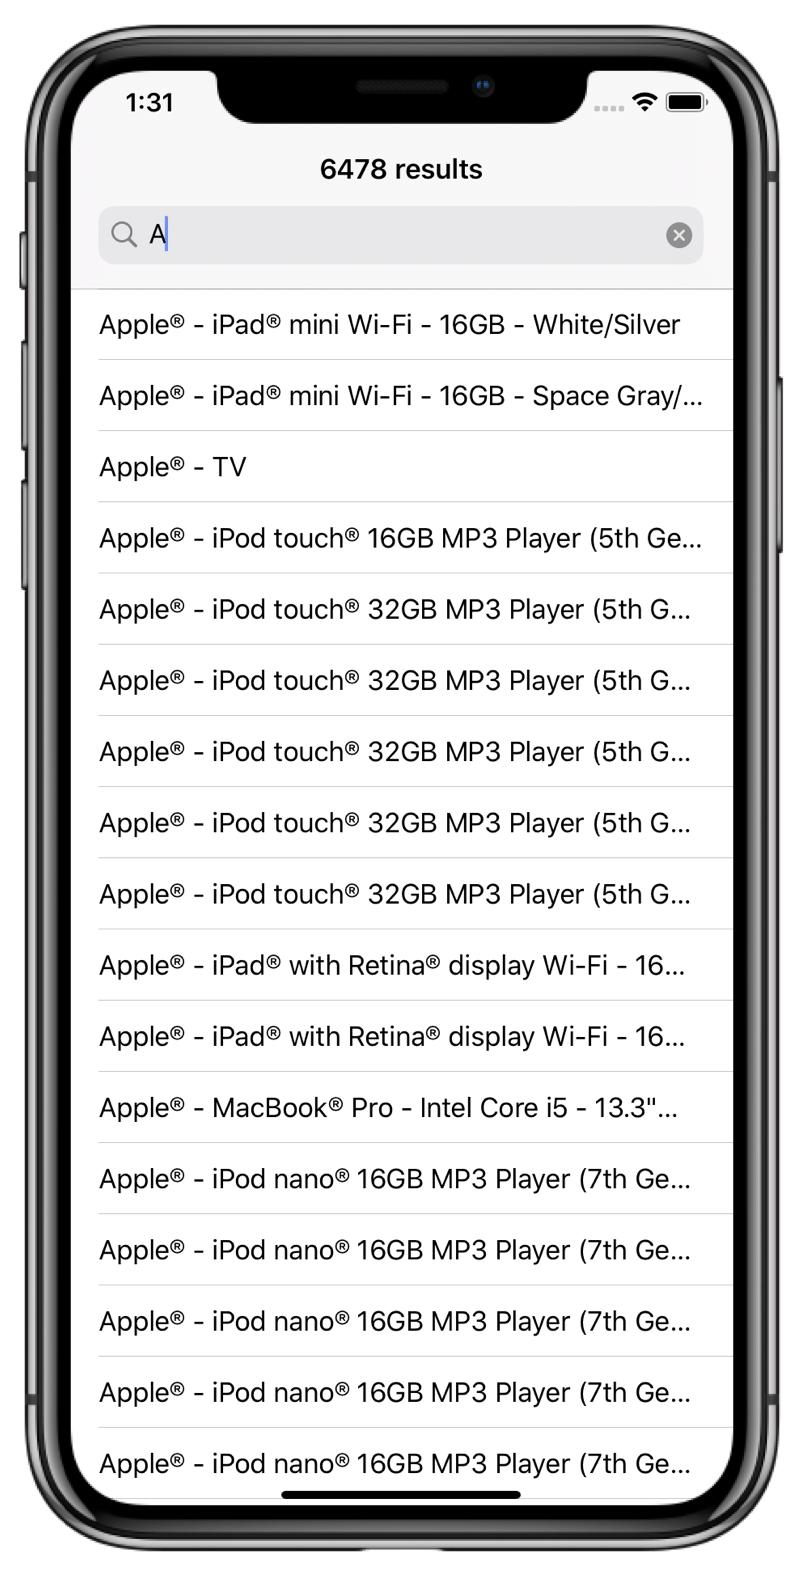
Build and run your app:
you should now see updated results *and* an updated hit count on each keystroke.
 Now you have a better understanding of the organization of InstantSearch modules:
* Each module has an `Interactor`, containing the module's business-logic.
* Each `Interactor` has a corresponding `Controller` protocol, which defines the interaction with a UI component.
Out of the box, InstantSearch provides a few basic implementations of the `Controller` protocol for UIKit components.
Examples of these are `HitsTableViewController`, `TextFieldController`, and `ActivityIndicatorController`.
Feel free to use them to discover the abilities of InstantSearch with minimal effort.
In your own project, you might want implement more custom UI and behavior.
If so, it's up to you to create an implementations of the `Controller` protocol, and to connect them to a corresponding `Interactor`.
### Filter your results: `RefinementList`
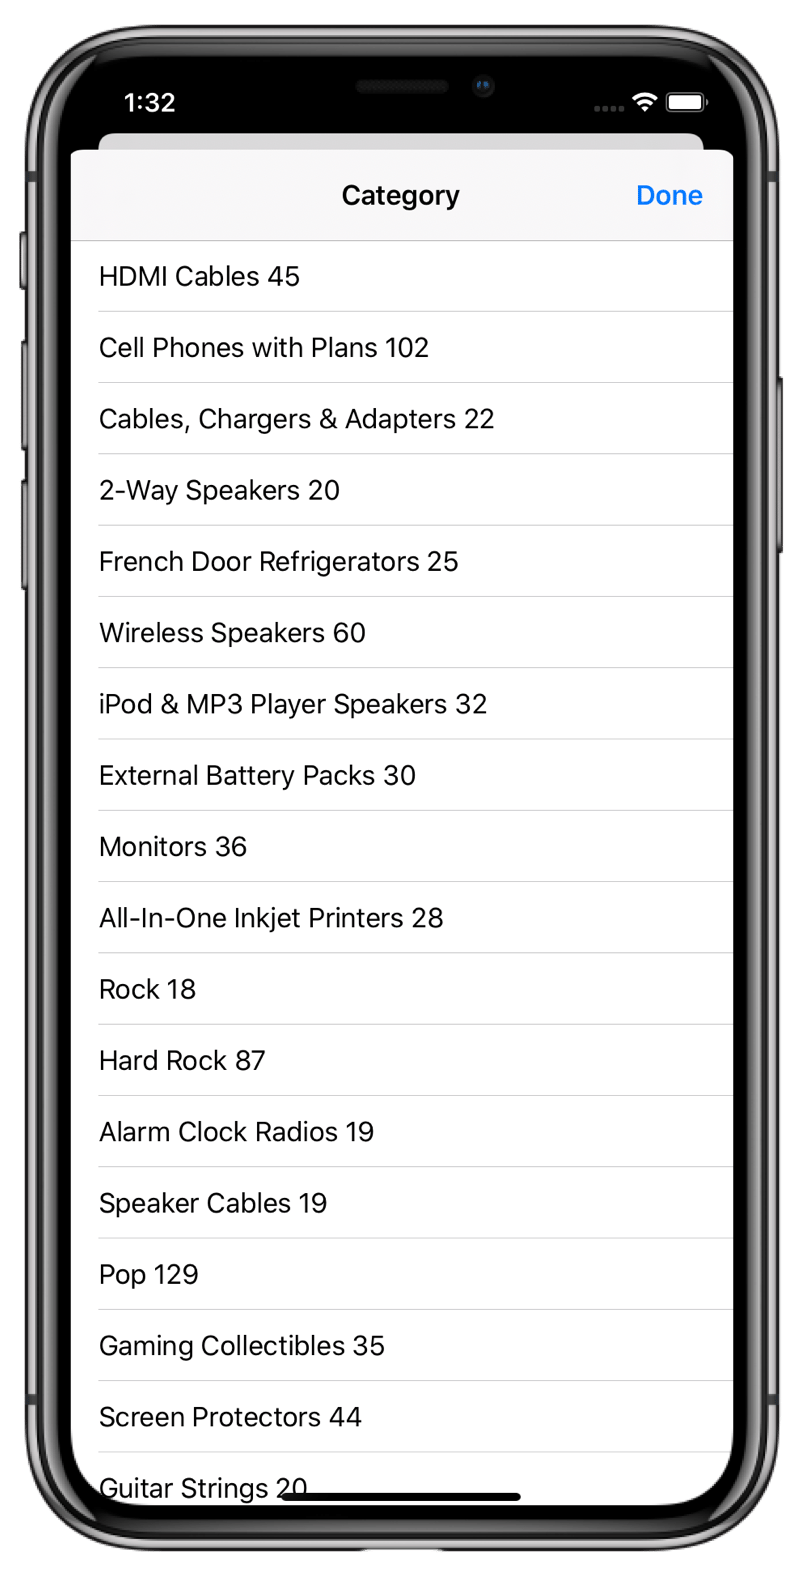
With your app, you can search more than 10,000 products. However, you don't want to scroll to the bottom of the list to find the exact product you're looking for. To resolve it, build a filter that allows to filter products by their category using the `RefinementList` components.
First, add a `FilterState` component. This component provides a convenient way to manage the state of your filters. In this example, a refinement attribute: `category` will be added. Finally, add the `RefinementList` components to other components in the search experience, such as `FacetListConnector`, `FacetListTableController` and `UITableViewController`. The `UITableViewController` will actually present a facet list. As a result, the definition of your `ViewController` has to look like this:
```swift Swift icon=code theme={"system"}
class ViewController: UIViewController {
lazy var searchController = UISearchController(searchResultsController: hitsViewController)
let hitsViewController = SearchResultsViewController()
let searcher = try! HitsSearcher(appID: "latency",
apiKey: "1f6fd3a6fb973cb08419fe7d288fa4db",
indexName: "bestbuy")
lazy var searchConnector = SearchConnector
Now you have a better understanding of the organization of InstantSearch modules:
* Each module has an `Interactor`, containing the module's business-logic.
* Each `Interactor` has a corresponding `Controller` protocol, which defines the interaction with a UI component.
Out of the box, InstantSearch provides a few basic implementations of the `Controller` protocol for UIKit components.
Examples of these are `HitsTableViewController`, `TextFieldController`, and `ActivityIndicatorController`.
Feel free to use them to discover the abilities of InstantSearch with minimal effort.
In your own project, you might want implement more custom UI and behavior.
If so, it's up to you to create an implementations of the `Controller` protocol, and to connect them to a corresponding `Interactor`.
### Filter your results: `RefinementList`
With your app, you can search more than 10,000 products. However, you don't want to scroll to the bottom of the list to find the exact product you're looking for. To resolve it, build a filter that allows to filter products by their category using the `RefinementList` components.
First, add a `FilterState` component. This component provides a convenient way to manage the state of your filters. In this example, a refinement attribute: `category` will be added. Finally, add the `RefinementList` components to other components in the search experience, such as `FacetListConnector`, `FacetListTableController` and `UITableViewController`. The `UITableViewController` will actually present a facet list. As a result, the definition of your `ViewController` has to look like this:
```swift Swift icon=code theme={"system"}
class ViewController: UIViewController {
lazy var searchController = UISearchController(searchResultsController: hitsViewController)
let hitsViewController = SearchResultsViewController()
let searcher = try! HitsSearcher(appID: "latency",
apiKey: "1f6fd3a6fb973cb08419fe7d288fa4db",
indexName: "bestbuy")
lazy var searchConnector = SearchConnector- (searcher: searcher,
searchController: searchController,
hitsInteractor: .init(),
hitsController: hitsViewController,
filterState: filterState)
let statsInteractor = StatsInteractor()
let filterState = FilterState()
lazy var categoryConnector = FacetListConnector(searcher: searcher,
filterState: filterState,
attribute: "category",
operator: .and,
controller: categoryListController)
lazy var categoryListController = FacetListTableController(tableView: categoryTableViewController.tableView)
let categoryTableViewController = UITableViewController()
override func viewDidLoad() {
super.viewDidLoad()
searchConnector.connect()
categoryConnector.connect()
statsInteractor.connectSearcher(searcher)
statsInteractor.connectController(self)
searcher.search()
setupUI()
}
override func viewDidAppear(_ animated: Bool) {
super.viewDidAppear(animated)
searchController.isActive = true
}
func setupUI() {
view.backgroundColor = .white
navigationItem.searchController = searchController
searchController.hidesNavigationBarDuringPresentation = false
searchController.showsSearchResultsController = true
searchController.automaticallyShowsCancelButton = false
}
}
extension ViewController: StatsTextController {
func setItem(_ item: String?) {
title = item
}
}
```
Finally, in the `setupUI()` method, set up a navigation bar button item that triggers the presentation of the facet list,
and sets the title of this list.
Add `showFilters` and `dismissFilters` functions responsible for the presentation and dismiss logic of the facet list.
```swift Swift icon=code theme={"system"}
class ViewController: UIViewController {
lazy var searchController = UISearchController(searchResultsController: hitsViewController)
let hitsViewController = SearchResultsViewController()
let searcher = try! HitsSearcher(appID: "latency",
apiKey: "1f6fd3a6fb973cb08419fe7d288fa4db",
indexName: "bestbuy")
lazy var searchConnector = SearchConnector
- (searcher: searcher,
searchController: searchController,
hitsInteractor: .init(),
hitsController: hitsViewController,
filterState: filterState)
let statsInteractor = StatsInteractor()
let filterState = FilterState()
lazy var categoryConnector = FacetListConnector(searcher: searcher,
filterState: filterState,
attribute: "category",
operator: .and,
controller: categoryListController)
lazy var categoryListController = FacetListTableController(tableView: categoryTableViewController.tableView)
let categoryTableViewController = UITableViewController()
override func viewDidLoad() {
super.viewDidLoad()
searchConnector.connect()
categoryConnector.connect()
statsInteractor.connectSearcher(searcher)
statsInteractor.connectController(self)
searcher.search()
setupUI()
}
override func viewDidAppear(_ animated: Bool) {
super.viewDidAppear(animated)
searchController.isActive = true
}
func setupUI() {
view.backgroundColor = .white
navigationItem.searchController = searchController
navigationItem.rightBarButtonItem = .init(title: "Category", style: .plain, target: self, action: #selector(showFilters))
searchController.hidesNavigationBarDuringPresentation = false
searchController.showsSearchResultsController = true
searchController.automaticallyShowsCancelButton = false
categoryTableViewController.title = "Category"
}
@objc func showFilters() {
let navigationController = UINavigationController(rootViewController: categoryTableViewController)
categoryTableViewController.navigationItem.rightBarButtonItem = UIBarButtonItem(barButtonSystemItem: .done, target: self, action: #selector(dismissFilters))
present(navigationController, animated: true, completion: .none)
}
@objc func dismissFilters() {
categoryTableViewController.navigationController?.dismiss(animated: true, completion: .none)
}
}
extension ViewController: StatsTextController {
func setItem(_ item: String?) {
title = item
}
}
```
You can now build and run your app to see your `RefinementList` in action.
 ## Going further
Your users can enter a and your app shows them results as they type.
It also provides a possibility to filter the results even further using `RefinementList`.
That's pretty nice already, but you can go further and improve on that.
* You can have a look at the [examples](/doc/guides/building-search-ui/resources/demos/ios) to see more complex examples of apps built with InstantSearch.
* You can head to the [components page](/doc/api-reference/widgets/ios) to see other components that you could use.
## Going further
Your users can enter a and your app shows them results as they type.
It also provides a possibility to filter the results even further using `RefinementList`.
That's pretty nice already, but you can go further and improve on that.
* You can have a look at the [examples](/doc/guides/building-search-ui/resources/demos/ios) to see more complex examples of apps built with InstantSearch.
* You can head to the [components page](/doc/api-reference/widgets/ios) to see other components that you could use.