> ## Documentation Index
> Fetch the complete documentation index at: https://algolia.com/llms.txt
> Use this file to discover all available pages before exploring further.
# JSON
> Index your data from a JSON file you host.
export const Records = () =>
records
;
export const Index = () =>
index
;
The JSON connector lets you read objects from a JSON file and store them in an Algolia .
The connector imports a single array of JSON objects as .
Each record must have a unique identifier to be used as the [object ID](/doc/guides/sending-and-managing-data/send-and-update-your-data#unique-object-identifiers) in Algolia.
In the following example, `userID` could serve as the object ID.
```json JSON icon=braces theme={"system"}
[
{
"userID": 1001,
"firstName": "Marianne",
"lastName": "Neal"
},
{
"userID": 1002,
"firstName": "Austin",
"lastName": "Wolfe"
}
]
```
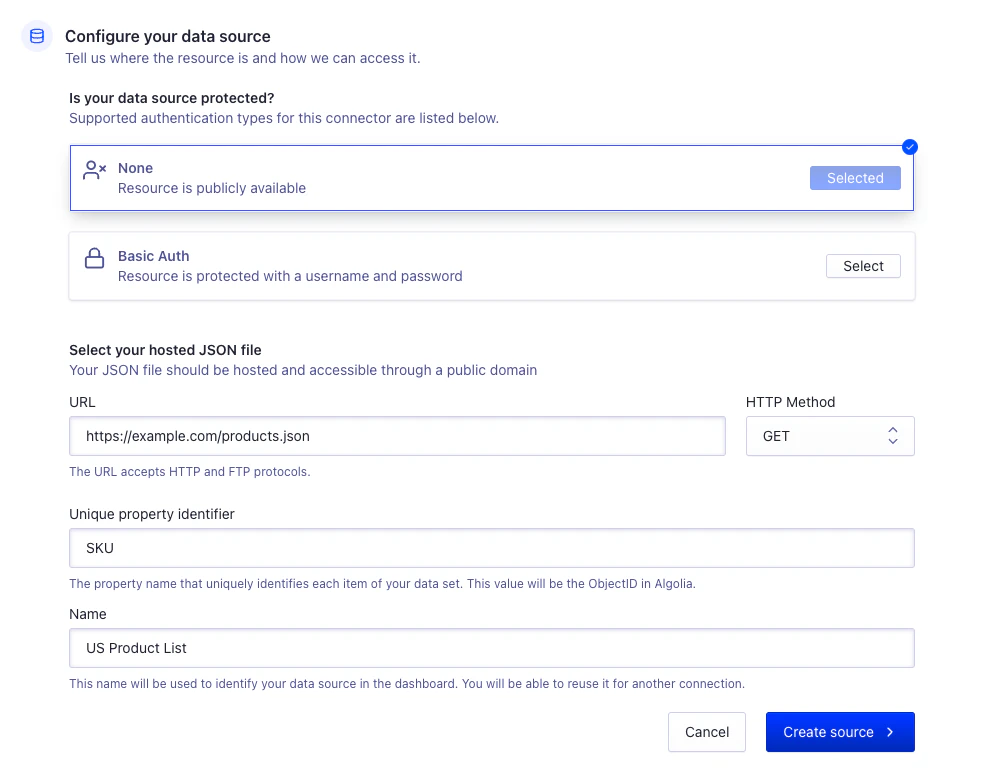
## Configure your data source
1. Open the [**Connectors**](https://dashboard.algolia.com/connectors) page in the Algolia dashboard.
2. Select the JSON connector and click **Connect**.
3. Click **Get started**.
4. Select the authentication method:
* **None** if the file is public.
* **Basic Auth** if you need a username and password to access the file.
5. Enter the URL of your JSON file. The protocol can be one of: `http`, `https`, `ftp`, `ftps`, or `sftp`.
For HTTP URLs, you can further select whether to fetch the JSON file with a GET or a POST request. This depends on your server.
6. In the **Unique property identifier** field, enter the property of your JSON objects that should serve as unique identifiers for your Algolia records (`objectID`).
7. Enter a name for the source. This helps you distinguish between different sources.
8. Click **Create source**.
 ## Configure your destination
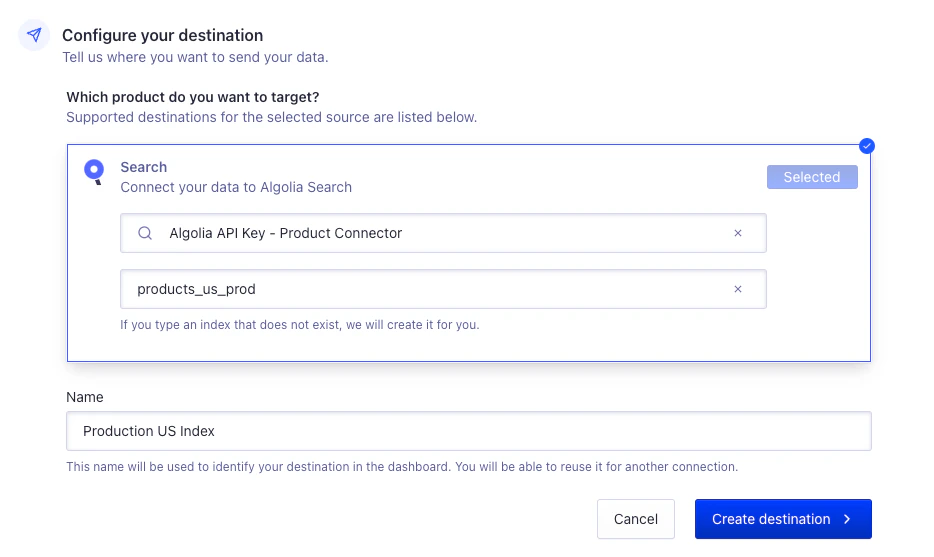
1. Create a new [Algolia API key](/doc/guides/security/api-keys)
or select an existing one for indexing your data.
2. Enter an index name, where the connector should store the records.
If you enter a name of an existing index, it'll be overwritten.
3. Enter a name for the destination. This helps you distinguish between different destinations.
4. Click **Create destination**.
## Configure your destination
1. Create a new [Algolia API key](/doc/guides/security/api-keys)
or select an existing one for indexing your data.
2. Enter an index name, where the connector should store the records.
If you enter a name of an existing index, it'll be overwritten.
3. Enter a name for the destination. This helps you distinguish between different destinations.
4. Click **Create destination**.
 ## Configure your task
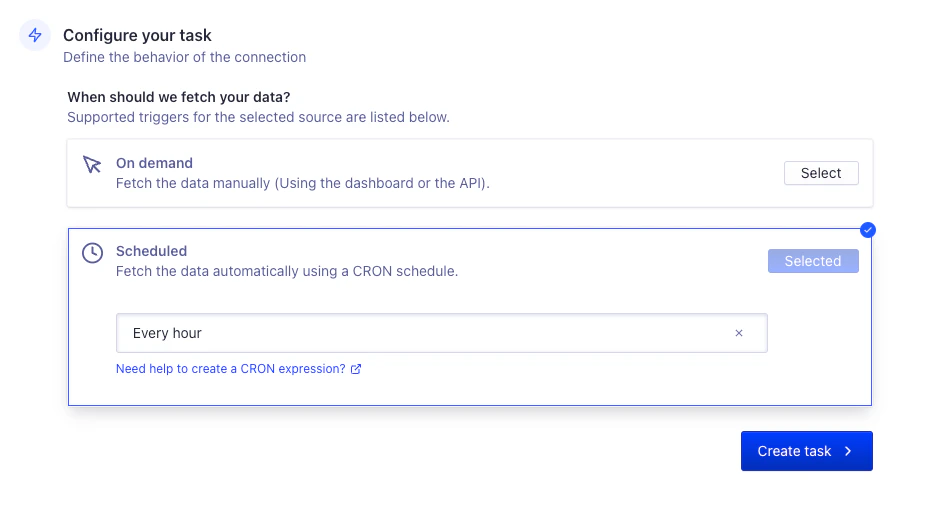
1. Select when the connector should fetch your data:
* **On demand**. The connector only fetches data if you manually run it from the [**Tasks**](https://dashboard.algolia.com/connectors/tasks/).
* **Scheduled**. The connector runs on a schedule.
You can select a schedule from the list, or enter a custom schedule with a cron expression.
2. Click **Create task**.
## Configure your task
1. Select when the connector should fetch your data:
* **On demand**. The connector only fetches data if you manually run it from the [**Tasks**](https://dashboard.algolia.com/connectors/tasks/).
* **Scheduled**. The connector runs on a schedule.
You can select a schedule from the list, or enter a custom schedule with a cron expression.
2. Click **Create task**.
 ### Manage your task
To see the status of your tasks, run them, deactivate them, or delete them,
go to the [**Tasks**](https://dashboard.algolia.com/connectors/tasks/) page in the Algolia dashboard.
## Limitations
This connector is subject to the following limitations:
* [Connectors limits](/doc/guides/scaling/algolia-service-limits/#connectors-limits)
* [Transformation limits](/doc/guides/scaling/algolia-service-limits/#data-transformation-and-fetch-limits)
### Manage your task
To see the status of your tasks, run them, deactivate them, or delete them,
go to the [**Tasks**](https://dashboard.algolia.com/connectors/tasks/) page in the Algolia dashboard.
## Limitations
This connector is subject to the following limitations:
* [Connectors limits](/doc/guides/scaling/algolia-service-limits/#connectors-limits)
* [Transformation limits](/doc/guides/scaling/algolia-service-limits/#data-transformation-and-fetch-limits)