> ## Documentation Index
> Fetch the complete documentation index at: https://algolia.com/llms.txt
> Use this file to discover all available pages before exploring further.

# Send ecommerce events

> Collect user interactions as events in your ecommerce store using InstantSearch.

export const UserProfile = () => <Tooltip tip="A user profile contains data about a single user, including behavior, preferences, and affinities collected from events. Algolia uses this data to deliver personalized content.">
    user profile
  </Tooltip>;

export const SearchRequest = () => <Tooltip tip="A search request is a single HTTP call to the Algolia Search API that can run one or more search operations. It can include multiple queries, for example, when querying several indices at once.">
    search request
  </Tooltip>;

export const SearchQuery = () => <Tooltip tip="The text users enter into a search box. In the Search API, this corresponds to the query parameter. A search query is often used with filters, facets, and other parameters, but these aren't part of the query text itself.">
    search query
  </Tooltip>;

export const Application = () => <Tooltip tip="An Algolia application is a self-contained environment with its own indices, configuration, and API keys. Applications don't share data or settings with each other.">
    application
  </Tooltip>;

This page shows ecommerce-specific click and conversion patterns for InstantSearch apps.
For the concepts behind event tracking,
see [Click and conversion events](/doc/guides/sending-events).
For other implementation paths,
see [Choose how to send events](/doc/guides/sending-events/getting-started).

## Enable events collection

To follow this guide,
build search results or category pages with one of these UI libraries:

* InstantSearch.js version 4.59 or later ([Upgrade guide](/doc/guides/building-search-ui/upgrade-guides/js))
* React InstantSearch version 7.2.1 or later ([Upgrade guide](/doc/guides/building-search-ui/upgrade-guides/react))
* Vue InstantSearch version 4.12.0 or later ([Upgrade guide](/doc/guides/building-search-ui/upgrade-guides/vue))

InstantSearch loads the `search-insights` library for you from [jsDelivr](https://www.jsdelivr.com/).
You don't need to install or initialize it yourself.

If you're using a [Content Security Policy](https://developer.mozilla.org/en-US/docs/Web/HTTP/CSP) and
you want to let InstantSearch load `search-insights`,
add `https://cdn.jsdelivr.net` to your list of trusted JavaScript sources.

```txt theme={"system"}
script-src https://cdn.jsdelivr.net/
```

If you prefer self-hosting `search-insights`, [install it](/doc/libraries/search-insights)

InstantSearch doesn't load `search-insights` when it detects it on the page.

You can enable automatic collection in the Algolia dashboard or in your InstantSearch app.

Enabling automatic events collection does the following:

* Adds the `search-insights` library to your project and makes it globally available as `window.aa`
* Sets an anonymous [`userToken`](/doc/guides/sending-events/concepts/usertoken) for events and search requests
* Includes the [`queryID`](/doc/guides/sending-events/concepts/event-types#events-related-and-unrelated-to-algolia-requests) parameter in the search response
* Sends [default click and view events](/doc/guides/building-search-ui/events/js#default-events) for your InstantSearch widgets

Go to the [Events hub](https://dashboard.algolia.com/events/) in the Algolia dashboard to check the default events arriving from your website or app.
For more information,
see [Validate your events](/doc/guides/sending-events/guides/validate).

### No code

1. Go to the [Algolia dashboard](https://dashboard.algolia.com/explorer/browse) and select your Algolia <Application />.
2. On the left sidebar, select **Data sources** > **Events** > **Settings**.
3. Click **Enable automatic events collection**.

### Code

Enable the [`insights`](/doc/api-reference/widgets/instantsearch/js#param-insights) option:

<CodeGroup>
  ```js JavaScript theme={"system"}
  const search = instantsearch({
    searchClient,
    indexName: "YourIndexName",
    insights: true, // [!code ++]
  });
  // Add your InstantSearch widgets here
  search.start();
  ```

  ```jsx React theme={"system"}
  <InstantSearch
    searchClient={searchClient}
    indexName="YourIndexName"
    insights={true} // [!code ++]
  >
    {/* Add your InstantSearch widgets here */}
  </InstantSearch>;
  ```

  ```vue Vue theme={"system"}
  <template>
    <ais-instant-search
      :index-name="YourIndexName"
      :search-client="searchClient"
      :insights="true" // [!code ++]
    >
      <!-- Add your InstantSearch widgets here -->
    </ais-instant-search>
  </template>
  ```
</CodeGroup>

For more on tracking `queryID` and `userToken`,
see [Keep track of query IDs](/doc/guides/sending-events/guides/queryid)
and [User token](/doc/guides/sending-events/concepts/usertoken).

## Map your ecommerce journey to events

Map the steps users take through your website and add events that aren't [automatically captured by InstantSearch widgets](/doc/guides/building-search-ui/events/js#default-events).
Focus on the actions that lead to the final goal:
the product purchase.

<Tabs>
  <Tab title="Search results page">
    <img src="https://mintcdn.com/algolia/2qKY7HStIjENri6J/images/sending-events/search-events.png?fit=max&auto=format&n=2qKY7HStIjENri6J&q=85&s=53bc6429cd07047975669113eca4d90d" width="1266" height="639" data-path="images/sending-events/search-events.png" />

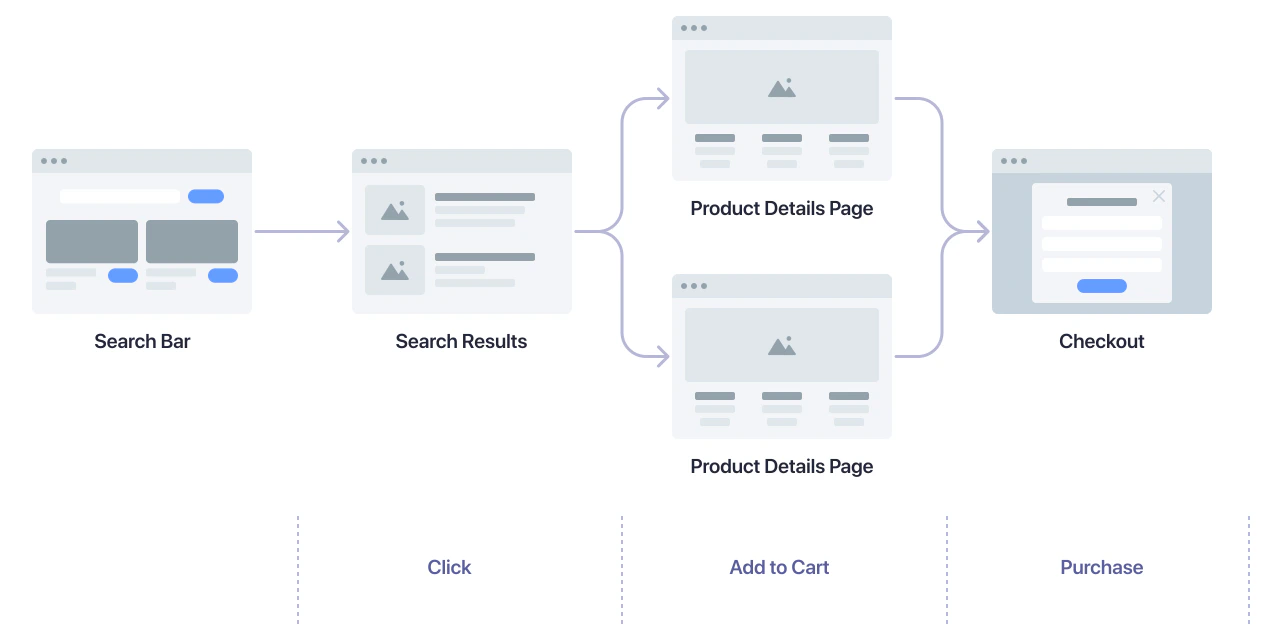
    Starting with a search on any of your pages, a user might take the following actions:

    1. Select a product from the search results to open the product details page.
    2. Add a product to the shopping cart.
    3. Buy the product.
  </Tab>

  <Tab title="Category page">
    <img src="https://mintcdn.com/algolia/2qKY7HStIjENri6J/images/sending-events/browse-events.png?fit=max&auto=format&n=2qKY7HStIjENri6J&q=85&s=9d19edc4d64fd3a02e16aca4c07e077e" width="1266" height="682" data-path="images/sending-events/browse-events.png" />

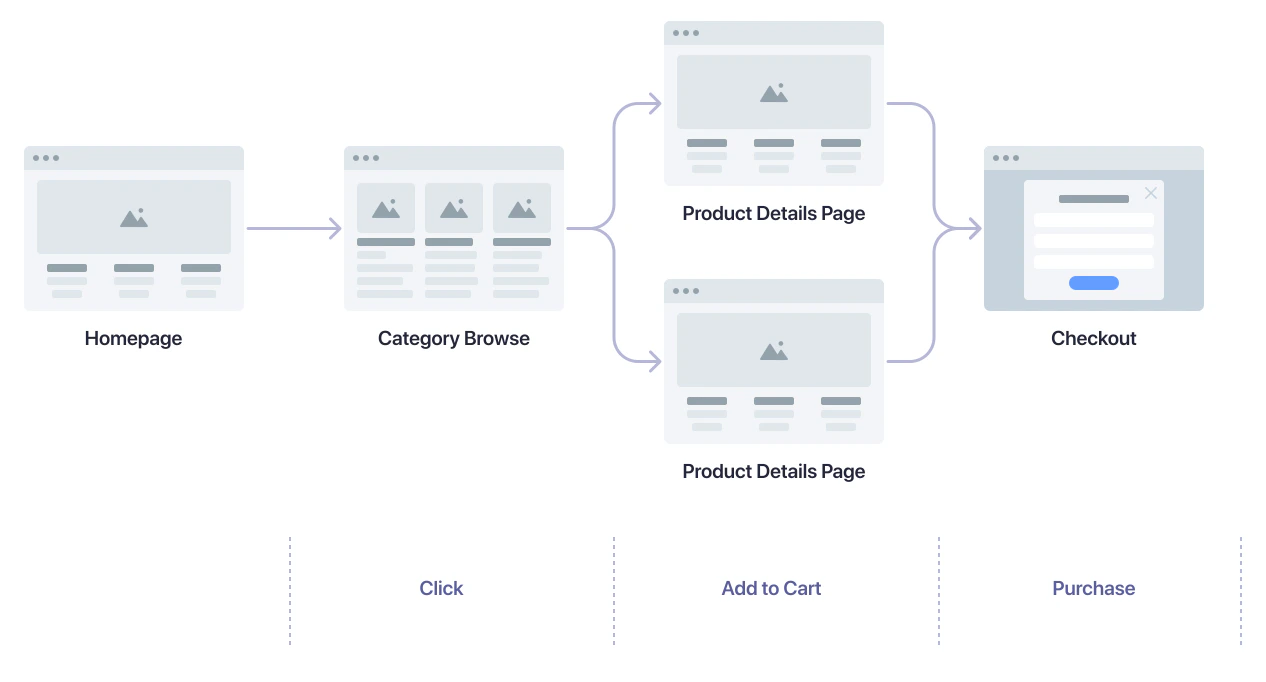
    Starting with a visit to your homepage, a user might take the following actions:

    1. Select a product category to open a category (product listing) page.
    2. Select a product to open a product details page.
    3. Add a product to the shopping cart.
    4. Buy the product.
  </Tab>

  <Tab title="External referrals">
    <img src="https://mintcdn.com/algolia/2qKY7HStIjENri6J/images/sending-events/personalization-events.png?fit=max&auto=format&n=2qKY7HStIjENri6J&q=85&s=6f57f26ed195369a474e36948df7327b" width="1596" height="916" data-path="images/sending-events/personalization-events.png" />

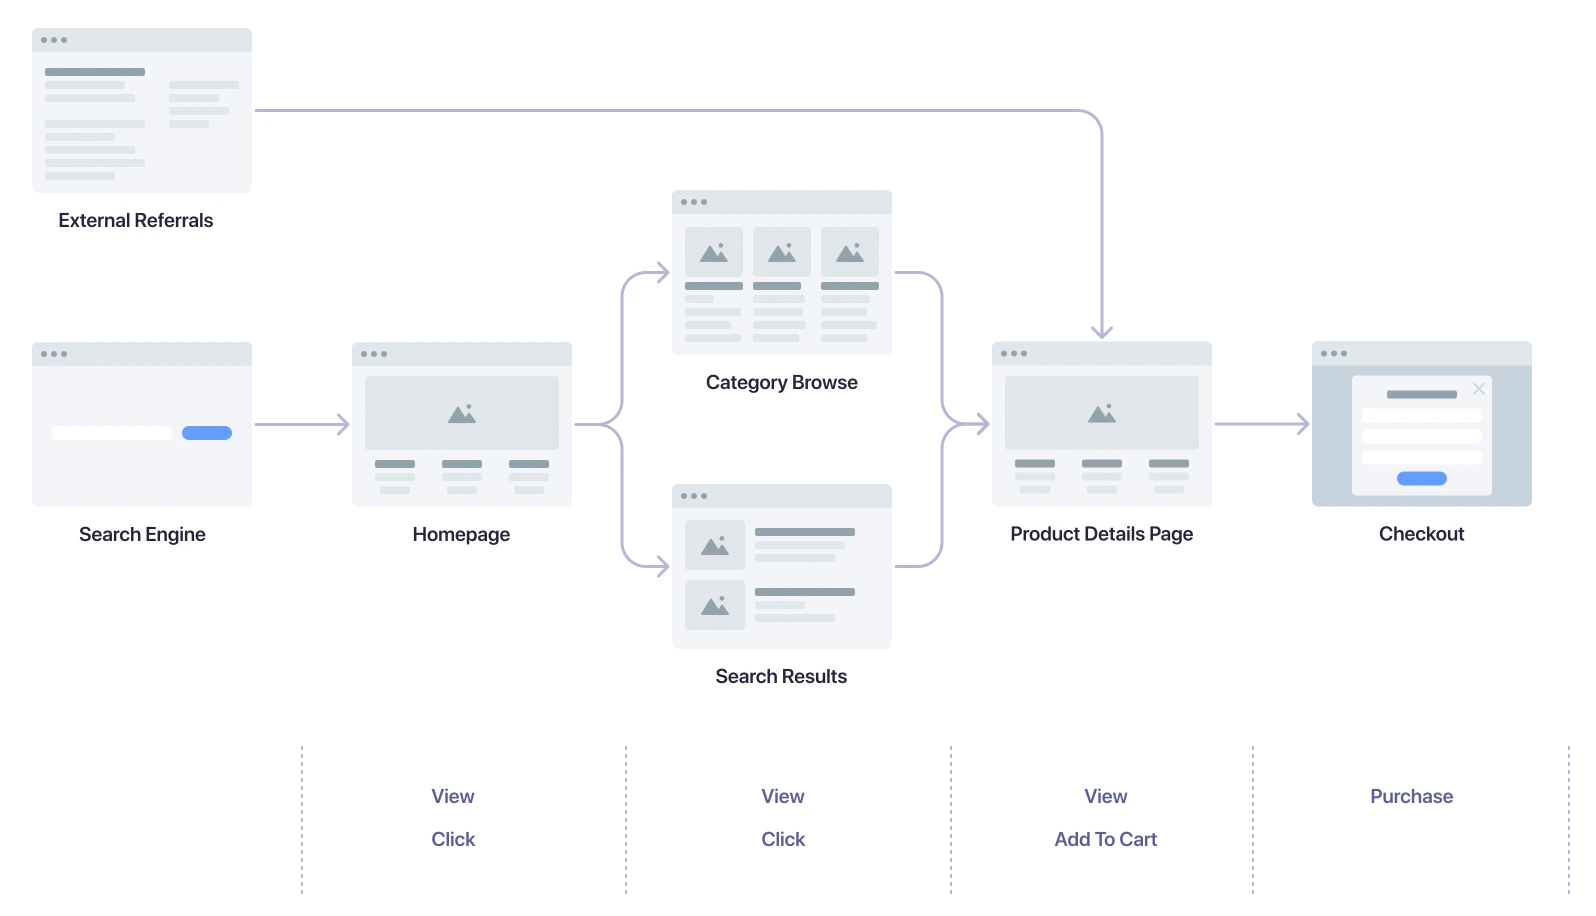
    Starting with a search on an internet search engine,
    with a click on a recommendation,
    or any other external referral,
    a user might take the following actions:

    1. Click on a (internet) search result, recommendation, or other link to your website.
    2. Depending on where the user lands on your website,
       they continue the same path as if they started with your homepage or with a category page.
  </Tab>
</Tabs>

#### Search and search results pages

| User action                        | Method name                       | Automatically collected?                                                                        |
| ---------------------------------- | --------------------------------- | ----------------------------------------------------------------------------------------------- |
| User clicks search result          | `clickedObjectIDsAfterSearch`     | [**Yes**](/doc/guides/building-search-ui/events/js#default-click-events-for-results-widgets)    |
| User adds product to shopping cart | `addedToCartObjectIDsAfterSearch` | **No**                                                                                          |
| User clicks categories/filters     | `clickedFilters`                  | [**Yes**](/doc/guides/building-search-ui/events/js#default-click-events-for-refinement-widgets) |
| User views search results          | `viewedObjectIDs`                 | [**Yes**](/doc/guides/building-search-ui/events/js#default-view-events-for-results-widgets)     |

#### Product listing and category pages

| User action                        | Method name                       | Automatically collected?                                                                     |
| ---------------------------------- | --------------------------------- | -------------------------------------------------------------------------------------------- |
| User clicks product                | `clickedObjectIDsAfterSearch`     | [**Yes**](/doc/guides/building-search-ui/events/js#default-click-events-for-results-widgets) |
| User adds product to shopping cart | `addedToCartObjectIDsAfterSearch` | **No**                                                                                       |
| User views category page           | `viewedObjectIDs`                 | [**Yes**](/doc/guides/building-search-ui/events/js#default-view-events-for-results-widgets)  |

#### Product details page

| User action               | Method name                       | Automatically collected? |
| ------------------------- | --------------------------------- | ------------------------ |
| User adds product to cart | `addedToCartObjectIDsAfterSearch` | **No**                   |
| User views product        | `viewedObjectIDs`                 | **No**                   |

#### Checkout page

| User action       | Event                           | Automatically collected? |
| ----------------- | ------------------------------- | ------------------------ |
| User buys product | `purchasedObjectIDsAfterSearch` | **No**                   |

## Track query IDs across pages

Conversion events often happen outside the search results page.

* A query ID is returned by the <SearchRequest /> when a user performs a search.
* To associate a conversion with the correct <SearchQuery />, save this query ID and include it in your conversion events.
* To link conversion events back to the originating search request on your search results or category pages, [track query IDs across your pages](/doc/guides/sending-events/guides/queryid).

## Track add-to-cart events

### Send events from InstantSearch widgets

When your users add an item to their cart, send a special `conversion` event with the `addToCart` subtype.

<CodeGroup>
  ```js JavaScript theme={"system"}
  hits({
    templates: {
      item(hit, { html, components, sendEvent }) {
        return html`
          <h2>${components.Highlight({ attribute: "name", hit })}</h2>
          <p>${hit.description}</p>
          <button
            onClick=${() =>
              sendEvent("conversion", hit, "Added To Cart", {
                // Special subtype
                eventSubtype: "addToCart",
                // An array of objects representing each item added to the cart
                objectData: [
                  {
                    // The discount value for this item, if applicable
                    discount: hit.discount || 0,
                    // The price value for this item (minus the discount)
                    price: hit.price,
                    // How many of this item were added
                    quantity: 2,
                  },
                ],
                // The total value of all items
                value: hit.price * 2,
                // The currency code
                currency: "USD",
              })}
          >
            Add to cart
          </button>
        `;
      },
    },
  });
  ```

  ```jsx React theme={"system"}
  function Hit({ hit, sendEvent }) {
    return (
      <>
        <h2>
          <Highlight hit={hit} attribute="name" />
        </h2>
        <p>{hit.description}</p>
        <button
          onClick={() =>
            sendEvent("conversion", hit, "Added To Cart", {
              // Special subtype
              eventSubtype: "addToCart",
              // An array of objects representing each item added to the cart
              objectData: [
                {
                  // The discount value for this item, if applicable
                  discount: hit.discount || 0,
                  // The price value for this item (minus the discount)
                  price: hit.price,
                  // How many of this item were added
                  quantity: 2,
                },
              ],
              // The total value of all items
              value: hit.price * 2,
              // The currency code
              currency: "USD",
            })
          }
        >
          Add to cart
        </button>
      </>
    );
  }
  ```

  ```vue Vue theme={"system"}
  <ais-hits>
    <template v-slot:item="{ item, sendEvent }">
      <h2>
        <ais-highlight attribute="name" :hit="item" />
      </h2>
      <p>{{ item.description }}</p>
      <button
        @click="sendEvent('conversion', hit, 'Added To Cart', {
          // Special subtype
          eventSubtype: 'addToCart',
          // An array of objects representing each item added to the cart
          objectData: [
            {
              // The discount value for this item, if applicable
              discount: item.discount || 0,
              // The price value for this item (minus the discount)
              price: item.price,
              // How many of this item were added
              quantity: 2,
              // The per-item `queryID` for the query preceding this event
              queryID: item.__queryID,
            },
          ],
          // The total value of all items
          value: item.price * 2,
          // The currency code
          currency: 'USD',
        })"
      >
        Add to cart
      </button>
    </template>
  </ais-hits>
  ```
</CodeGroup>

<Note>
  Fields representing monetary values accept both numbers and strings,
  in major currency units (for example, `5.45` or `'5.45'`).
  **To prevent floating-point math issues**, use strings, especially if you're performing calculations.
</Note>

### On pages without InstantSearch widgets

Add the following code to all components and pages where users can add products to their shopping cart.

For add-to-cart events associated with a search:

```js JavaScript icon=code theme={"system"}
window.aa("addedToCartObjectIDsAfterSearch", {
  eventName: "Product Added To Cart",
  index: "YourIndexName",
  queryID: "queryID-1",
  objectIDs: ["objectID-1"],
  objectData: [
    {
      price: 19.99,
      discount: 3.99,
      quantity: 3,
    },
  ],
  currency: "USD",
});
```

The `window.aa` object is the API client for the Insights API and is globally available
if you enabled automatic events collection.

When all objects in the event are attributed to the same query, set the `queryID` parameter at the root level as shown above.
However, when objects have different query IDs (for example, items added to cart from different searches), specify the `queryID` for each object in the `objectData` array:

```js JavaScript icon=code theme={"system"}
window.aa("addedToCartObjectIDsAfterSearch", {
  eventName: "Product Added To Cart",
  index: "YourIndexName",
  objectIDs: ["objectID-1", "objectID-2"],
  objectData: [
    {
      queryID: "queryID-1",
      price: 19.99,
      discount: 3.99,
      quantity: 3,
    },
    {
      queryID: "queryID-2",
      price: 59.99,
      quantity: 2,
    },
  ],
  currency: "USD",
});
```

You should store the query ID with other product details when updating a user's shopping cart.
This helps you record query IDs for each item for any following purchase events.

For add-to-cart events not related to a search query, for example, after a user clicks on a
'Recommended for you' or 'Buy again' carousel on the home page, you don't need to specify `queryID`:

```js JavaScript icon=code theme={"system"}
window.aa("addedToCartObjectIDs", {
  eventName: "Recommended Product Added To Cart",
  index: "YourIndexName",
  objectIDs: ["objectID-1"],
  objectData: [
    {
      price: 68.5,
      quantity: 2,
    },
  ],
  currency: "USD",
});
```

## Track purchase events

### Send events from InstantSearch widgets

When your users purchase an item, send a special `conversion` event with the `purchase` subtype.

<CodeGroup>
  ```js JavaScript theme={"system"}
  hits({
    templates: {
      item(hit, { html, components, sendEvent }) {
        return html`
          <h2>${components.Highlight({ attribute: "name", hit })}</h2>
          <p>${hit.description}</p>
          <button
            onClick=${() =>
              sendEvent("conversion", hit, "Purchased", {
                // Special subtype
                eventSubtype: "purchase",
                // An array of objects representing each purchased item
                objectData: [
                  {
                    // The discount value for this item, if applicable
                    discount: hit.discount || 0,
                    // The price value for this item (minus the discount)
                    price: hit.price,
                    // How many of this item were added
                    quantity: 2,
                    // The per-item `queryID` for the query preceding this event
                    queryID: hit.__queryID,
                  },
                ],
                // The total value of all items
                value: hit.price * 2,
                // The currency code
                currency: "USD",
              })}
          >
            Purchase
          </button>
        `;
      },
    },
  });
  ```

  ```jsx React theme={"system"}
  function Hit({ hit, sendEvent }) {
    return (
      <>
        <h2>
          <Highlight hit={hit} attribute="name" />
        </h2>
        <p>{hit.description}</p>
        <button
          onClick={() =>
            sendEvent("conversion", hit, "Purchased", {
              // Special subtype
              eventSubtype: "purchase",
              // An array of objects representing each purchased item
              objectData: [
                {
                  // The discount value for this item, if applicable
                  discount: hit.discount || 0,
                  // The price value for this item (minus the discount)
                  price: hit.price,
                  // How many of this item were added
                  quantity: 2,
                  // The per-item `queryID` for the query preceding this event
                  queryID: hit.__queryID,
                },
              ],
              // The total value of all items
              value: hit.price * 2,
              // The currency code
              currency: "USD",
            })
          }
        >
          Purchase
        </button>
      </>
    );
  }
  ```

  ```vue Vue theme={"system"}
  <ais-hits>
    <template v-slot:item="{ item, sendEvent }">
      <h2>
        <ais-highlight attribute="name" :hit="item" />
      </h2>
      <p>{{ item.description }}</p>
      <button
        @click="sendEvent('conversion', hit, 'Purchased', {
          // Special subtype
          eventSubtype: 'purchase',
          // An array of objects representing each purchased item
          objectData: [
            {
              // The discount value for this item, if applicable
              discount: item.discount || 0,
              // The price value for this item (minus the discount)
              price: item.price,
              // How many of this item were added
              quantity: 2,
            },
          ],
          // The total value of all items
          value: item.price * 2,
          // The currency code
          currency: 'USD',
        })"
      >
        Purchase
      </button>
    </template>
  </ais-hits>
  ```
</CodeGroup>

<Note>
  Fields representing monetary values accept both numbers and strings, in major
  currency units (for example, `5.45` or `'5.45'`). **To prevent floating-point
  math issues**, use strings, especially if you're performing calculations.
</Note>

### On pages without InstantSearch widgets

Add the following code to your checkout flow.

When all objects in the purchase are attributed to the same query, you can set the `queryID` parameter at the root level:

```js JavaScript icon=code theme={"system"}
window.aa("purchasedObjectIDsAfterSearch", {
  eventName: "Products Purchased",
  index: "YourIndexName",
  queryID: "queryID-1",
  objectIDs: ["objectID-1", "objectID-2"],
  objectData: [
    {
      price: 19.99,
      discount: 3.99,
      quantity: 3,
    },
    {
      price: 59.99,
      quantity: 2,
    },
  ],
  currency: "USD",
});
```

However, users often purchase items that were added to the cart in response to different queries.
For example, a user might search for "shoes" and add a pair of shoes to their cart.
Then, they search for "lamp" and add a lamp to their cart. Then, they check out and complete the purchase of both items.
In this case, there would be a single purchase event, but each item should be attributed to its originating query.
Specify the `queryID` for each object in the `objectData` array:

```js JavaScript icon=code theme={"system"}
window.aa("purchasedObjectIDsAfterSearch", {
  userToken: "anonymous-123456", // required for Node.js
  authenticatedUserToken: "user-123456",
  eventName: "your_event_name",
  index: "INDEX_NAME",
  objectIDs: ["objectID-1", "objectID-2"],
  objectData: [
    {
      queryID: "queryID-1",
      price: 19.99,
      discount: 3.99,
      quantity: 3,
    },
    {
      queryID: "queryID-2",
      price: 59.99,
      quantity: 2,
    },
  ],
  currency: "USD",
});
```

## Track other conversion events

You can track other conversions in addition to add-to-cart and purchase events.

### Send events from InstantSearch widgets

You can use the `sendEvent` function to send conversion events from your InstantSearch app.

<CodeGroup>
  ```js JavaScript theme={"system"}
  hits({
    templates: {
      item(hit, { html, components, sendEvent }) {
        return html`
          <h2>${components.Highlight({ attribute: "name", hit })}</h2>
          <p>${hit.description}</p>
          <button
            onClick="${() =>
              sendEvent("conversion", hit, "Product Added To Wishlist")
            }"
          >
            Add to wishlist
          </button>
        `;
      },
    },
  });
  ```

  ```jsx React theme={"system"}
  function Hit({ hit, sendEvent }) {
    return (
      <>
        <h2>
          <Highlight hit={hit} attribute="name" />
        </h2>
        <p>{hit.description}</p>
        <button
          onClick={() =>
            sendEvent("conversion", hit, "Product Added To Wishlist")
          }
        >
          Add to wishlist
        </button>
      </>
    );
  }
  ```

  ```vue Vue theme={"system"}
  <ais-hits>
    <template v-slot:item="{ item, sendEvent }">
      <h2><ais-highlight attribute="name" :hit="item" /></h2>
      <p>{{ item.description }}</p>
      <button @click="sendEvent('conversion', item, 'Product Added To Wishlist')">
        Add to wishlist
      </button>
    </template>
  </ais-hits>
  ```
</CodeGroup>

<Note>
  Setting custom `conversion` events doesn't prevent the custom `click` event from being sent.
</Note>

### On pages without InstantSearch widgets

This is an example of a conversion that may occur on a page without InstantSearch:

```js JavaScript icon=code theme={"system"}
// A user added a product to their wishlist from the homepage
window.aa("convertedObjectIDs", {
  eventName: "Product Added To Wishlist",
  index: "YourIndexName",
  objectIDs: ["objectID-1"],
});
```

## Track click events

### Override default click events

The [`hits`](/doc/api-reference/widgets/hits/js) and [`infiniteHits`](/doc/api-reference/widgets/infinite-hits/js) widgets expose a `sendEvent` function. Use it to send `click` events when users interact with your search results.

<CodeGroup>
  ```js JavaScript theme={"system"}
  hits({
    templates: {
      item(hit, { html, components, sendEvent }) {
        return html`
          <div onClick="${() => sendEvent("click", hit, "Product Clicked")}">
            <h2>${components.Highlight({ attribute: "name", hit })}</h2>
            <p>${hit.description}</p>
          </div>
        `;
      },
    },
  });
  ```

  ```jsx React theme={"system"}
  import { InstantSearch, Hits, Highlight } from "react-instantsearch";

  function Hit({ hit, sendEvent }) {
    return (
      <div onClick={() => sendEvent("click", hit, "Product Clicked")}>
        <h2>
          <Highlight hit={hit} attribute="name" />
        </h2>
        <p>{hit.description}</p>
      </div>
    );
  }

  function App(props) {
    return (
      <InstantSearch {...props}>
        <Hits hitComponent={Hit} />
      </InstantSearch>
    );
  }
  ```

  ```vue Vue theme={"system"}
  <ais-hits>
    <template v-slot:item="{ item, sendEvent }">
      <div @click="sendEvent('click', item, 'Product Clicked')">
        <h2>
          <ais-highlight attribute="name" :hit="item" />
        </h2>
        <p>{{ item.description }}</p>
      </div>
    </template>
  </ais-hits>
  ```
</CodeGroup>

You can set more events on specific parts of your template.
In the following example, when users click the **Add to favorites** button, two events are sent to the Insights API:

* A `click` event with the `eventName` "Product Added to Favorites".
* A `click` event with the `eventName` "Product Clicked" (through event propagation).

<CodeGroup>
  ```js JavaScript theme={"system"}
  hits({
    templates: {
      item(hit, { html, components, sendEvent }) {
        return html`
          <div onClick="${() => sendEvent("click", hit, "Product Clicked")}">
            <h2>${components.Highlight({ attribute: "name", hit })}</h2>
            <p>${hit.description}</p>
            <button
              onClick="${() =>
                sendEvent("click", hit, "Product Added to Favorites")
              }"
            >
              Add to favorites
            </button>
          </div>
        `;
      },
    },
  });
  ```

  ```jsx React theme={"system"}
  function Hit({ hit, sendEvent }) {
    return (
      <div onClick={() => sendEvent("click", hit, "Product Clicked")}>
        <h2>
          <Highlight hit={hit} attribute="name" />
        </h2>
        <p>{hit.description}</p>
        <button
          onClick={() => sendEvent("click", hit, "Product Added to Favorites")}
        >
          Add to favorites
        </button>
      </div>
    );
  }
  ```

  ```vue Vue theme={"system"}
  <ais-hits>
    <template v-slot:item="{ item, sendEvent }">
      <div @click="sendEvent('click', item, 'Product Clicked')">
        <h2>
          <ais-highlight attribute="name" :hit="item" />
        </h2>
        <p>{{ item.description }}</p>
        <button @click="sendEvent('click', item, 'Product Added to Favorites')">
          Add to favorites
        </button>
      </div>
    </template>
  </ais-hits>
  ```
</CodeGroup>

To only send the most specific event per clicked element,
you can use [`Event.stopPropagation`](https://developer.mozilla.org/en-US/docs/Web/API/Event/stopPropagation) in your event handler.

<CodeGroup>
  ```js JavaScript theme={"system"}
  hits({
    templates: {
      item(hit, { html, components, sendEvent }) {
        return html`
          <div onClick="${() => sendEvent("click", hit, "Product Clicked")}">
            <!-- ... -->
            <button
              onClick="${(event) => {
  +             event.stopPropagation(); // [!code ++]

                sendEvent("click", hit, "Product Added to Favorites");
              }}"
            >
              Add to favorites
            </button>
          </div>
        `;
      },
    },
  });
  ```

  ```jsx React theme={"system"}
  function Hit({ hit, sendEvent }) {
    return (
      <div onClick={() => sendEvent("click", hit, "Product Clicked")}>
        <h2>
          <Highlight hit={hit} attribute="name" />
        </h2>
        <p>{hit.description}</p>
        <button
          onClick={(event) => {
                event.stopPropagation(); // [!code ++]

            sendEvent("click", hit, "Product Added to Favorites");
          }}
        >
          Add to favorites
        </button>
      </div>
    );
  }
  ```

  ```vue Vue theme={"system"}
  <ais-hits>
      <template v-slot:item="{ item, sendEvent }">
        <div @click="sendEvent('click', item, 'Product Clicked')">
          <!-- … -->
          <button @click="(event) => {
            event.stopPropagation(); // [!code ++]

            sendEvent('click', item, 'Product Added to Favorites');
          }">
            Add to favorites
          </button>
        </div>
      </template>
    </ais-hits>
  ```
</CodeGroup>

When InstantSearch captures a custom `click` event that you defined, it doesn't send the default `click` event.
In the following example, when users click the **Add to favorites** button, only the "Product Added to Favorites" event is sent:

<CodeGroup>
  ```js JavaScript theme={"system"}
  hits({
    templates: {
      item(hit, { html, components, sendEvent }) {
        return html`
          <h2>${components.Highlight({ attribute: "name", hit })}</h2>
          <p>${hit.description}</p>
          <button
            onClick="${() =>
              sendEvent("click", hit, "Product Added to Favorites")
            }"
          >
            Add to favorites
          </button>
        `;
      },
    },
  });
  ```

  ```jsx React theme={"system"}
  function Hit({ hit, sendEvent }) {
    return (
      <>
        <h2>
          <Highlight hit={hit} attribute="name" />
        </h2>
        <p>{hit.description}</p>
        <button
          onClick={() => sendEvent("click", hit, "Product Added to Favorites")}
        >
          Add to favorites
        </button>
      </>
    );
  }
  ```

  ```vue Vue theme={"system"}
  <ais-hits>
    <template v-slot:item="{ item, sendEvent }">
      <h2>
        <ais-highlight attribute="name" :hit="item" />
      </h2>
      <p>{{ item.description }}</p>
      <button @click="sendEvent('click', item, 'Product Added to Favorites')">
        Add to favorites
      </button>
    </template>
  </ais-hits>
  ```
</CodeGroup>

### Track more click events

For Algolia Recommend and Personalization, capture additional click events
when users select individual products:

* On your home page
* From product recommendations

To send click events with the Insights client, add the following code
whenever a user clicks on a product—for example,
on your homepage.

```js JavaScript icon=code theme={"system"}
window.aa("clickedObjectIDs", {
  index: "YourIndexName",
  eventName: "Product Clicked",
  objectIDs: ["objectID-1"],
});
```

## Optional: identify known users for Personalization

For effective [personalization](/doc/guides/personalization/classic-personalization/what-is-personalization),
identify users across sessions.
It's best to use an identifier from your authentication system after users sign in.

After getting the identifier from your system,
set it as the `authenticatedUserToken` parameter.

```js JavaScript icon="code" theme={"system"}
// Get a unique, pseudonymous identifier for signed-in users
const authenticatedUserToken = getUserTokenAfterSignIn();
window.aa("setAuthenticatedUserToken", authenticatedUserToken);
```

If you can't get persistent user identifiers from your system,
you can store the anonymous user token in a cookie **after obtaining user consent**.

```js JavaScript icon="code" theme={"system"}
// If user consented
aa("init", {
  partial: true,
  useCookie: true,
});
```

If you don't use persistent user identifiers,
a new anonymous user token is generated on every page refresh.

For more on identity strategy and persistence,
see [User token](/doc/guides/sending-events/concepts/usertoken).

InstantSearch automatically sends view events for search results and category pages.
Send additional view events for experiences outside InstantSearch widgets,
such as homepage carousels or recommendation modules.

## Optional: send view events for Personalization

Personalization benefits from the same click and conversion events,
plus it can use view events to enrich each <UserProfile />.

Use the following code snippet to track view events,
such as when a user views search results.

```js JavaScript icon="code" theme={"system"}
window.aa("viewedObjectIDs", {
  index: "YourIndexName",
  eventName: "Item Viewed",
  objectIDs: ["objectID-1"],
});
```

<Note>
  You don't need to send a `queryID` when tracking view events.
</Note>

## Examples

* InstantSearch.js:

  * [Demo](https://codesandbox.io/s/github/algolia/doc-code-samples/tree/master/instantsearch.js/algolia-insights)
  * [Source code](https://github.com/algolia/doc-code-samples/tree/master/instantsearch.js/algolia-insights)

* React InstantSearch:

  * [Demo](https://codesandbox.io/s/github/algolia/doc-code-samples/tree/master/react-instantsearch/algolia-insights)
  * [Source code](https://github.com/algolia/doc-code-samples/tree/master/react-instantsearch/algolia-insights)

* Vue InstantSearch:

  * [Demo](https://codesandbox.io/s/github/algolia/doc-code-samples/tree/master/vue-instantsearch/algolia-insights)
  * [Source code](https://github.com/algolia/doc-code-samples/tree/master/vue-instantsearch/algolia-insights)

### Add events to a React InstantSearch application

<Frame>
  <iframe width="644" height="363" src="https://www.youtube.com/embed/UPOc9pIuvk4" title="Adding Events to an InstantSearch Application" frameborder="0" allow="accelerometer; autoplay; clipboard-write; encrypted-media; gyroscope; picture-in-picture; web-share" referrerpolicy="strict-origin-when-cross-origin" allowfullscreen className="video-embed" />
</Frame>
