> ## Documentation Index
> Fetch the complete documentation index at: https://algolia.com/llms.txt
> Use this file to discover all available pages before exploring further.
# Guided search
> Help users narrow their search results by showing facets near the search box to guide their discovery experience.
export const Index = () =>
index
;
[Facets](/doc/guides/managing-results/refine-results/faceting) are a great way to let your users refine their search. But sometimes, there are so many facets that it can be hard to find the right ones. One way to solve this problem is to show the most popular facets at the top of the page.
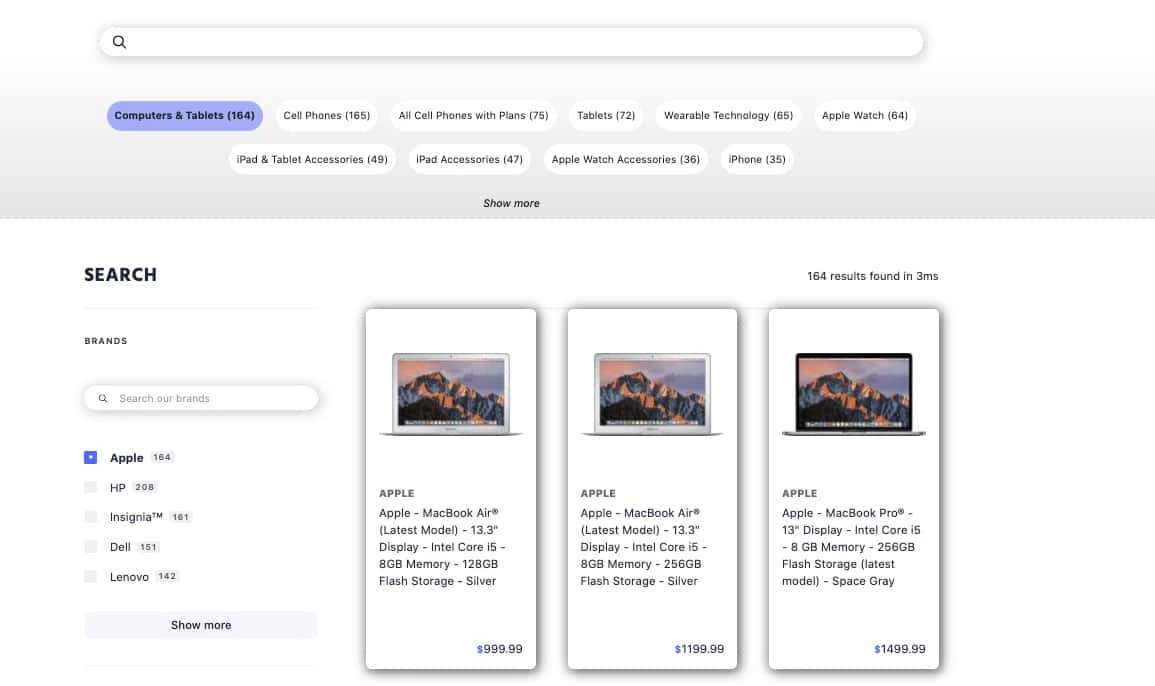 In this image, a set of guided search facets appear near the search box.
For example, if a user is looking for a computer, clicking **Computers & Tablets** will update the results on the page and the facet filters to stay in context with the scope of the query.
In this case, the **brands** facet updates to show relevant brands such as HP and Apple.
This helps users to refine and improve the relevance of their results.
The order of the facet values is based on count but you can adjust it to alphabetical or any custom order that makes sense for your organization.
## Before you begin
This tutorial requires [InstantSearch.js](/doc/guides/building-search-ui/getting-started/js).
## Implementation guide
In this guide, you build a classic ecommerce search page with a search box,
guided search facets at the top, two facets (brand and price), and results.
### High-level approach
To create guided search facets, you need to create a UI for the [`refinementList`](/doc/api-reference/widgets/refinement-list/js) widget using connectors.
Essentially, you override the out-of-the-box behavior of a refinement list widget with your own render function.
Find the code examples in the guide on the [custom refinement list connector](/doc/api-reference/widgets/current-refinements/js#customize-the-ui-with-connectcurrentrefinements).
Before you get started, make sure you:
* Select an attribute as the guided facet filter and set it as one of the [`attributesForFaceting`](/doc/api-reference/api-parameters/attributesForFaceting).
* Set up your UI with the [InstantSearch getting started guide](/doc/guides/building-search-ui/getting-started/js).
For more information, see:
* [Declare attributes for faceting in the dashboard](/doc/guides/managing-results/refine-results/faceting/how-to/declaring-attributes-for-faceting-with-dashboard)
* [Declare attributes for faceting with the API](/doc/guides/managing-results/refine-results/faceting/how-to/declaring-attributes-for-faceting)
* [Auto-selected facets](/doc/guides/solutions/ecommerce/filtering-and-navigation/tutorials/auto-selected-facets)
* [Visual facets](/doc/guides/solutions/ecommerce/filtering-and-navigation/tutorials/visual-facets)
### File and index structure
For this implementation, you need two files:
* `index.html`
* `main.js`
You also need an Algolia containing the [ecommerce dataset](https://www.github.com/algolia/datasets/tree/master/ecommerce).
For this guide, name the index `instant_search_solutions_ecommerce`.
It's a four-step process (this code is located in `main.js`):
The rendering function is called before the query and each time results come back from Algolia.
The function in `main.js` is populated with [rendering options](/doc/api-reference/widgets/refinement-list/js#rendering-options). This code creates the look and feel of the category's facet values and defines the click-event behavior. It also manages the "show more" logic.
```js JavaScript icon=braces theme={"system"}
// 1. Create a render function
const renderRefinementList = (renderOptions, isFirstRender) => {
const {
items,
refine,
createURL,
isShowingMore,
toggleShowMore,
widgetParams,
} = renderOptions;
//Do some initial rendering and bind events
if (isFirstRender) {
const ul = document.createElement('ul');
const button = document.createElement('button');
button.classList.add('btn-showMore')
button.textContent = 'Show more';
button.addEventListener('click', () => {
toggleShowMore();
});
widgetParams.container.appendChild(ul);
widgetParams.container.appendChild(button);
}
//Render the widget
widgetParams.container.querySelector('ul').innerHTML = items
.map(
item => `
${item.label} (${item.count})
`
)
.join('');
[...widgetParams.container.querySelectorAll('a')].forEach(element => {
element.addEventListener('click', event => {
event.preventDefault();
refine(event.currentTarget.dataset.value);
});
});
const button = widgetParams.container.querySelector('button');
button.textContent = isShowingMore ? 'Show less' : 'Show more';
};
function isRefined(item) {
if (item.isRefined) {
return 'font-weight: bold; background-color: rgba(83,101,252, 0.5)'
}
}
```
```js JavaScript icon=braces theme={"system"}
const customRefinementList = instantsearch.connectors.connectRefinementList(
renderRefinementList
);
```
Add the new customized connector to your collection of widgets also in `main.js`.
You give it the container used by the HTML, as described in the next section.
In the example, the container ID is `#guided-search-facets`.
```js JavaScript icon=braces theme={"system"}
// 3. Instantiate
search.addWidgets([
customRefinementList({
container: document.querySelector('#guided-search-facets'),
attribute: 'categories',
showMoreLimit: 40,
})
]);
```
Add the widget to your `index.html`.
Here it's positioned just under the search box.
```html HTML icon="xml-code" theme={"system"}
```
In this image, a set of guided search facets appear near the search box.
For example, if a user is looking for a computer, clicking **Computers & Tablets** will update the results on the page and the facet filters to stay in context with the scope of the query.
In this case, the **brands** facet updates to show relevant brands such as HP and Apple.
This helps users to refine and improve the relevance of their results.
The order of the facet values is based on count but you can adjust it to alphabetical or any custom order that makes sense for your organization.
## Before you begin
This tutorial requires [InstantSearch.js](/doc/guides/building-search-ui/getting-started/js).
## Implementation guide
In this guide, you build a classic ecommerce search page with a search box,
guided search facets at the top, two facets (brand and price), and results.
### High-level approach
To create guided search facets, you need to create a UI for the [`refinementList`](/doc/api-reference/widgets/refinement-list/js) widget using connectors.
Essentially, you override the out-of-the-box behavior of a refinement list widget with your own render function.
Find the code examples in the guide on the [custom refinement list connector](/doc/api-reference/widgets/current-refinements/js#customize-the-ui-with-connectcurrentrefinements).
Before you get started, make sure you:
* Select an attribute as the guided facet filter and set it as one of the [`attributesForFaceting`](/doc/api-reference/api-parameters/attributesForFaceting).
* Set up your UI with the [InstantSearch getting started guide](/doc/guides/building-search-ui/getting-started/js).
For more information, see:
* [Declare attributes for faceting in the dashboard](/doc/guides/managing-results/refine-results/faceting/how-to/declaring-attributes-for-faceting-with-dashboard)
* [Declare attributes for faceting with the API](/doc/guides/managing-results/refine-results/faceting/how-to/declaring-attributes-for-faceting)
* [Auto-selected facets](/doc/guides/solutions/ecommerce/filtering-and-navigation/tutorials/auto-selected-facets)
* [Visual facets](/doc/guides/solutions/ecommerce/filtering-and-navigation/tutorials/visual-facets)
### File and index structure
For this implementation, you need two files:
* `index.html`
* `main.js`
You also need an Algolia containing the [ecommerce dataset](https://www.github.com/algolia/datasets/tree/master/ecommerce).
For this guide, name the index `instant_search_solutions_ecommerce`.
It's a four-step process (this code is located in `main.js`):
The rendering function is called before the query and each time results come back from Algolia.
The function in `main.js` is populated with [rendering options](/doc/api-reference/widgets/refinement-list/js#rendering-options). This code creates the look and feel of the category's facet values and defines the click-event behavior. It also manages the "show more" logic.
```js JavaScript icon=braces theme={"system"}
// 1. Create a render function
const renderRefinementList = (renderOptions, isFirstRender) => {
const {
items,
refine,
createURL,
isShowingMore,
toggleShowMore,
widgetParams,
} = renderOptions;
//Do some initial rendering and bind events
if (isFirstRender) {
const ul = document.createElement('ul');
const button = document.createElement('button');
button.classList.add('btn-showMore')
button.textContent = 'Show more';
button.addEventListener('click', () => {
toggleShowMore();
});
widgetParams.container.appendChild(ul);
widgetParams.container.appendChild(button);
}
//Render the widget
widgetParams.container.querySelector('ul').innerHTML = items
.map(
item => `
${item.label} (${item.count})
`
)
.join('');
[...widgetParams.container.querySelectorAll('a')].forEach(element => {
element.addEventListener('click', event => {
event.preventDefault();
refine(event.currentTarget.dataset.value);
});
});
const button = widgetParams.container.querySelector('button');
button.textContent = isShowingMore ? 'Show less' : 'Show more';
};
function isRefined(item) {
if (item.isRefined) {
return 'font-weight: bold; background-color: rgba(83,101,252, 0.5)'
}
}
```
```js JavaScript icon=braces theme={"system"}
const customRefinementList = instantsearch.connectors.connectRefinementList(
renderRefinementList
);
```
Add the new customized connector to your collection of widgets also in `main.js`.
You give it the container used by the HTML, as described in the next section.
In the example, the container ID is `#guided-search-facets`.
```js JavaScript icon=braces theme={"system"}
// 3. Instantiate
search.addWidgets([
customRefinementList({
container: document.querySelector('#guided-search-facets'),
attribute: 'categories',
showMoreLimit: 40,
})
]);
```
Add the widget to your `index.html`.
Here it's positioned just under the search box.
```html HTML icon="xml-code" theme={"system"}
```