> ## Documentation Index
> Fetch the complete documentation index at: https://algolia.com/llms.txt
> Use this file to discover all available pages before exploring further.
# Set up the Algolia cartridge
> Learn how to set up the Algolia cartridge for Salesforce B2C Commerce.
Algolia provides the following cartridges to integrate with your Salesforce B2C Commerce storefronts:
| Cartridge name | Purpose |
| ------------------------------------------------------ | --------------------------------------------------------------------------------------------------------------------------- |
| **bm\_algolia** | Configure and monitor Algolia indexing and search from your Business Manager (adding a corresponding Merchant Tools module) |
| **int\_algolia** | Synchronize (index) your product catalog and content data from B2C Commerce to Algolia |
| **int\_algolia\_sfra** | Add Algolia InstantSearch and Autocomplete on your SFRA storefront |
| **int\_algolia\_controllers** **algolia\_sg\_changes** | Add Algolia InstantSearch and Autocomplete to your SiteGenesis storefront |
## Install the cartridge
You can install the cartridges with sgmf-scripts,
the Prophet Debugger Visual Studio Code extension,
or Salesforce B2C Commerce UX Studio.
### Install using sgmf-scripts
1. Download the cartridge source from [GitHub](https://github.com/algolia/algoliasearch-sfcc-b2c).
2. Extract the directory.
3. Install the dependencies from the extracted directory:
```sh Command line icon=square-terminal theme={"system"}
cd /path/to/unzipped/folder
npm install
```
4. Create a `dw.json` file in the same directory with the following content:
```json JSON icon=braces theme={"system"}
{
"hostname": "...",
"username": "...",
"password": "...",
"code-version": "..."
}
```
* `hostname`: hostname of your sandbox—for example: `"zzaa-001.sandbox.us01.dx.commercecloud.salesforce.com"`
* `username` and `password`: your account manager credentials
* `code-version`: active code version listed in **Administration > Code Deployment**—for example, `"SFRA_AP_05_15_2020"`
5. Upload the cartridges:
```sh Command line icon=square-terminal theme={"system"}
npm run uploadCartridge
```
6. Go to **Administration > Development Setup > Folder Browser > Cartridges** and verify that the Algolia cartridges are uploaded.
### Install using Prophet
1. Install [Prophet](https://marketplace.visualstudio.com/items?itemName=SqrTT.prophet) from the Visual Studio Code marketplace.
2. Create a `dw.json` file in the same directory with the following content:
```json JSON icon=braces theme={"system"}
{
"hostname": "...",
"username": "...",
"password": "...",
"code-version": "..."
}
```
3. Run `Prophet: Enable Upload` from the command menu.
### Install with Salesforce B2C Commerce UX Studio
1. Download the cartridge source from [GitHub](https://github.com/algolia/algoliasearch-sfcc-b2c).
2. Establish a new digital server connection with your Salesforce B2C Commerce instance.
3. Import the cartridges to a workspace in Salesforce UX Studio.
 4. Select the cartridges you want to add and click **Finish**.
 5. Wait until Salesforce UX Studio uploads the cartridge to your B2C Commerce instance.
## Enable the cartridges on your site
### Add the Algolia cartridges to your site
1. Go to **Administration > Sites > Manage Sites**.
Select your site from the **Storefront Sites** list:
5. Wait until Salesforce UX Studio uploads the cartridge to your B2C Commerce instance.
## Enable the cartridges on your site
### Add the Algolia cartridges to your site
1. Go to **Administration > Sites > Manage Sites**.
Select your site from the **Storefront Sites** list:
 2. In **Settings**, add the cartridges that match your site's architecture:
* **SFRA**
Add `int_algolia_sfra:int_algolia` to the **beginning** of your cartridge path.
2. In **Settings**, add the cartridges that match your site's architecture:
* **SFRA**
Add `int_algolia_sfra:int_algolia` to the **beginning** of your cartridge path.
 * **SiteGenesis**
1. Add `algolia_sg_changes:int_algolia_controllers` to the **beginning** of your cartridge path.
2. Add `int_algolia` to the **end** of your cartridge path.
* **SiteGenesis**
1. Add `algolia_sg_changes:int_algolia_controllers` to the **beginning** of your cartridge path.
2. Add `int_algolia` to the **end** of your cartridge path.
 * **Headless**
Add `int_algolia` to the **beginning** of your cartridge path.
### Add the Algolia cartridges to the Business Manager
1. Go to **Administration > Sites > Manage Sites** and select **Business Manager**.
* **Headless**
Add `int_algolia` to the **beginning** of your cartridge path.
### Add the Algolia cartridges to the Business Manager
1. Go to **Administration > Sites > Manage Sites** and select **Business Manager**.
 2. In **Settings**, add `bm_algolia:int_algolia` at the **end** of your cartridge path.
 ## Enable Algolia in the Business Manager
{/* vale Algolia.Ampersand = NO */}
1. Go to **Administration > Organization > Roles & Permissions**.
2. Select the role for which you'd like to enable access, such as, Administrator.
## Enable Algolia in the Business Manager
{/* vale Algolia.Ampersand = NO */}
1. Go to **Administration > Organization > Roles & Permissions**.
2. Select the role for which you'd like to enable access, such as, Administrator.
 3. Go to **Business Manager Modules**.
 4. Select **Algolia** and click **Update**.
## Import metadata
1. Go to **Administration > Site Development > Import & Export** and click **Upload** under **Import & Export files**.
2. Upload both files from the `metadata/algolia/meta` folder by clicking **Choose File**, then **Upload**.
Do this for both `custom-objecttype-definitions.xml` and `system-objecttype-extensions.xml`.
4. Select **Algolia** and click **Update**.
## Import metadata
1. Go to **Administration > Site Development > Import & Export** and click **Upload** under **Import & Export files**.
2. Upload both files from the `metadata/algolia/meta` folder by clicking **Choose File**, then **Upload**.
Do this for both `custom-objecttype-definitions.xml` and `system-objecttype-extensions.xml`.
 3. Go back to **Administration > Site Development > Import & Export** and click **Import** under **Meta Data**.
4. Select `custom-objecttype-definitions.xml`, click **Next**, then **Import**.
5. Click **Import** under **Meta Data** and import `system-objecttype-extensions.xml` as well.
6. Confirm that the import is successful:
3. Go back to **Administration > Site Development > Import & Export** and click **Import** under **Meta Data**.
4. Select `custom-objecttype-definitions.xml`, click **Next**, then **Import**.
5. Click **Import** under **Meta Data** and import `system-objecttype-extensions.xml` as well.
6. Confirm that the import is successful:
 ## Import jobs and services
1. Go to **Administration > Operations > Import & Export** and click **Upload** under **Import & Export files**
2. Upload both files from the `metadata/algolia` folder by clicking **Choose File**, then **Upload**. Do this for both `jobs.xml` and `services.xml`.
3. Go back to **Administration > Operations > Import & Export** and click **Import** under **Jobs**.
4. Select `jobs.xml` and click **Next**, **Next**, then **Import**.
5. Click **Import** under **Services**.
6. Select `services.xml` and click **Next**, **Next**, then **Import**.
7. Confirm that the import is successful:
## Import jobs and services
1. Go to **Administration > Operations > Import & Export** and click **Upload** under **Import & Export files**
2. Upload both files from the `metadata/algolia` folder by clicking **Choose File**, then **Upload**. Do this for both `jobs.xml` and `services.xml`.
3. Go back to **Administration > Operations > Import & Export** and click **Import** under **Jobs**.
4. Select `jobs.xml` and click **Next**, **Next**, then **Import**.
5. Click **Import** under **Services**.
6. Select `services.xml` and click **Next**, **Next**, then **Import**.
7. Confirm that the import is successful:
 ## Set Algolia custom preferences for your site
1. Go to **Merchant Tools > Algolia > Algolia**.
## Set Algolia custom preferences for your site
1. Go to **Merchant Tools > Algolia > Algolia**.
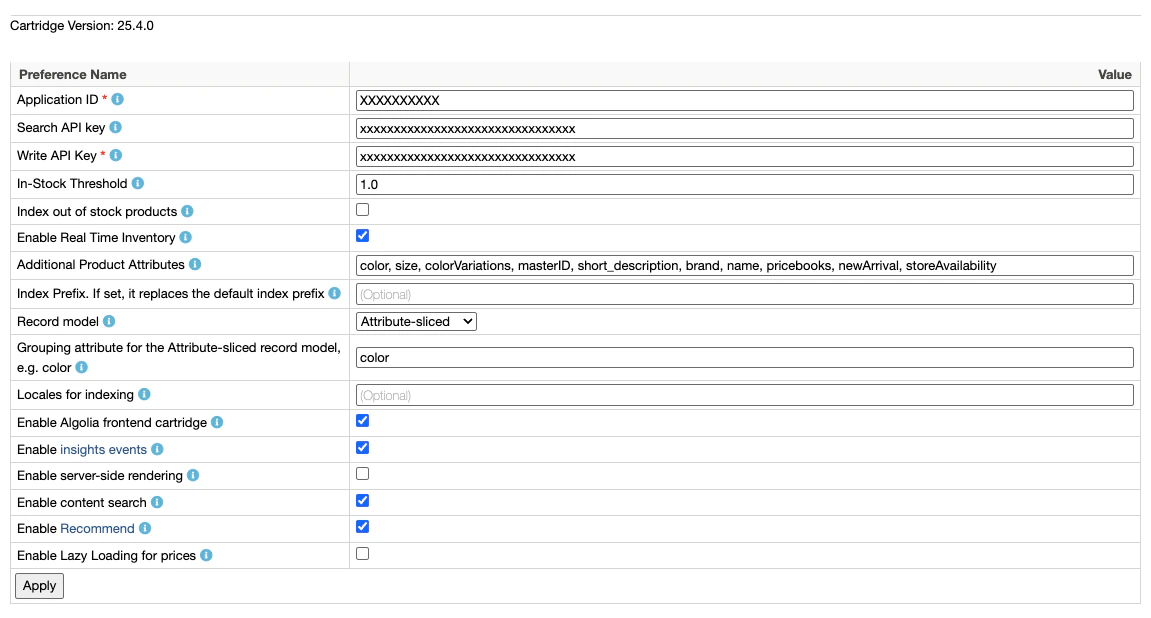 2. Enable Algolia by checking the checkbox next to **Enable Algolia**.
3. Enter your **Application ID**, **Search API Key** and **Write API Key**.
Find them in the [Algolia dashboard](https://dashboard.algolia.com/account/api-keys/).
Consider using restricted API keys for increased security.
The Write API key needs `addObject`, `deleteObject`, `deleteIndex`, and `settings` ACL when indexing with the Search API.
When [indexing with the Ingestion API](/doc/integration/salesforce-commerce-cloud-b2c/guides/ingestion-api), the key must also include `editSettings`.
For more information see [API key restrictions](/doc/guides/security/api-keys/in-depth/api-key-restrictions).
4. In the **Additional Product Attributes** field,
enter the [additional attributes](/doc/integration/salesforce-commerce-cloud-b2c/indexing/product-indexing/indexing-attributes#configurable-attributes) you want to index.
The following attributes are always indexed, so you don't need to specify them:
* `name`
* `__primary_category`
* `categoryPageId`
* `url`
* `image_groups`
* `in_stock`
* `price`
Consider adding these attributes: `short_description` and `long_description`.
Then, expand the list to include attributes specific to your product catalog,
such as, `brand`, `color`, or `size`.
The content attributes you want to index are managed using the `attributeList` job step parameter.
For more information, see [Content indexing job configuration](/doc/integration/salesforce-commerce-cloud-b2c/indexing/content-indexing/configuration#content-indexing-job-configuration).
5. To use [active data](/doc/integration/salesforce-commerce-cloud-b2c/indexing/product-indexing/indexing-attributes#index-active-data) for [custom ranking](/doc/guides/managing-results/must-do/custom-ranking), in **Active data for custom ranking**, select the recommended `ProductActiveData` attributes to index at the record root: `ordersWeek`, `revenueWeek`, `conversionWeek`, `ordersMonth`, `revenueMonth`, or `conversionMonth`.
To index a `ProductActiveData` attribute that isn't in the checkbox list, add its ID (without the `activeData.` prefix) to **Additional Product Attributes**.
Active data values are returned in search responses by default.
If you use them only as ranking signals, add the same attribute IDs to [`unretrievableAttributes`](/doc/api-reference/api-parameters/unretrievableAttributes) on every product index the cartridge writes to.
For more information, see [Make active data attributes unretrievable](/doc/integration/salesforce-commerce-cloud-b2c/indexing/product-indexing/indexing-attributes#make-active-data-attributes-unretrievable).
6. Choose a record model that fits your needs.
Consider [grouping records](/doc/integration/salesforce-commerce-cloud-b2c/getting-started/configure-your-search#configure-results-grouping)
if you use the variant-level model.
For more information, see [Custom preferences](/doc/integration/salesforce-commerce-cloud-b2c/getting-started/custom-preferences).
## Update your templates
You need to update your templates, if your site uses a **SiteGenesis** or **SFRA** architecture **AND**
you haven't [enabled the Algolia cartridge](#enable-the-cartridges-on-your-site).
The Algolia cartridges already include these updates.
If you are using a **headless** architecture,
see [Headless storefronts](/doc/integration/salesforce-commerce-cloud-b2c/guides/headless).
To maintain the integrity of the original SFRA cartridge,
create a new cartridge as a best practice.
You can then move the original templates into this new cartridge and make the necessary modifications.
If you are already using a custom cartridge,
incorporate or adapt these changes into your existing cartridge.
1. In `app_storefront_base/cartridge/templates/default/common/htmlHead.isml`,
add the following code on line 32:
```html HTML icon=code-xml theme={"system"}
```
2. In `app_storefront_base/cartridge/templates/default/components/header/search.isml`,
add the following code at the start of the file, and move existing the code to an `` section:
```html HTML expandable theme={"system"}
```
3. In `app_storefront_base/cartridge/templates/default/search/searchResult.isml`,
replace this line:
```html HTML icon=code-xml theme={"system"}
```
with the following code:
```html HTML icon=code-xml theme={"system"}
```
2. Enable Algolia by checking the checkbox next to **Enable Algolia**.
3. Enter your **Application ID**, **Search API Key** and **Write API Key**.
Find them in the [Algolia dashboard](https://dashboard.algolia.com/account/api-keys/).
Consider using restricted API keys for increased security.
The Write API key needs `addObject`, `deleteObject`, `deleteIndex`, and `settings` ACL when indexing with the Search API.
When [indexing with the Ingestion API](/doc/integration/salesforce-commerce-cloud-b2c/guides/ingestion-api), the key must also include `editSettings`.
For more information see [API key restrictions](/doc/guides/security/api-keys/in-depth/api-key-restrictions).
4. In the **Additional Product Attributes** field,
enter the [additional attributes](/doc/integration/salesforce-commerce-cloud-b2c/indexing/product-indexing/indexing-attributes#configurable-attributes) you want to index.
The following attributes are always indexed, so you don't need to specify them:
* `name`
* `__primary_category`
* `categoryPageId`
* `url`
* `image_groups`
* `in_stock`
* `price`
Consider adding these attributes: `short_description` and `long_description`.
Then, expand the list to include attributes specific to your product catalog,
such as, `brand`, `color`, or `size`.
The content attributes you want to index are managed using the `attributeList` job step parameter.
For more information, see [Content indexing job configuration](/doc/integration/salesforce-commerce-cloud-b2c/indexing/content-indexing/configuration#content-indexing-job-configuration).
5. To use [active data](/doc/integration/salesforce-commerce-cloud-b2c/indexing/product-indexing/indexing-attributes#index-active-data) for [custom ranking](/doc/guides/managing-results/must-do/custom-ranking), in **Active data for custom ranking**, select the recommended `ProductActiveData` attributes to index at the record root: `ordersWeek`, `revenueWeek`, `conversionWeek`, `ordersMonth`, `revenueMonth`, or `conversionMonth`.
To index a `ProductActiveData` attribute that isn't in the checkbox list, add its ID (without the `activeData.` prefix) to **Additional Product Attributes**.
Active data values are returned in search responses by default.
If you use them only as ranking signals, add the same attribute IDs to [`unretrievableAttributes`](/doc/api-reference/api-parameters/unretrievableAttributes) on every product index the cartridge writes to.
For more information, see [Make active data attributes unretrievable](/doc/integration/salesforce-commerce-cloud-b2c/indexing/product-indexing/indexing-attributes#make-active-data-attributes-unretrievable).
6. Choose a record model that fits your needs.
Consider [grouping records](/doc/integration/salesforce-commerce-cloud-b2c/getting-started/configure-your-search#configure-results-grouping)
if you use the variant-level model.
For more information, see [Custom preferences](/doc/integration/salesforce-commerce-cloud-b2c/getting-started/custom-preferences).
## Update your templates
You need to update your templates, if your site uses a **SiteGenesis** or **SFRA** architecture **AND**
you haven't [enabled the Algolia cartridge](#enable-the-cartridges-on-your-site).
The Algolia cartridges already include these updates.
If you are using a **headless** architecture,
see [Headless storefronts](/doc/integration/salesforce-commerce-cloud-b2c/guides/headless).
To maintain the integrity of the original SFRA cartridge,
create a new cartridge as a best practice.
You can then move the original templates into this new cartridge and make the necessary modifications.
If you are already using a custom cartridge,
incorporate or adapt these changes into your existing cartridge.
1. In `app_storefront_base/cartridge/templates/default/common/htmlHead.isml`,
add the following code on line 32:
```html HTML icon=code-xml theme={"system"}
```
2. In `app_storefront_base/cartridge/templates/default/components/header/search.isml`,
add the following code at the start of the file, and move existing the code to an `` section:
```html HTML expandable theme={"system"}
```
3. In `app_storefront_base/cartridge/templates/default/search/searchResult.isml`,
replace this line:
```html HTML icon=code-xml theme={"system"}
```
with the following code:
```html HTML icon=code-xml theme={"system"}
```