> ## Documentation Index
> Fetch the complete documentation index at: https://algolia.com/llms.txt
> Use this file to discover all available pages before exploring further.
# Link Adobe Analytics with the Crawler
> Enrich your extracted records with data from Adobe Analytics.
If you use Adobe Analytics to track metrics like popularity,
you can use this data to boost relevant search results and improve your site's search experience.
## Set up Adobe Analytics access
### Get your company and report suite IDs
1. Go to your Adobe Analytics interface
2. Go to **Admin > All Admin > Company settings home > API Access**.
3. Note down your Company ID and Report Suite ID for when you [create a service account](#create-a-service-account) later.
For more information about report suites,
refer to [Adobe's documentation](https://experienceleague.adobe.com/en/docs/analytics/admin/admin-tools/manage-report-suites/c-new-report-suite/new-report-suite).
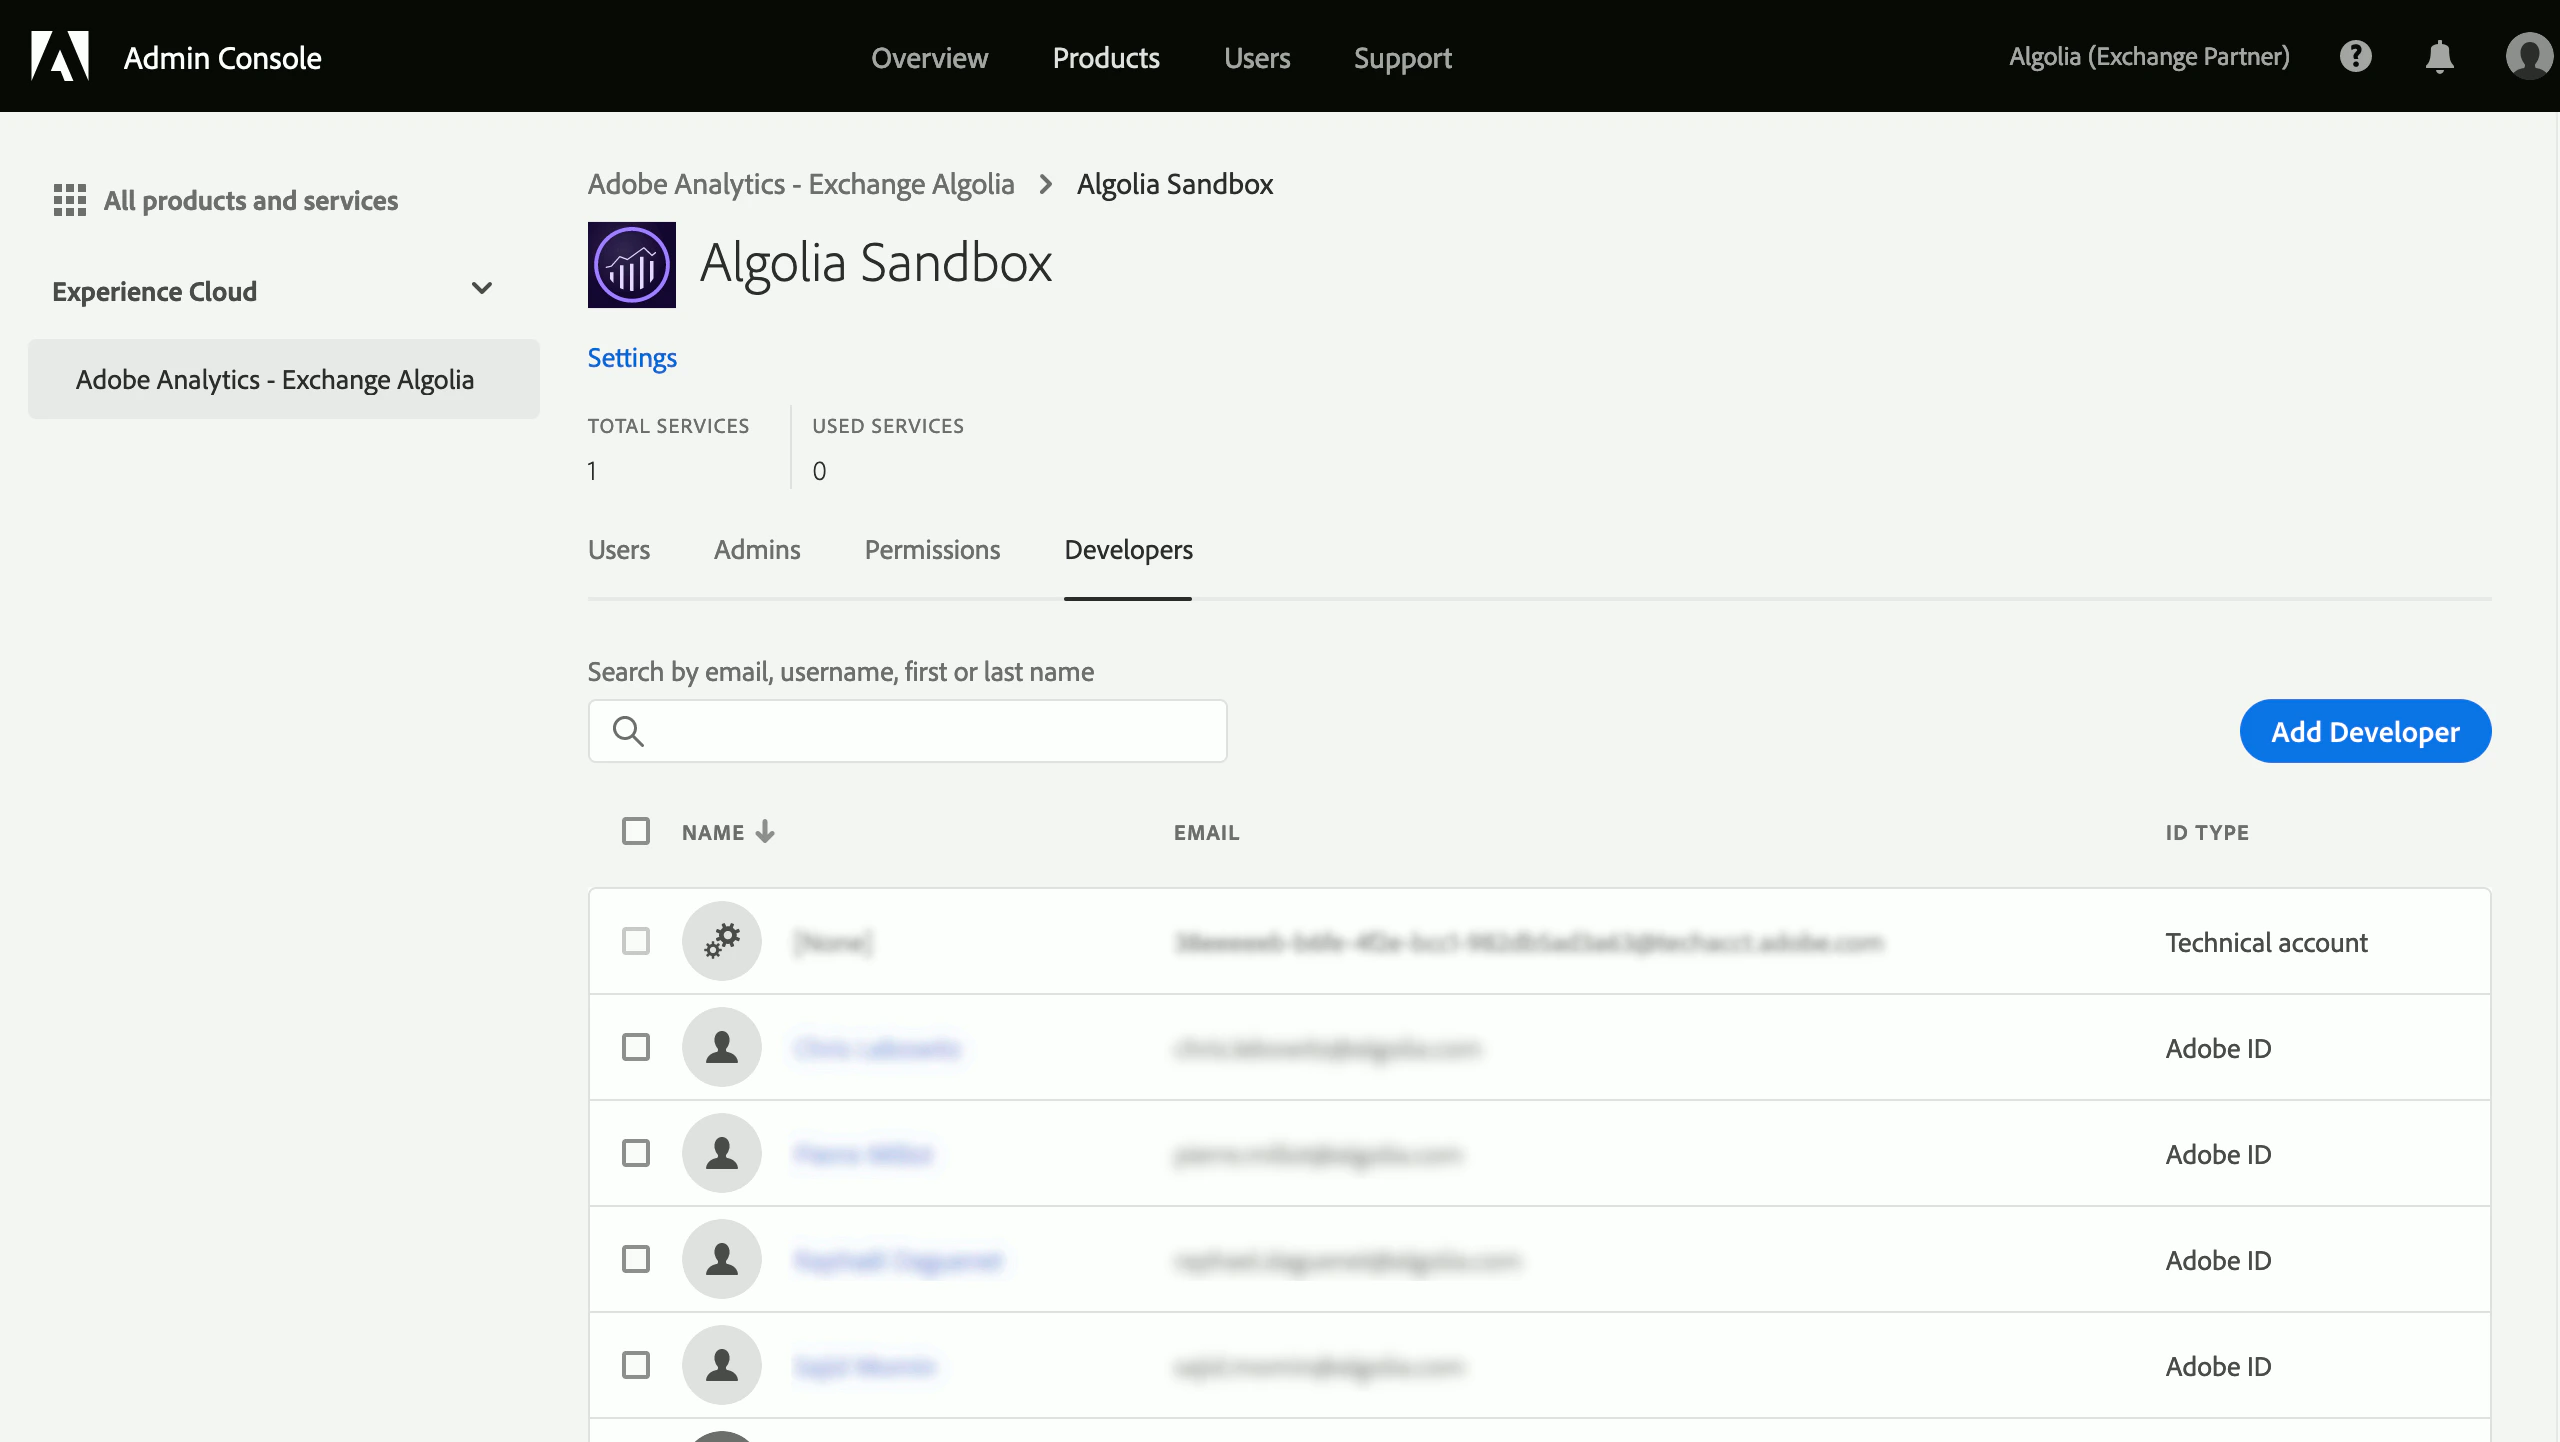
### Add developer permissions to your product profile
The Crawler's connection to Adobe Analytics requires Developer permissions:
1. Go to [Adobe Admin Console](https://adminconsole.adobe.com/) and select **Adobe Analytics** in the Products list.
2. Select or create a Product Profile and click the **Developers** tab.
3. Click **Add Developer**.
 For more information about developer management,
read [Adobe's documentation](https://helpx.adobe.com/enterprise/admin-guide.html/enterprise/using/manage-developers.ug.html).
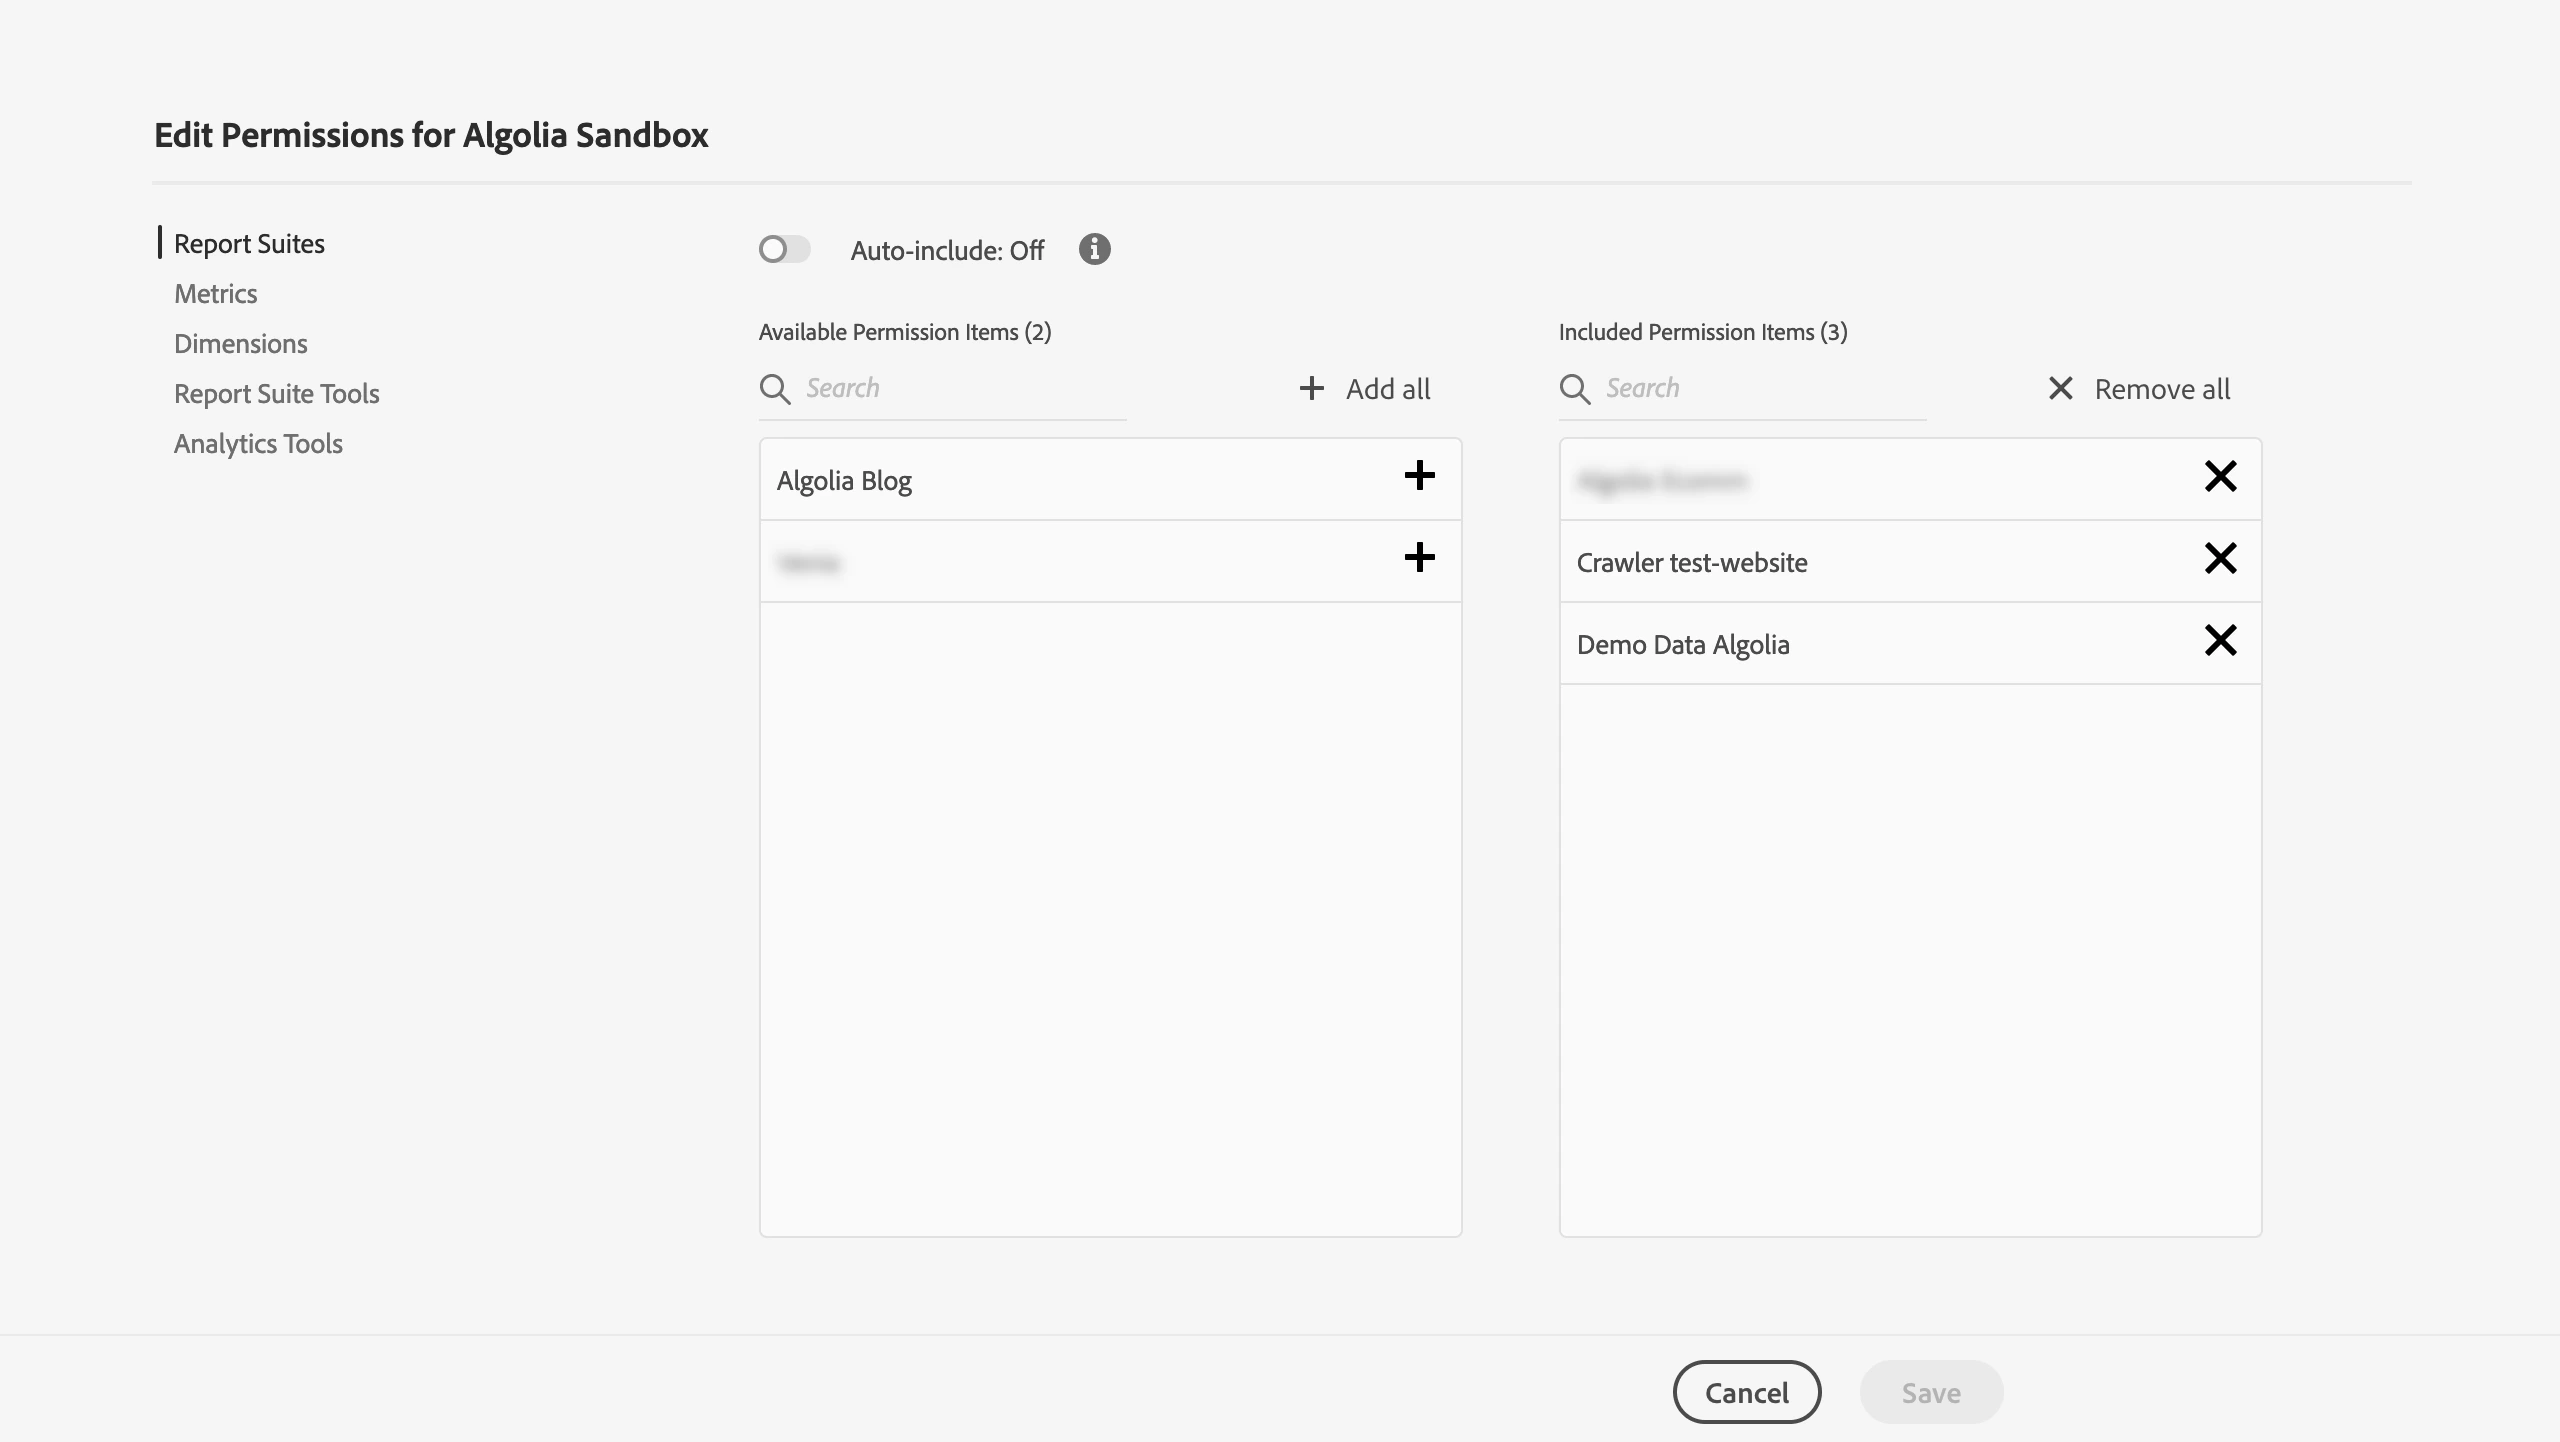
### Grant permissions for the report suite
In the Product Profile of the Adobe Admin Console:
1. Go to the **Permissions** tab.
2. Click **Report Suites** and add your report suite to the **Included Permission Items**.
3. Do the same for the Metrics and Dimensions you want to use with the crawler.
For more information about developer management,
read [Adobe's documentation](https://helpx.adobe.com/enterprise/admin-guide.html/enterprise/using/manage-developers.ug.html).
### Grant permissions for the report suite
In the Product Profile of the Adobe Admin Console:
1. Go to the **Permissions** tab.
2. Click **Report Suites** and add your report suite to the **Included Permission Items**.
3. Do the same for the Metrics and Dimensions you want to use with the crawler.
 ### Create a service account
1. Go to [Adobe Developer Console](https://developer.adobe.com/console/home) and sign in with [the developer account you added](#add-developer-permissions-to-your-product-profile).
2. In the Projects tab, click **Create new project** or use an existing one.
3. In the project, click **+ Add to Project > API**, select the Adobe Analytics API, and click **Next**.
4. When asked for the authentication type, select **OAuth Server-to-Server**.
5. Use your Company ID and Report Suite ID when setting up the service account.
### Create a service account
1. Go to [Adobe Developer Console](https://developer.adobe.com/console/home) and sign in with [the developer account you added](#add-developer-permissions-to-your-product-profile).
2. In the Projects tab, click **Create new project** or use an existing one.
3. In the project, click **+ Add to Project > API**, select the Adobe Analytics API, and click **Next**.
4. When asked for the authentication type, select **OAuth Server-to-Server**.
5. Use your Company ID and Report Suite ID when setting up the service account.
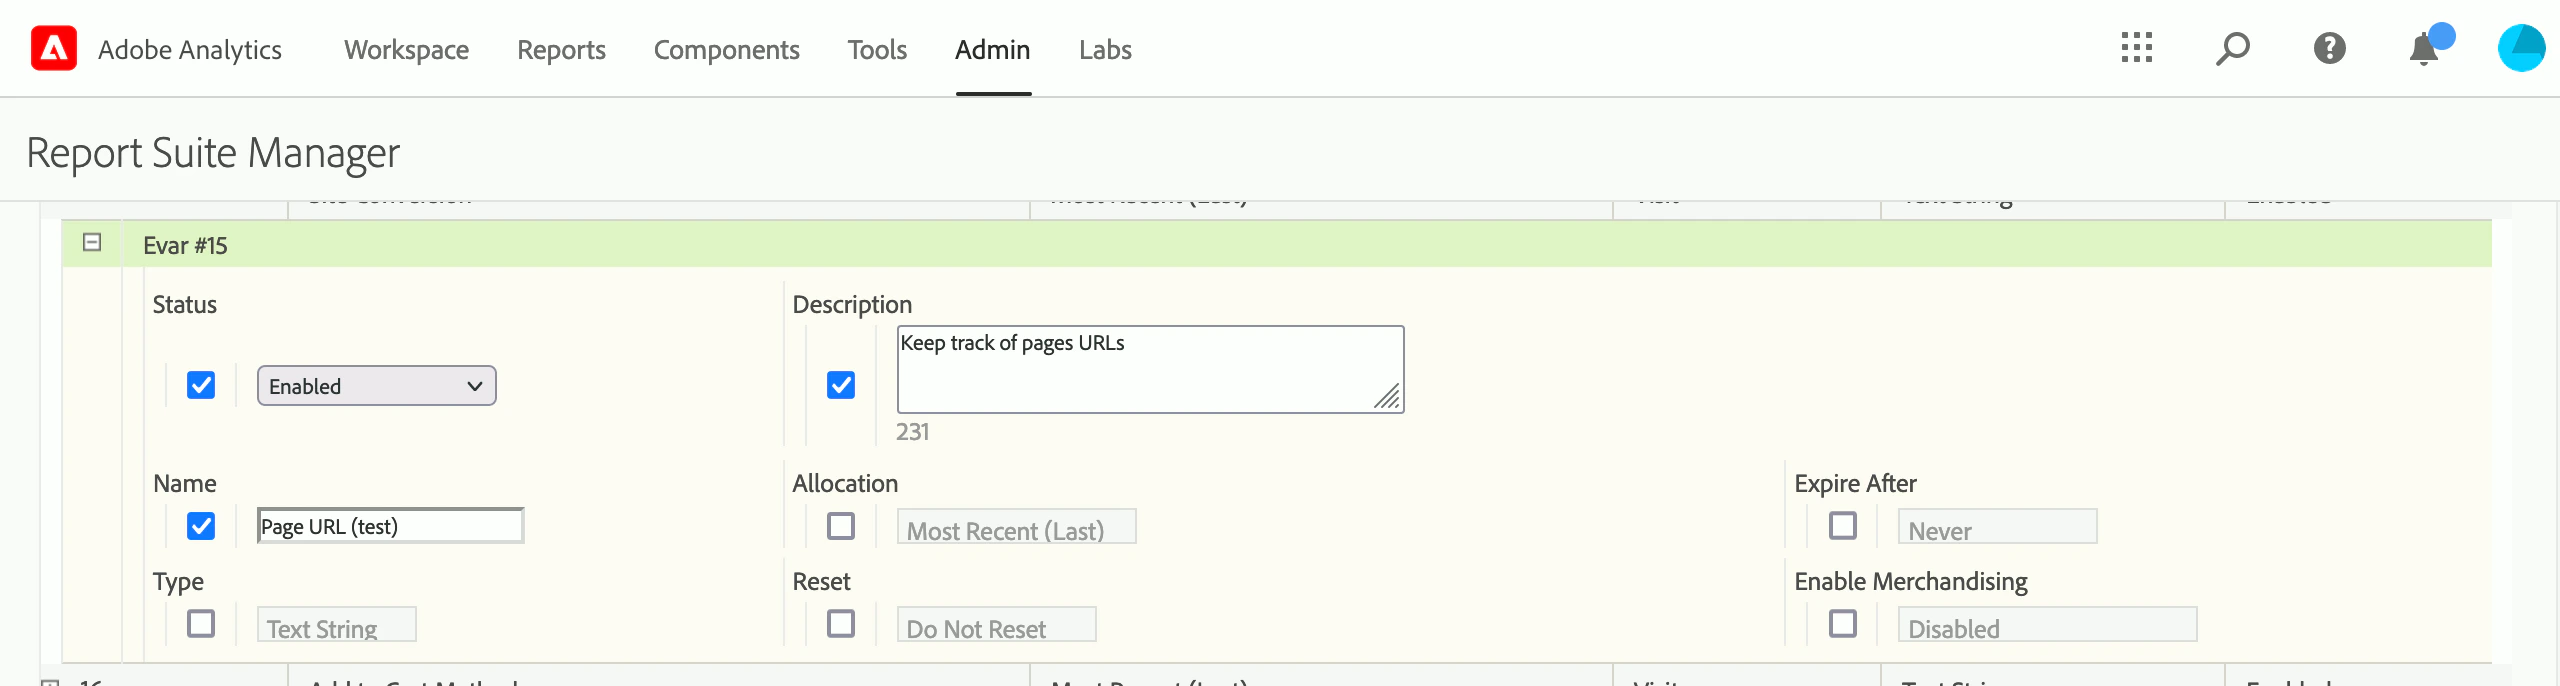
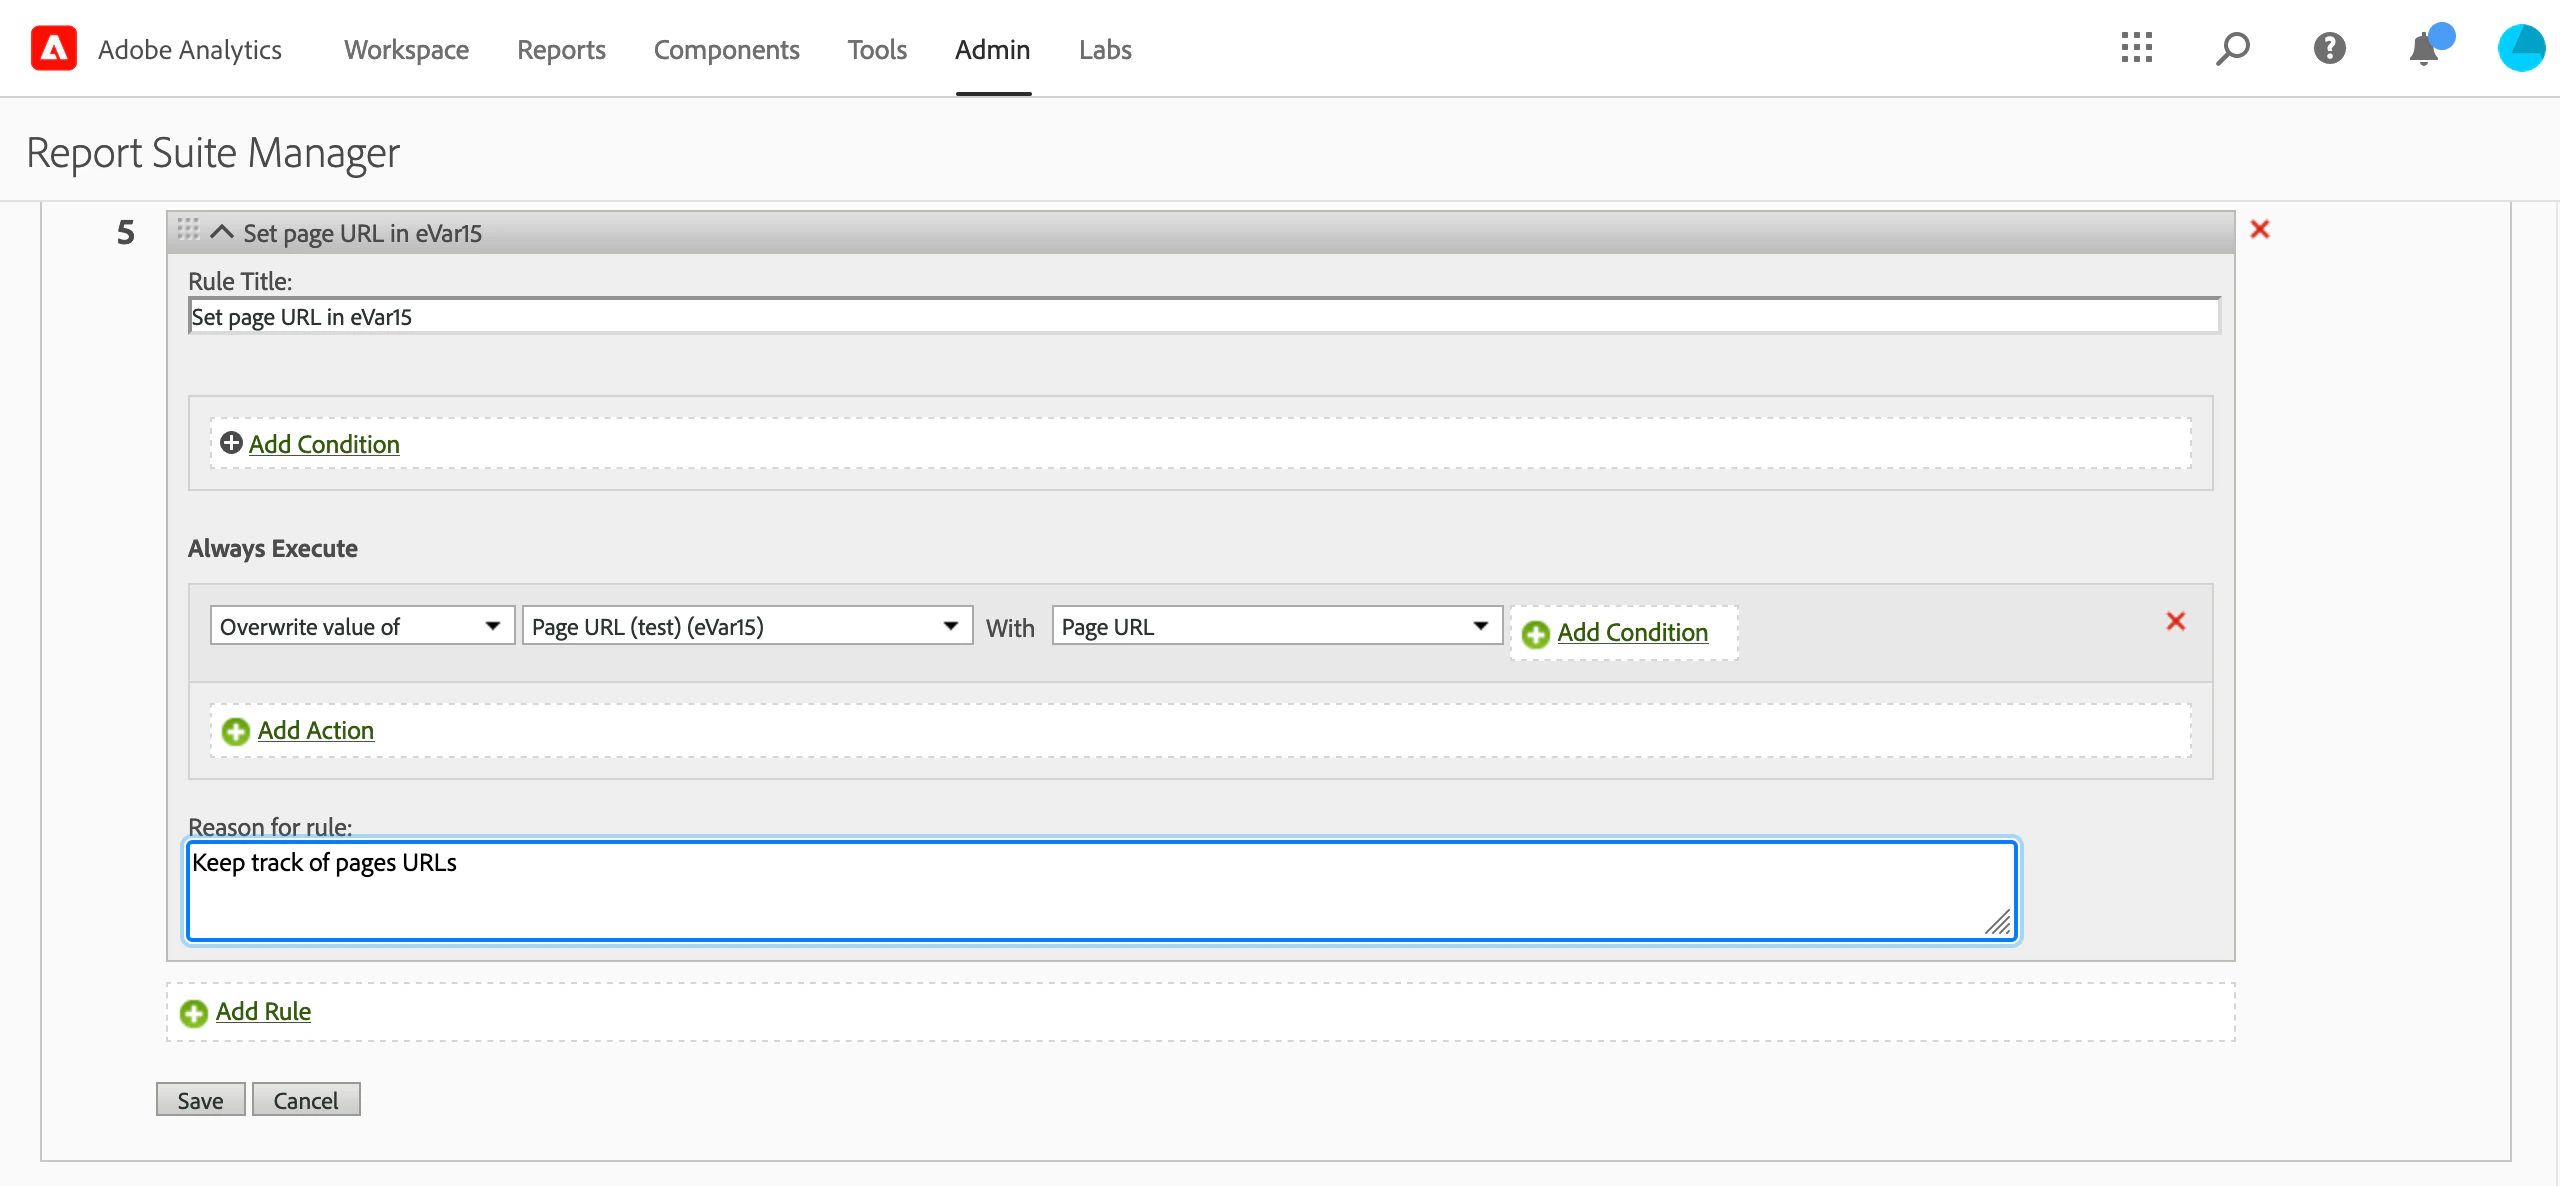
 ### Push page URLs into a conversion variable
The Crawler uses [Adobe's `Page` dimension](https://experienceleague.adobe.com/docs/analytics/components/dimensions/page.html) to map analytics data to each visited URL.
By default, this dimension collects data from the `pageName` variable and falls back to the `pageURL` variable
The [`pageURL`](https://experienceleague.adobe.com/docs/analytics/implementation/vars/page-vars/pageurl.html) dimension isn't available in Adobe Analysis Workspace.
To ensure reliable URL population of named pages, create a conversion variable (eVar) and push the page URLs into it:
1. [Enable a new conversion variable (eVar)](https://experienceleague.adobe.com/docs/analytics/admin/admin-tools/conversion-variables/t-conversion-variables-admin.html).
### Push page URLs into a conversion variable
The Crawler uses [Adobe's `Page` dimension](https://experienceleague.adobe.com/docs/analytics/components/dimensions/page.html) to map analytics data to each visited URL.
By default, this dimension collects data from the `pageName` variable and falls back to the `pageURL` variable
The [`pageURL`](https://experienceleague.adobe.com/docs/analytics/implementation/vars/page-vars/pageurl.html) dimension isn't available in Adobe Analysis Workspace.
To ensure reliable URL population of named pages, create a conversion variable (eVar) and push the page URLs into it:
1. [Enable a new conversion variable (eVar)](https://experienceleague.adobe.com/docs/analytics/admin/admin-tools/conversion-variables/t-conversion-variables-admin.html).
 2. [Use a processing rule](https://experienceleague.adobe.com/docs/analytics/admin/admin-tools/processing-rules/processing-rules-configuration/t-processing-rules.html) to copy the page URL into the conversion variable.
 ## Create a new external data source
1. On the Crawler page, open the [**External Data**](https://dashboard.algolia.com/crawler/external-data/) tab.
2. Click **Add External Data**.
3. As **External Data type**, select **Adobe Analytics**\*\*, and fill in the form:
* **Unique name**: references this external data in your crawler configuration.
* **Client ID** and **Client Secret**: the credentials obtained when you [created your service account](#create-a-service-account)
* **Scopes**: a comma-separated list of the scopes you require. To see the scopes available for your account, go to your project on the [Adobe Developer Console](https://developer.adobe.com/console).
## Add the external data source to your crawler configuration
[Edit the crawler configuration](/doc/tools/crawler/getting-started/crawler-configuration) to use the external data you just created:
1. Select a [crawler](https://dashboard.algolia.com/crawler/) and click the **Editor** tab.
2. Add the external data's **Unique name** to your `externalData` property. For example:
`externalData: ['myAdobeAnalyticsData']`
3. Save your changes.
The Crawler reports errors encountered when fetching analytics less than one minute after the crawl begins.
## Integrate analytics into records
Edit your `recordExtractor` so that it integrates metrics from Adobe Analytics into the records it produces:
1. Select a [crawler](https://dashboard.algolia.com/crawler/) and click the **Editor** tab.
2. Read metric values from the external data source you added and store them as attributes for your resulting records.
If the current page has Adobe Analytics data,
the associated metrics are present in the
[`dataSources`](/doc/tools/crawler/apis/configuration/actions#param-record-extractor-data-sources) parameter of your
[`recordExtractor`](/doc/tools/crawler/apis/configuration/actions#param-record-extractor):
```js JavaScript icon=code theme={"system"}
recordExtractor: ({ url, dataSources }) => {
// 'myAdobeAnalyticsData' must match one of the unique names defined in 'externalData'
const pageviews = dataSources.myAdobeAnalyticsData['metrics/pageviews'];
return [
{
objectID: url.href,
pageviews,
},
];
},
```
3. In the [URL Tester](/doc/tools/crawler/getting-started/monitoring#url-tester),
enter the URL of a page with Adobe Analytics data.
4. Click **Run test**.
5. When the test completes, click **External data**.
You should see the data extracted from Adobe Analytics for that page.
If this doesn't work as expected, try adding a trailing `/` to your URL or test with another URL.
## Create a new external data source
1. On the Crawler page, open the [**External Data**](https://dashboard.algolia.com/crawler/external-data/) tab.
2. Click **Add External Data**.
3. As **External Data type**, select **Adobe Analytics**\*\*, and fill in the form:
* **Unique name**: references this external data in your crawler configuration.
* **Client ID** and **Client Secret**: the credentials obtained when you [created your service account](#create-a-service-account)
* **Scopes**: a comma-separated list of the scopes you require. To see the scopes available for your account, go to your project on the [Adobe Developer Console](https://developer.adobe.com/console).
## Add the external data source to your crawler configuration
[Edit the crawler configuration](/doc/tools/crawler/getting-started/crawler-configuration) to use the external data you just created:
1. Select a [crawler](https://dashboard.algolia.com/crawler/) and click the **Editor** tab.
2. Add the external data's **Unique name** to your `externalData` property. For example:
`externalData: ['myAdobeAnalyticsData']`
3. Save your changes.
The Crawler reports errors encountered when fetching analytics less than one minute after the crawl begins.
## Integrate analytics into records
Edit your `recordExtractor` so that it integrates metrics from Adobe Analytics into the records it produces:
1. Select a [crawler](https://dashboard.algolia.com/crawler/) and click the **Editor** tab.
2. Read metric values from the external data source you added and store them as attributes for your resulting records.
If the current page has Adobe Analytics data,
the associated metrics are present in the
[`dataSources`](/doc/tools/crawler/apis/configuration/actions#param-record-extractor-data-sources) parameter of your
[`recordExtractor`](/doc/tools/crawler/apis/configuration/actions#param-record-extractor):
```js JavaScript icon=code theme={"system"}
recordExtractor: ({ url, dataSources }) => {
// 'myAdobeAnalyticsData' must match one of the unique names defined in 'externalData'
const pageviews = dataSources.myAdobeAnalyticsData['metrics/pageviews'];
return [
{
objectID: url.href,
pageviews,
},
];
},
```
3. In the [URL Tester](/doc/tools/crawler/getting-started/monitoring#url-tester),
enter the URL of a page with Adobe Analytics data.
4. Click **Run test**.
5. When the test completes, click **External data**.
You should see the data extracted from Adobe Analytics for that page.
If this doesn't work as expected, try adding a trailing `/` to your URL or test with another URL.