> ## Documentation Index
> Fetch the complete documentation index at: https://algolia.com/llms.txt
> Use this file to discover all available pages before exploring further.
# Voice search
> Learn how to build a voice search experience with InstantSearch iOS and VoiceOverlay.
export const Records = () =>
records
;
export const Index = () =>
index
;
Starting May 1, 2024,
Apple requires all iOS apps to include a privacy manifest.
For more information, see [Privacy manifest](/doc/guides/building-search-ui/resources/privacy-manifest/ios/).
This guide explains how to build step by step a voice search experience using the libraries provided by Algolia.
You'll build an iOS app with a classic search box and a button that triggers the voice input.
To create this app, you'll use the [InstantSearch](https://github.com/algolia/instantsearch-ios) and [Voice overlay](https://github.com/algolia/voice-overlay-ios) libraries.
Building a voice search experience has three steps:
* **Input** using speech-to-text
* **Processing** using Algolia
* **Output** using speech synthesis
## Speech-to-text input layer
You must have a speech-to-text layer to convert your users' speech into something Algolia understands (Algolia can't process non-textual searches).
You can add a speech-to-text layer in two ways:
* Using the Chrome browser, iOS or Android native apps, or a voice platform tool like Alexa or Google Assistant with speech-to-text built-in.
* Using a third-party service. You send user speech to the service. When you receive it back, you then send it to Algolia as a search query. Some services include:
* [Google Cloud Speech-to-Text](https://cloud.google.com/speech-to-text/)
* [Azure Cognitive Services](https://azure.microsoft.com/en-us/services/cognitive-services/speech-to-text/)
* [AssemblyAI](https://assemblyai.com)
## Process the query with Algolia
After converting speech to text, you need to process the query and return relevant results from your Algolia .
This step involves:
* Query time settings
* Index configuration
Both steps help improve the search experience, especially for voice input.
### Query time settings
The query time settings improve search results during query time.
For instance, [selecting a language](/doc/guides/managing-results/optimize-search-results/handling-natural-languages-nlp/how-to/how-to-set-an-index-query-language) for Algolia let you set certain features like ignoring "noise" words that users could enter in their search query.
If you choose English as the language, and you turn on the stop words feature, the search engine ignores words like 'a' and 'an' as they're not relevant to the search query.
This gives more exact search results.
* Set [`removeStopWords`](/doc/api-reference/api-parameters/removeStopWords) and ensure to select a supported language. For example, `en` for English.
This setting removes stop words like "a", "an", or "the" before running the search query.
* Send the entire query string along as [`optionalWords`](/doc/api-reference/api-parameters/optionalWords).
Speech often has words that aren't in any of your . With this setting, records don't need to match all the words. Records matching more words rank higher. For example, in the spoken query "Show me all blue dresses", only "blue dresses" may yield results for a clothing store: the other words should be optional.
* Set [`ignorePlurals`](/doc/api-reference/api-parameters/ignorePlurals) to `true` and ensure to [select a supported language](/doc/guides/managing-results/optimize-search-results/handling-natural-languages-nlp/how-to/how-to-set-an-index-query-language). For example, `en` for English.
This setting marks words like "car" and "cars" as matching terms.
* Apply [`analyticsTags`](/doc/api-reference/api-parameters/analyticsTags) to the query, including voice queries.
You can activate these settings using the [`naturalLanguages`](/doc/api-reference/api-parameters/naturalLanguages) parameter. These settings work well together when the query format is in natural language instead of keywords, for example, when your user performs a voice search.
### Index configuration
Similarly, you can apply some rules related to your index.
These rules are dynamic and apply depending on what users type in the search query.
[Detecting user intent](/doc/guides/managing-results/rules/detecting-intent) can help dynamically change the search results.
## Speech synthesis output
Not all voice platforms need speech synthesis or text-to-speech.
For example, a site that shows search results may be enough.
If your voice platform does need speech synthesis, your options are:
* A built-in system such as Alexa or Google Assistant.
* A third-party system. Most modern browsers support speech synthesis through the [SpeechSynthesis API](https://developer.mozilla.org/en-US/docs/Web/API/SpeechSynthesis). If you want a wider choice of voices, you have [Azure Cognitive Services](https://azure.microsoft.com/en-us/services/cognitive-services/speech-to-text/) or [Amazon Web Services' Polly](https://aws.amazon.com/polly/).
## Prepare your project
To use InstantSearch, you need an Algolia account.
You can [create a new account](https://dashboard.algolia.com/users/sign_up),
or use the following credentials:
* Application ID: `latency`
* Search API Key: `927c3fe76d4b52c5a2912973f35a3077`
* Index name: `STAGING_native_ecom_demo_products`
These credentials give access to a pre-loaded dataset of products appropriate for this guide.
### Create a new Xcode project
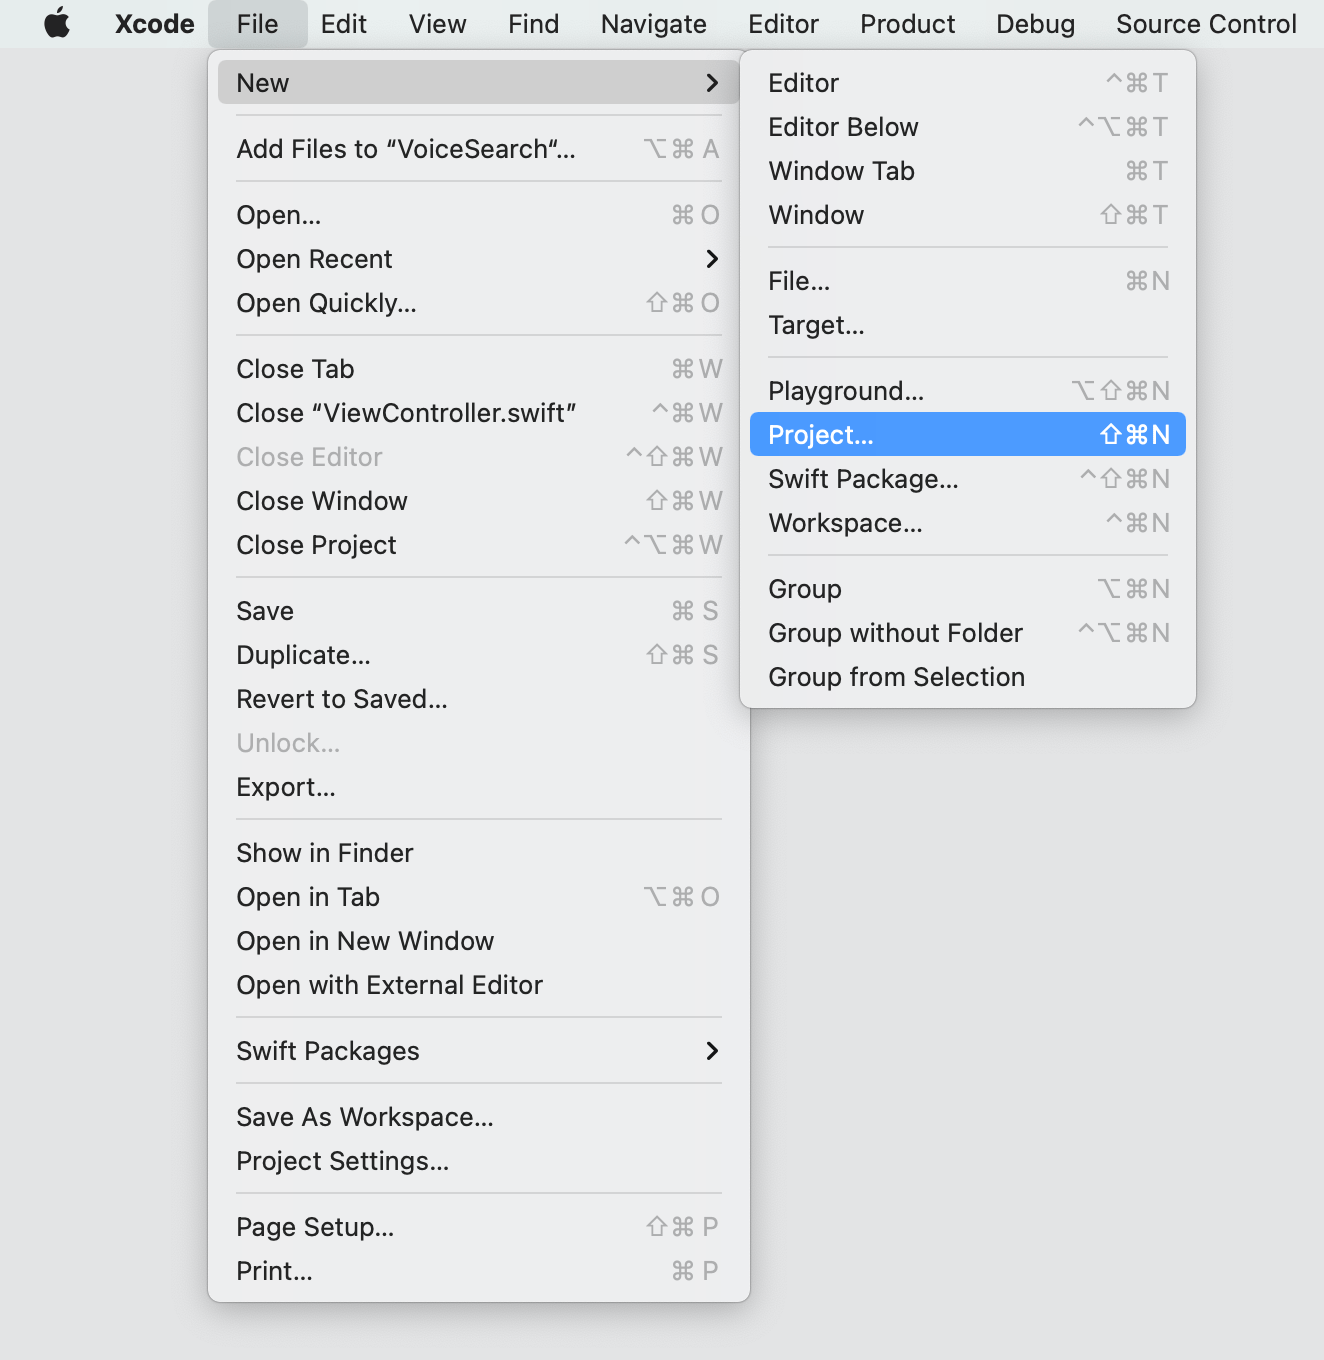
Start by creating a new Xcode project.
Open Xcode, and select `File -> New -> Project` in the menu bar.
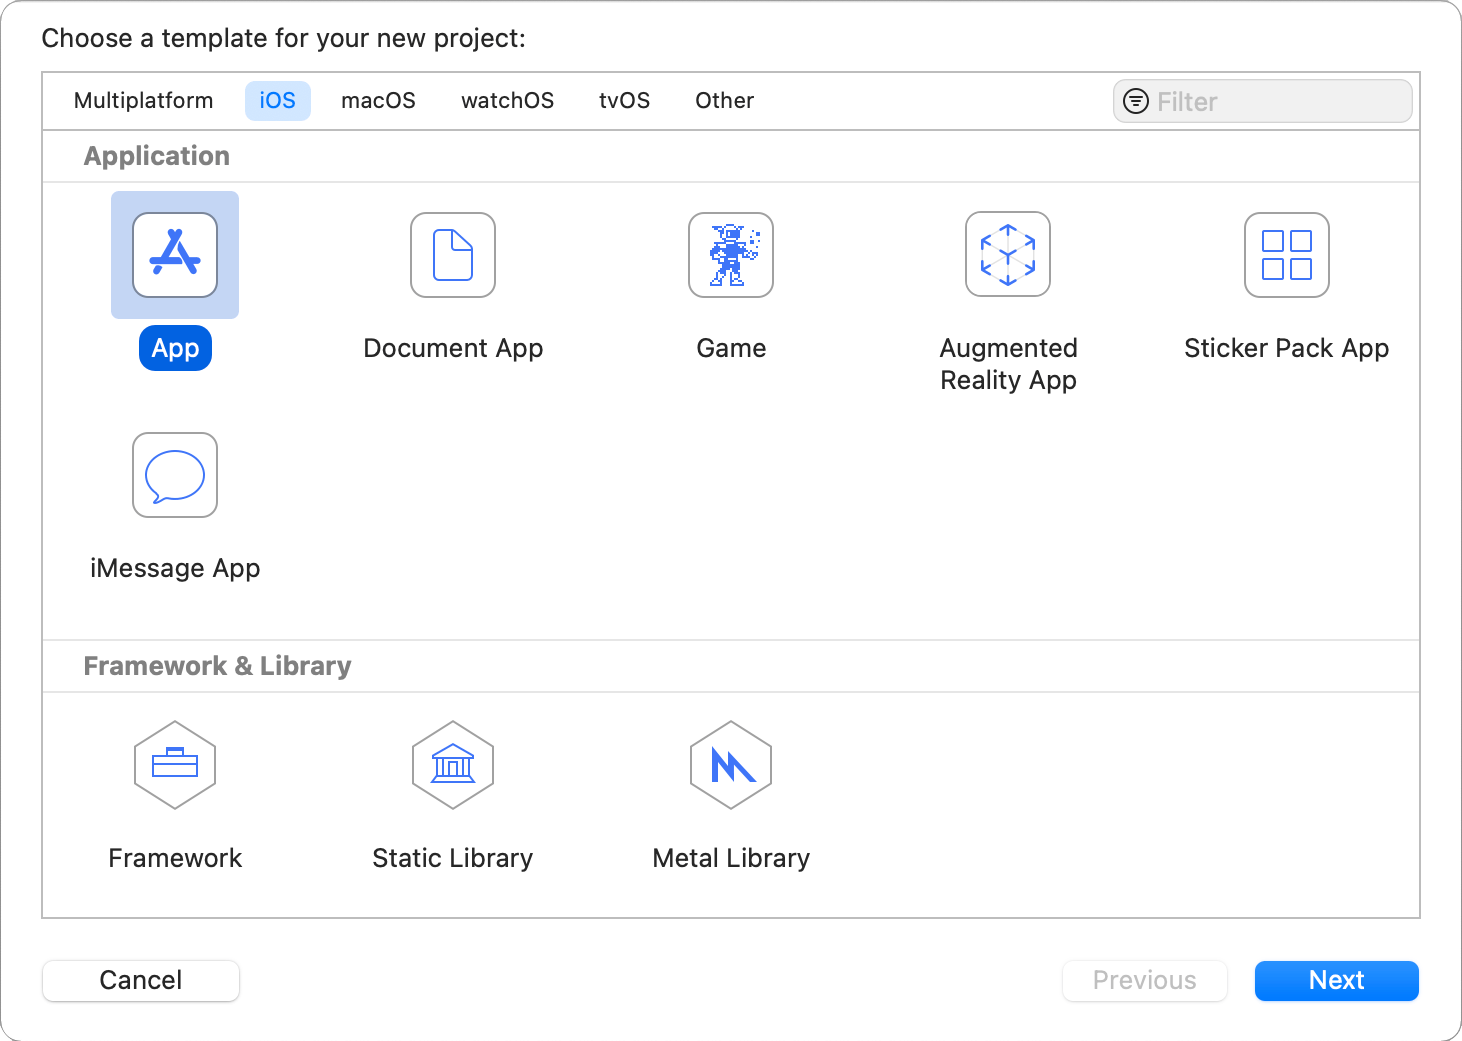
 Select `iOS -> App` template and click **Next**.
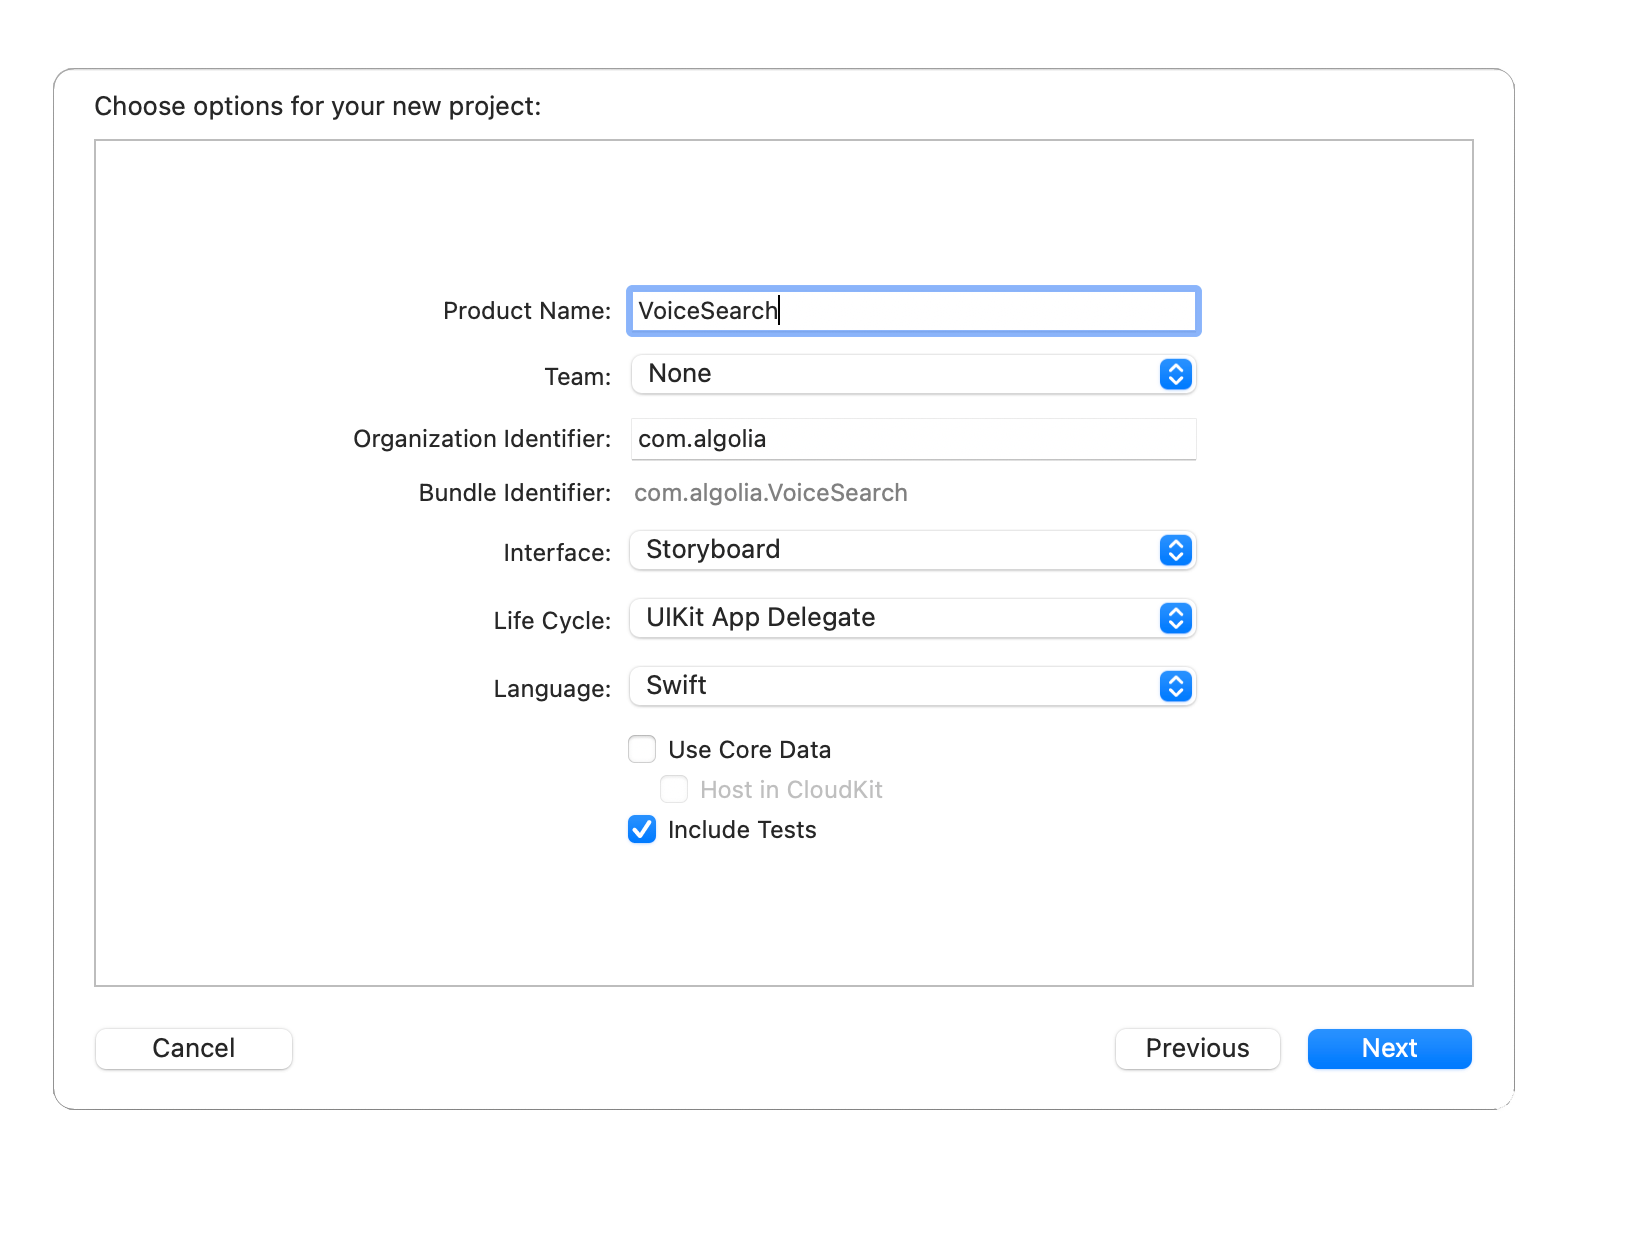
 Give your app a name and click **Next**.
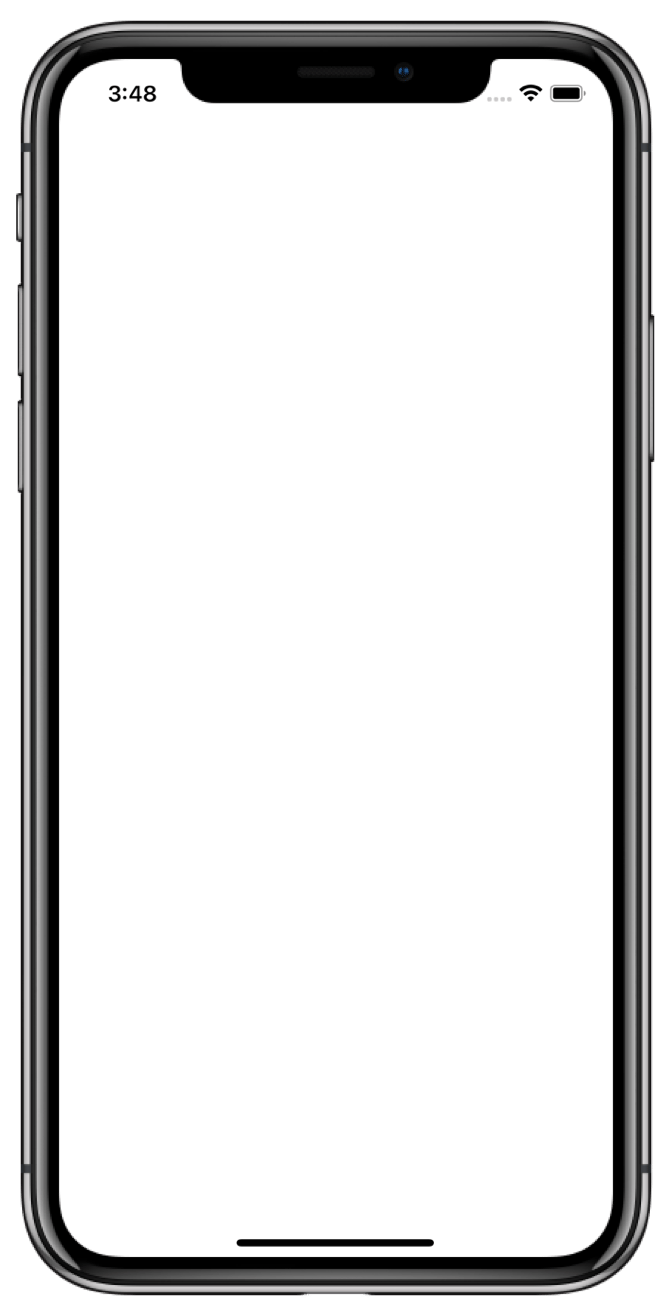
 Build and run your app (for example, by pressing `Command+R`).
You should see the device simulator with a blank screen.
Build and run your app (for example, by pressing `Command+R`).
You should see the device simulator with a blank screen.
 ### Add project dependencies
This tutorial uses [Swift Package Manager](https://www.swift.org/documentation/package-manager/) to integrate the Algolia libraries.
If you prefer to use another dependency manager (`Cocoapods`) read the corresponding installation guides for [InstantSearch](https://github.com/algolia/instantsearch-ios#cocoapods) and [VoiceOverlay](https://github.com/algolia/voice-overlay-ios#cocoapods).
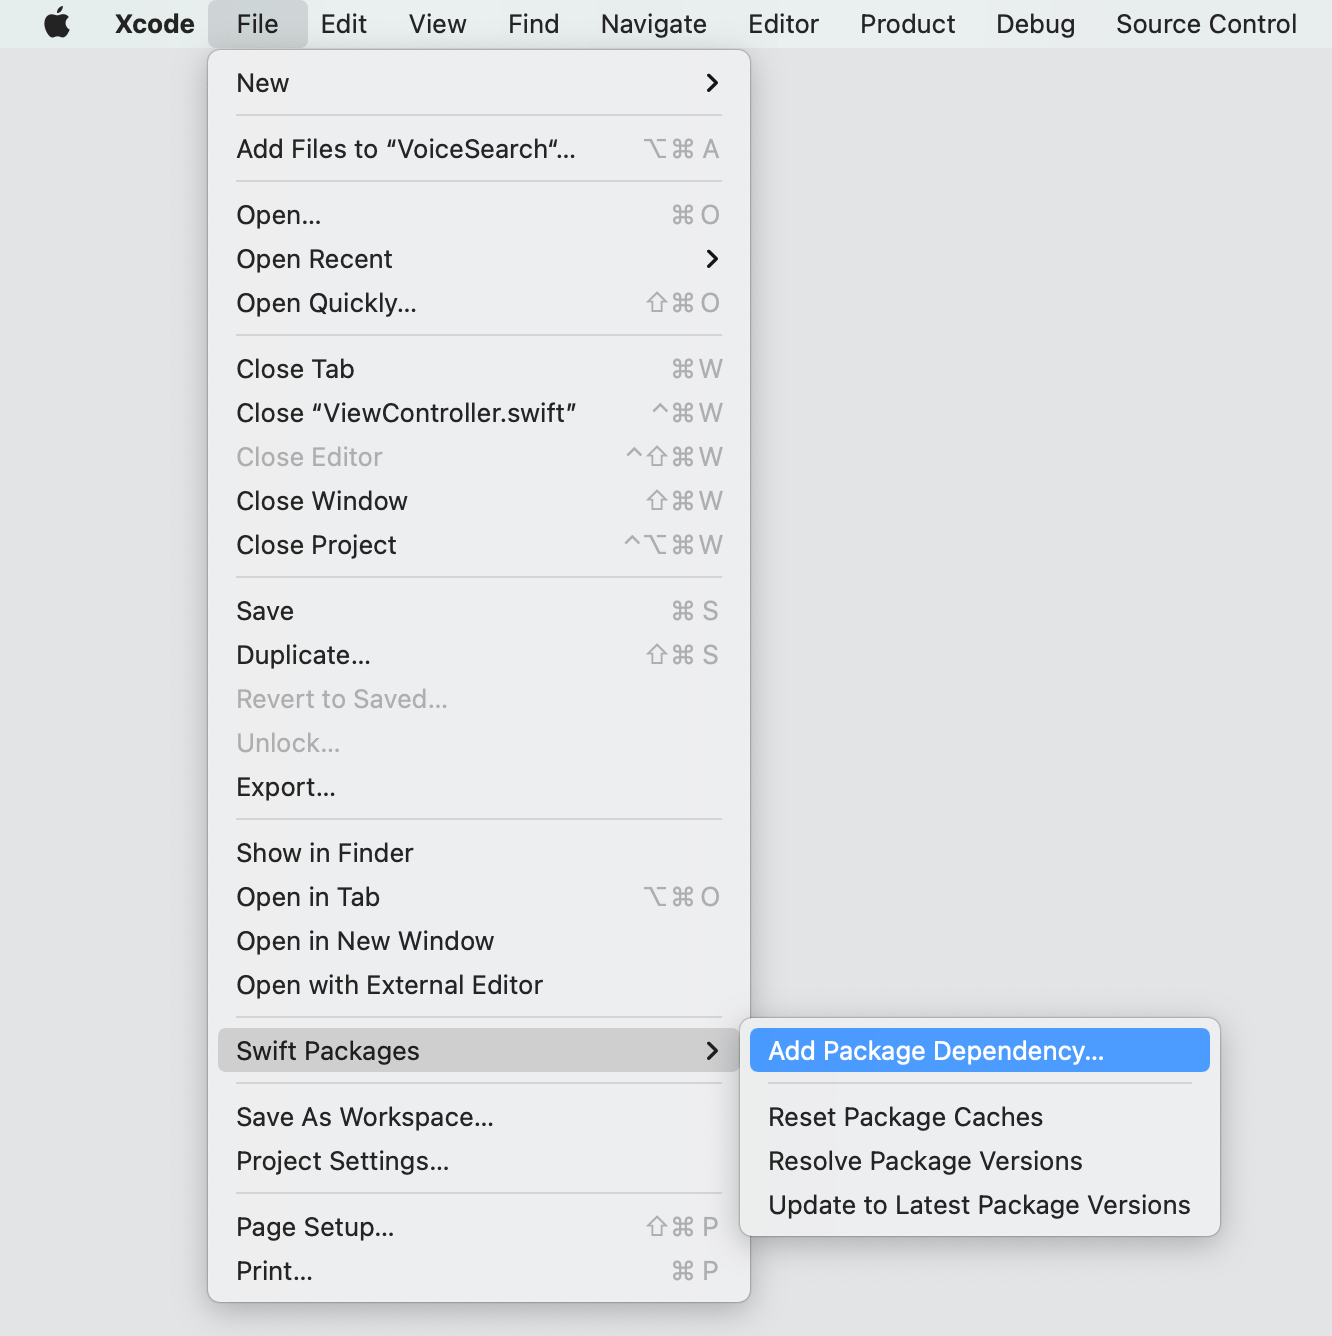
In the menu bar select **File > Swift Packages > Add Package Dependency**.
### Add project dependencies
This tutorial uses [Swift Package Manager](https://www.swift.org/documentation/package-manager/) to integrate the Algolia libraries.
If you prefer to use another dependency manager (`Cocoapods`) read the corresponding installation guides for [InstantSearch](https://github.com/algolia/instantsearch-ios#cocoapods) and [VoiceOverlay](https://github.com/algolia/voice-overlay-ios#cocoapods).
In the menu bar select **File > Swift Packages > Add Package Dependency**.
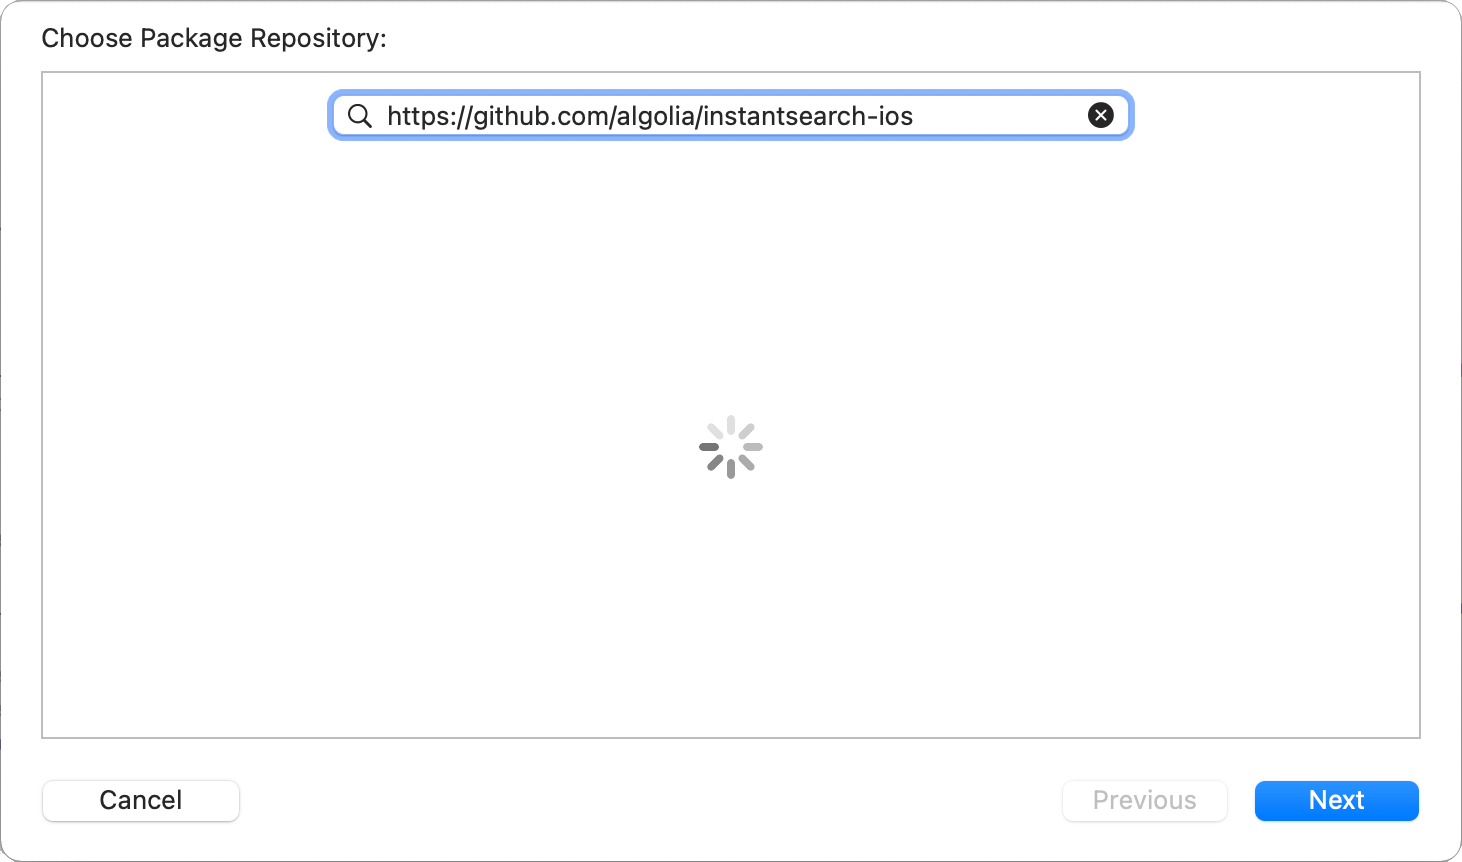
 Enter the GitHub link for the InstantSearch library: [`https://github.com/algolia/instantsearch-ios`](https://github.com/algolia/instantsearch-ios)
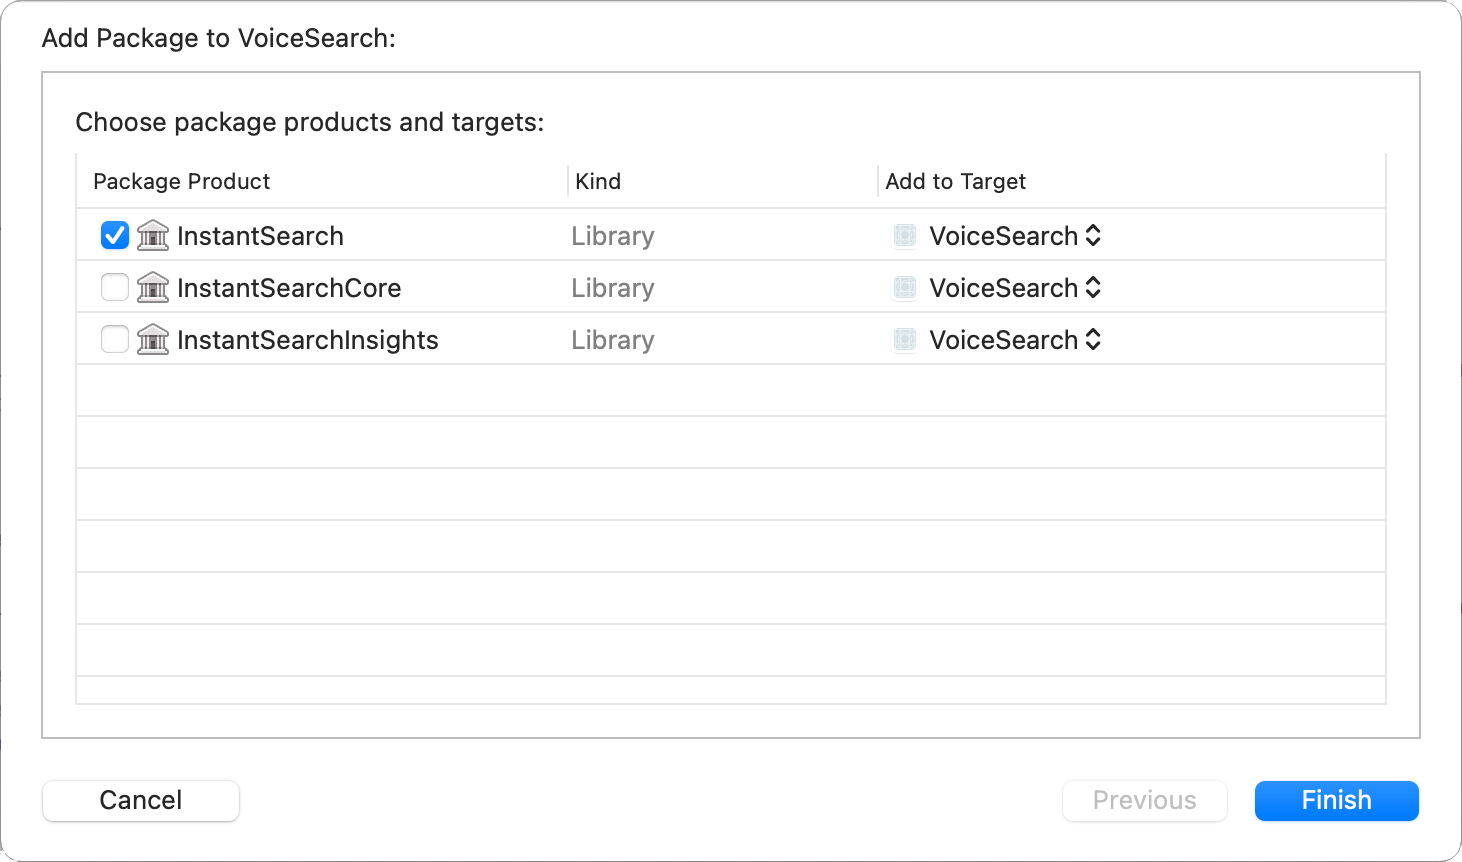
 Select the latest library version on the next screen,
and select the `InstantSearch` product from the following list:
Select the latest library version on the next screen,
and select the `InstantSearch` product from the following list:
 Add other project dependencies in the same way:
* `VoiceOverlay` [`https://github.com/algolia/voice-overlay-ios`](https://github.com/algolia/voice-overlay-ios)
* `SDWebImage` [`https://github.com/SDWebImage/SDWebImage`](https://github.com/SDWebImage/SDWebImage)
Your dependencies are installed and you're all set to work on your app.
### Model object
Start with declaring the `StoreItem` model object that represents the items in the index.
Add a new file `StoreItem.swift` to the project with the following code:
```swift Swift icon=code theme={"system"}
struct StoreItem: Codable {
let name: String
let brand: String?
let description: String?
let images: [URL]
let price: Double?
enum CodingKeys: String, CodingKey {
case name
case brand
case description
case images = "image_urls"
case price
}
enum PriceCodingKeys: String, CodingKey {
case value
}
init(from decoder: Decoder) throws {
let container = try decoder.container(keyedBy: CodingKeys.self)
self.name = try container.decode(String.self, forKey: .name)
self.brand = try? container.decode(String.self, forKey: .brand)
self.description = try? container.decode(String.self, forKey: .description)
if let rawImages = try? container.decode([String].self, forKey: .images) {
self.images = rawImages.compactMap(URL.init)
} else {
self.images = []
}
if
let priceContainer = try? container.nestedContainer(keyedBy: PriceCodingKeys.self, forKey: .price),
let price = try? priceContainer.decode(Double.self, forKey: .value) {
self.price = price
} else {
self.price = .none
}
}
func encode(to encoder: Encoder) throws {
var container = encoder.container(keyedBy: CodingKeys.self)
try container.encode(name, forKey: .name)
try container.encode(brand, forKey: .brand)
try container.encode(description, forKey: .description)
try container.encode(images, forKey: .images)
try container.encode(price, forKey: .price)
}
}
```
### Result views
Add a file `ProductTableViewCell.swift` for visually displaying the store item in the results list.
```swift Swift icon=code theme={"system"}
import Foundation
import UIKit
import SDWebImage
class ProductTableViewCell: UITableViewCell {
let itemImageView: UIImageView
let titleLabel: UILabel
let subtitleLabel: UILabel
let priceLabel: UILabel
let mainStackView: UIStackView
let labelsStackView: UIStackView
override init(style: UITableViewCell.CellStyle, reuseIdentifier: String?) {
itemImageView = .init()
titleLabel = .init()
subtitleLabel = .init()
mainStackView = .init()
labelsStackView = .init()
priceLabel = .init()
super.init(style: style, reuseIdentifier: reuseIdentifier)
layout()
backgroundColor = .white
}
required init?(coder: NSCoder) {
fatalError("init(coder:) has not been implemented")
}
private func layout() {
itemImageView.sd_imageIndicator = SDWebImageActivityIndicator.gray
itemImageView.translatesAutoresizingMaskIntoConstraints = false
itemImageView.clipsToBounds = true
itemImageView.contentMode = .scaleAspectFit
itemImageView.layer.masksToBounds = true
titleLabel.translatesAutoresizingMaskIntoConstraints = false
titleLabel.font = .systemFont(ofSize: 15, weight: .bold)
titleLabel.numberOfLines = 1
subtitleLabel.translatesAutoresizingMaskIntoConstraints = false
subtitleLabel.font = .systemFont(ofSize: 13, weight: .regular)
subtitleLabel.textColor = .gray
subtitleLabel.numberOfLines = 1
priceLabel.translatesAutoresizingMaskIntoConstraints = false
priceLabel.font = .systemFont(ofSize: 14)
labelsStackView.axis = .vertical
labelsStackView.translatesAutoresizingMaskIntoConstraints = false
labelsStackView.spacing = 3
labelsStackView.addArrangedSubview(titleLabel)
labelsStackView.addArrangedSubview(subtitleLabel)
labelsStackView.addArrangedSubview(priceLabel)
labelsStackView.addArrangedSubview(UIView())
mainStackView.axis = .horizontal
mainStackView.translatesAutoresizingMaskIntoConstraints = false
mainStackView.spacing = 20
mainStackView.addArrangedSubview(itemImageView)
mainStackView.addArrangedSubview(labelsStackView)
contentView.addSubview(mainStackView)
contentView.layoutMargins = .init(top: 5, left: 3, bottom: 5, right: 3)
mainStackView.pin(to: contentView.layoutMarginsGuide)
itemImageView.widthAnchor.constraint(equalTo: itemImageView.heightAnchor).isActive = true
}
}
```
Define a `ProductTableViewCell` extension.
Its `setup` method configures a cell with a `StoreItem` instance:
```swift Swift icon=code theme={"system"}
extension ProductTableViewCell {
func setup(with productHit: Hit) {
let product = productHit.object
itemImageView.sd_setImage(with: product.images.first)
if let highlightedName = productHit.hightlightedString(forKey: "name") {
titleLabel.attributedText = NSAttributedString(highlightedString: highlightedName,
attributes: [
.foregroundColor: UIColor.tintColor])
} else {
titleLabel.text = product.name
}
if let highlightedDescription = productHit.hightlightedString(forKey: "brand") {
subtitleLabel.attributedText = NSAttributedString(highlightedString: highlightedDescription,
attributes: [
.foregroundColor: UIColor.tintColor
])
} else {
subtitleLabel.text = product.brand
}
if let price = product.price {
priceLabel.text = "\(price) €"
}
}
}
```
### Results view controller
Algolia doesn't provide a ready-to-use results view controller,
but you can create one with the tools in the [InstantSearch](https://github.com/algolia/instantsearch-ios) library by copying the following code.
To learn more, see [`Hits`](/doc/api-reference/widgets/hits/ios).
Add a `StoreItemsTableViewController` class, which implements the `HitsController` protocol.
This view controller presents the search results with the previously declared `ProductTableViewCell`.
```swift Swift icon=code theme={"system"}
import Foundation
import UIKit
import InstantSearch
class StoreItemsTableViewController: UITableViewController, HitsController {
var hitsSource: HitsInteractor>?
var didSelect: ((Hit) -> Void)?
let cellIdentifier = "cellID"
override func viewDidLoad() {
super.viewDidLoad()
tableView.register(ProductTableViewCell.self, forCellReuseIdentifier: cellIdentifier)
}
override func tableView(_ tableView: UITableView, numberOfRowsInSection section: Int) -> Int {
return hitsSource?.numberOfHits() ?? 0
}
override func tableView(_ tableView: UITableView, cellForRowAt indexPath: IndexPath) -> UITableViewCell {
guard let cell = tableView.dequeueReusableCell(withIdentifier: cellIdentifier, for: indexPath) as? ProductTableViewCell else {
return UITableViewCell()
}
guard let hit = hitsSource?.hit(atIndex: indexPath.row) else {
return cell
}
cell.setup(with: hit)
return cell
}
override func tableView(_ tableView: UITableView, heightForRowAt indexPath: IndexPath) -> CGFloat {
return 80
}
override func tableView(_ tableView: UITableView, didSelectRowAt indexPath: IndexPath) {
if let hit = hitsSource?.hit(atIndex: indexPath.row) {
didSelect?(hit)
}
}
}
```
## Create a basic search experience
All the auxiliary parts of the app are ready. You can now set up the main view controller of the app.
In your Xcode project, open the `ViewController.swift` file and import the `InstantSearch` library.
```swift Swift icon=code theme={"system"}
import UIKit
import InstantSearch
class ViewController: UIViewController {
override func viewDidLoad() {
super.viewDidLoad()
// Do any additional setup after loading the view.
}
}
```
Start by creating a classic search interface with a search box and a results list.
Fill your `ViewController` class with a minimal set of InstantSearch components for a basic search experience.
* `HitsSearcher`: component that performs search requests and handles search responses.
* `UISearchController`: view controller that manages the display of search results based on interactions with a search box. UIKit component.
* `TextFieldController`: controller that binds the `SearchBar` with other InstantSearch components.
* `SearchBoxConnector`: connector that encapsulates the textual query input handling logic and connects it with `HitsSearcher` and `TextFieldController`.
* `StoreItemsTableViewController`: controller that presents the list of search results.
* `HitsConnector`: connector that encapsulates the search hits handling logic and connects it with `HitsSearcher` and `HitsController`.
Your `ViewController` class should look as follows:
```swift Swift icon=code theme={"system"}
import UIKit
import InstantSearch
import InstantSearchVoiceOverlay
class ViewController: UIViewController {
let searchController: UISearchController
let searcher: HitsSearcher
let searchBoxConnector: SearchBoxConnector
let textFieldController: TextFieldController
let hitsConnector: HitsConnector>
let searchResultsController: StoreItemsTableViewController
override init(nibName nibNameOrNil: String?, bundle nibBundleOrNil: Bundle?) {
searcher = .init(client: .newDemo,
indexName: Index.Ecommerce.products)
searchResultsController = .init()
hitsConnector = .init(searcher: searcher,
controller: searchResultsController)
searchController = .init(searchResultsController: searchResultsController)
textFieldController = .init(searchBar: searchController.searchBar)
searchBoxConnector = .init(searcher: searcher,
controller: textFieldController)
super.init(nibName: nibNameOrNil, bundle: nibBundleOrNil)
}
required init?(coder: NSCoder) {
fatalError("init(coder:) has not been implemented")
}
override func viewDidLoad() {
super.viewDidLoad()
// Do any additional setup after loading the view.
}
}
```
Add the private `setup` method which configures the `viewController` and its `searchController`. Call it from the `viewDidLoad` method.
Next, make the `searchController` active in the `viewDidAppear` method to make the search appear on each appearance of the main view.
```swift Swift icon=code theme={"system"}
import UIKit
import InstantSearch
import InstantSearchVoiceOverlay
class ViewController: UIViewController {
let searchController: UISearchController
let searcher: HitsSearcher
let searchBoxConnector: SearchBoxConnector
let textFieldController: TextFieldController
let hitsConnector: HitsConnector>
let searchResultsController: StoreItemsTableViewController
override init(nibName nibNameOrNil: String?, bundle nibBundleOrNil: Bundle?) {
searcher = .init(client: .newDemo,
indexName: Index.Ecommerce.products)
searchResultsController = .init()
hitsConnector = .init(searcher: searcher,
controller: searchResultsController)
searchController = .init(searchResultsController: searchResultsController)
textFieldController = .init(searchBar: searchController.searchBar)
searchBoxConnector = .init(searcher: searcher,
controller: textFieldController)
super.init(nibName: nibNameOrNil, bundle: nibBundleOrNil)
}
required init?(coder: NSCoder) {
fatalError("init(coder:) has not been implemented")
}
override func viewDidLoad() {
super.viewDidLoad()
setup()
}
override func viewDidAppear(_ animated: Bool) {
super.viewDidAppear(animated)
searchController.isActive = true
}
private func setup() {
title = "Voice Search"
view.backgroundColor = .white
navigationItem.searchController = searchController
searchController.hidesNavigationBarDuringPresentation = false
searchController.showsSearchResultsController = true
searchController.automaticallyShowsCancelButton = false
searcher.search()
}
}
```
Embed the main view controller in the navigation controller.
Open the `Main` storyboard file.
Select the view in the **View Controller Scene**.
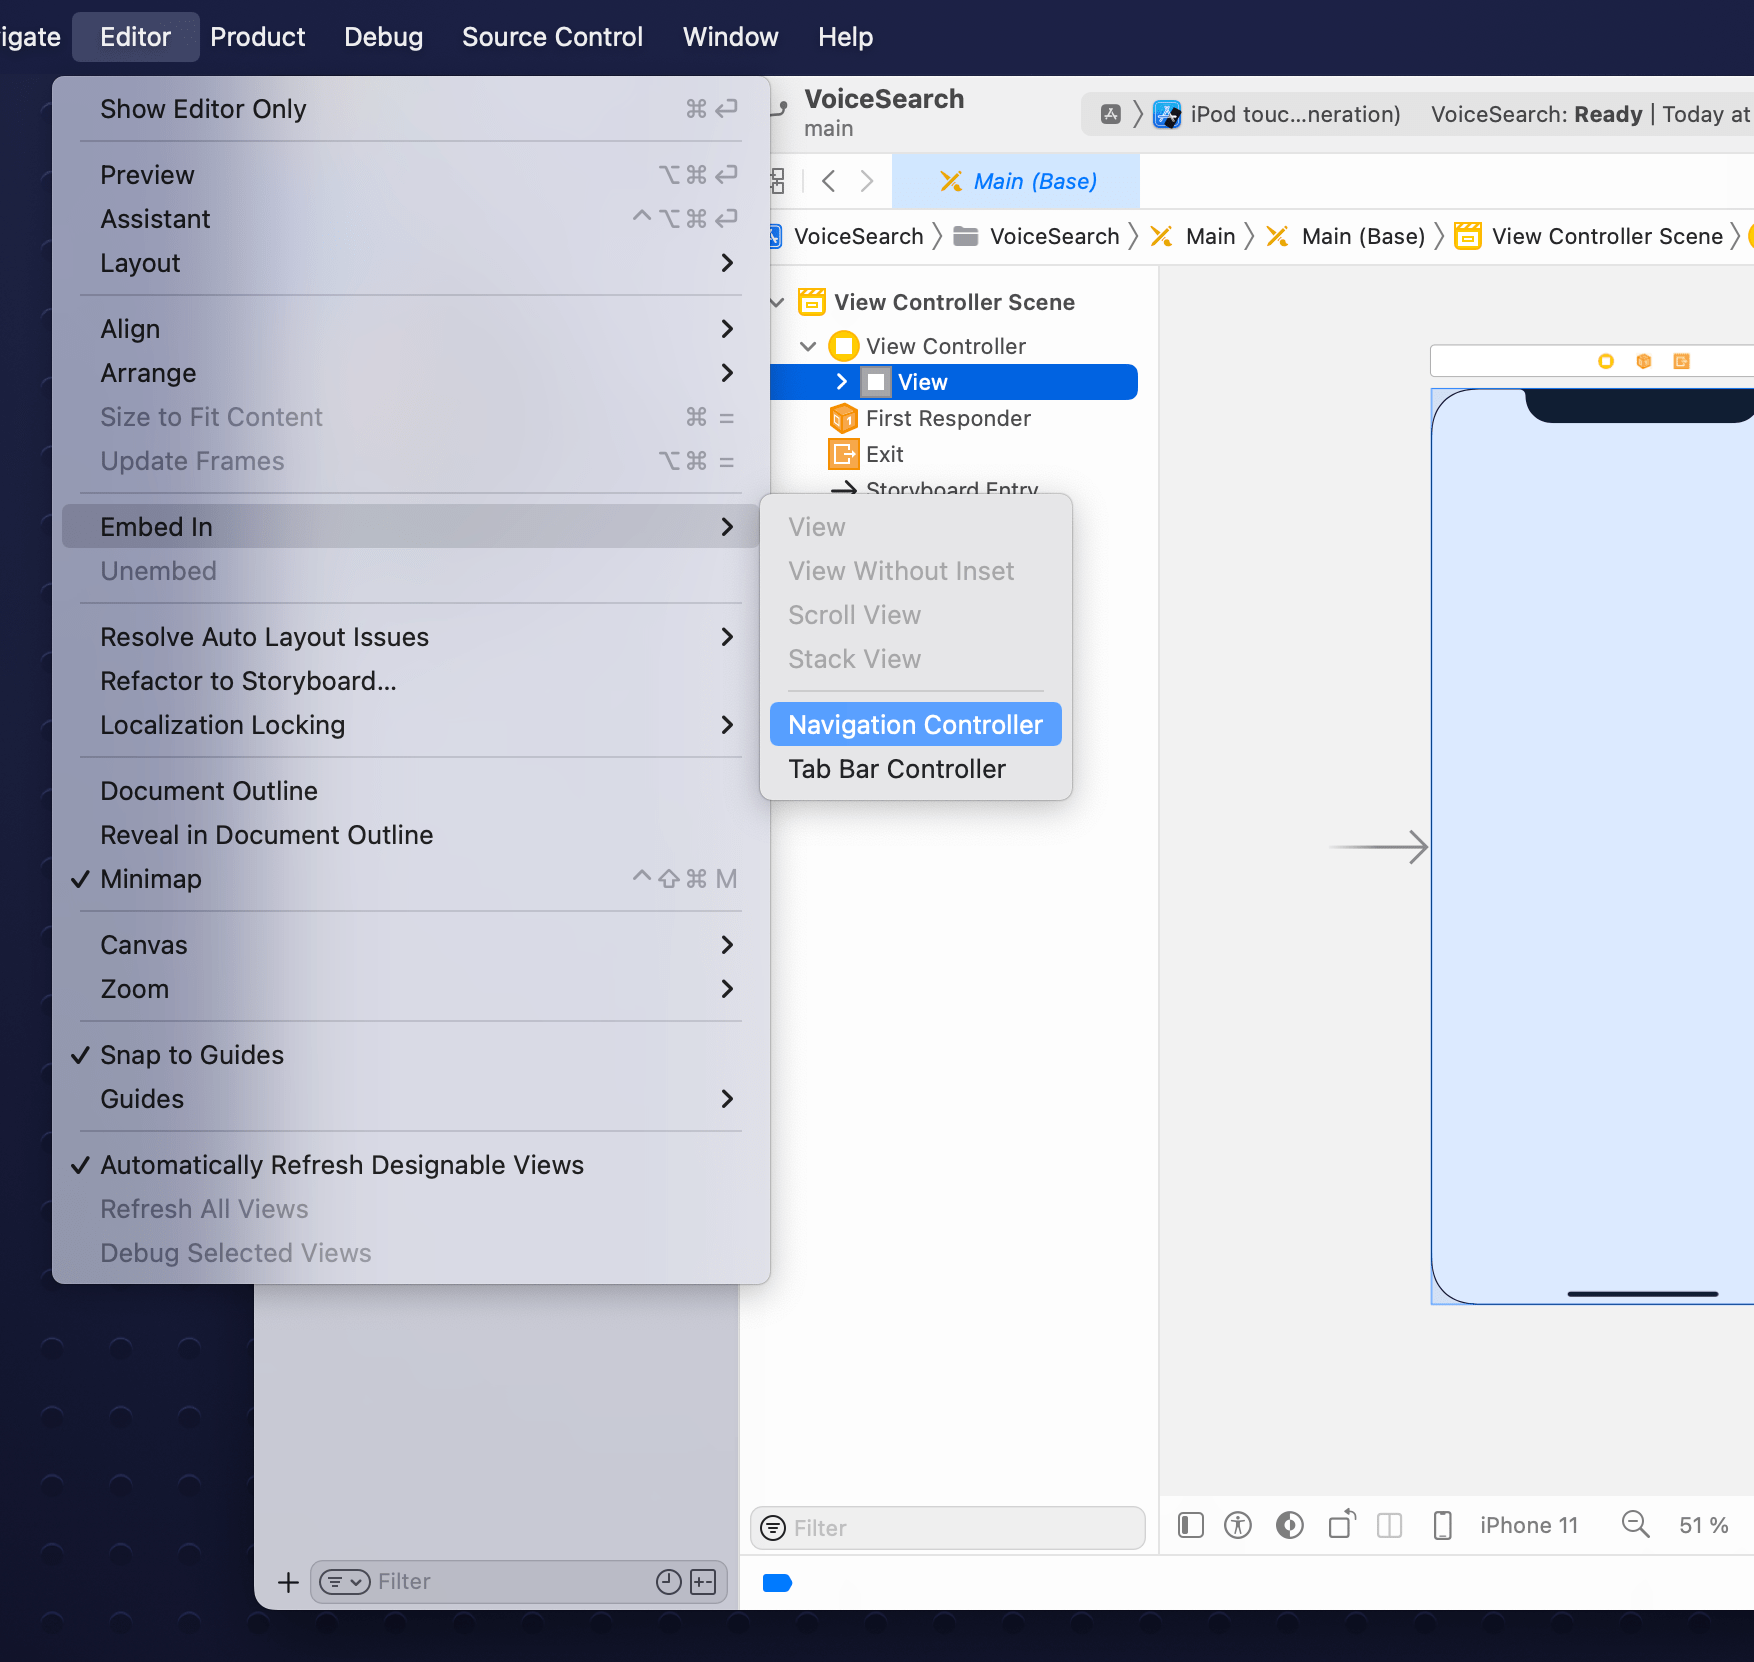
In the Xcode menu select **Editor > Embed In > Navigation Controller**.
Add other project dependencies in the same way:
* `VoiceOverlay` [`https://github.com/algolia/voice-overlay-ios`](https://github.com/algolia/voice-overlay-ios)
* `SDWebImage` [`https://github.com/SDWebImage/SDWebImage`](https://github.com/SDWebImage/SDWebImage)
Your dependencies are installed and you're all set to work on your app.
### Model object
Start with declaring the `StoreItem` model object that represents the items in the index.
Add a new file `StoreItem.swift` to the project with the following code:
```swift Swift icon=code theme={"system"}
struct StoreItem: Codable {
let name: String
let brand: String?
let description: String?
let images: [URL]
let price: Double?
enum CodingKeys: String, CodingKey {
case name
case brand
case description
case images = "image_urls"
case price
}
enum PriceCodingKeys: String, CodingKey {
case value
}
init(from decoder: Decoder) throws {
let container = try decoder.container(keyedBy: CodingKeys.self)
self.name = try container.decode(String.self, forKey: .name)
self.brand = try? container.decode(String.self, forKey: .brand)
self.description = try? container.decode(String.self, forKey: .description)
if let rawImages = try? container.decode([String].self, forKey: .images) {
self.images = rawImages.compactMap(URL.init)
} else {
self.images = []
}
if
let priceContainer = try? container.nestedContainer(keyedBy: PriceCodingKeys.self, forKey: .price),
let price = try? priceContainer.decode(Double.self, forKey: .value) {
self.price = price
} else {
self.price = .none
}
}
func encode(to encoder: Encoder) throws {
var container = encoder.container(keyedBy: CodingKeys.self)
try container.encode(name, forKey: .name)
try container.encode(brand, forKey: .brand)
try container.encode(description, forKey: .description)
try container.encode(images, forKey: .images)
try container.encode(price, forKey: .price)
}
}
```
### Result views
Add a file `ProductTableViewCell.swift` for visually displaying the store item in the results list.
```swift Swift icon=code theme={"system"}
import Foundation
import UIKit
import SDWebImage
class ProductTableViewCell: UITableViewCell {
let itemImageView: UIImageView
let titleLabel: UILabel
let subtitleLabel: UILabel
let priceLabel: UILabel
let mainStackView: UIStackView
let labelsStackView: UIStackView
override init(style: UITableViewCell.CellStyle, reuseIdentifier: String?) {
itemImageView = .init()
titleLabel = .init()
subtitleLabel = .init()
mainStackView = .init()
labelsStackView = .init()
priceLabel = .init()
super.init(style: style, reuseIdentifier: reuseIdentifier)
layout()
backgroundColor = .white
}
required init?(coder: NSCoder) {
fatalError("init(coder:) has not been implemented")
}
private func layout() {
itemImageView.sd_imageIndicator = SDWebImageActivityIndicator.gray
itemImageView.translatesAutoresizingMaskIntoConstraints = false
itemImageView.clipsToBounds = true
itemImageView.contentMode = .scaleAspectFit
itemImageView.layer.masksToBounds = true
titleLabel.translatesAutoresizingMaskIntoConstraints = false
titleLabel.font = .systemFont(ofSize: 15, weight: .bold)
titleLabel.numberOfLines = 1
subtitleLabel.translatesAutoresizingMaskIntoConstraints = false
subtitleLabel.font = .systemFont(ofSize: 13, weight: .regular)
subtitleLabel.textColor = .gray
subtitleLabel.numberOfLines = 1
priceLabel.translatesAutoresizingMaskIntoConstraints = false
priceLabel.font = .systemFont(ofSize: 14)
labelsStackView.axis = .vertical
labelsStackView.translatesAutoresizingMaskIntoConstraints = false
labelsStackView.spacing = 3
labelsStackView.addArrangedSubview(titleLabel)
labelsStackView.addArrangedSubview(subtitleLabel)
labelsStackView.addArrangedSubview(priceLabel)
labelsStackView.addArrangedSubview(UIView())
mainStackView.axis = .horizontal
mainStackView.translatesAutoresizingMaskIntoConstraints = false
mainStackView.spacing = 20
mainStackView.addArrangedSubview(itemImageView)
mainStackView.addArrangedSubview(labelsStackView)
contentView.addSubview(mainStackView)
contentView.layoutMargins = .init(top: 5, left: 3, bottom: 5, right: 3)
mainStackView.pin(to: contentView.layoutMarginsGuide)
itemImageView.widthAnchor.constraint(equalTo: itemImageView.heightAnchor).isActive = true
}
}
```
Define a `ProductTableViewCell` extension.
Its `setup` method configures a cell with a `StoreItem` instance:
```swift Swift icon=code theme={"system"}
extension ProductTableViewCell {
func setup(with productHit: Hit) {
let product = productHit.object
itemImageView.sd_setImage(with: product.images.first)
if let highlightedName = productHit.hightlightedString(forKey: "name") {
titleLabel.attributedText = NSAttributedString(highlightedString: highlightedName,
attributes: [
.foregroundColor: UIColor.tintColor])
} else {
titleLabel.text = product.name
}
if let highlightedDescription = productHit.hightlightedString(forKey: "brand") {
subtitleLabel.attributedText = NSAttributedString(highlightedString: highlightedDescription,
attributes: [
.foregroundColor: UIColor.tintColor
])
} else {
subtitleLabel.text = product.brand
}
if let price = product.price {
priceLabel.text = "\(price) €"
}
}
}
```
### Results view controller
Algolia doesn't provide a ready-to-use results view controller,
but you can create one with the tools in the [InstantSearch](https://github.com/algolia/instantsearch-ios) library by copying the following code.
To learn more, see [`Hits`](/doc/api-reference/widgets/hits/ios).
Add a `StoreItemsTableViewController` class, which implements the `HitsController` protocol.
This view controller presents the search results with the previously declared `ProductTableViewCell`.
```swift Swift icon=code theme={"system"}
import Foundation
import UIKit
import InstantSearch
class StoreItemsTableViewController: UITableViewController, HitsController {
var hitsSource: HitsInteractor>?
var didSelect: ((Hit) -> Void)?
let cellIdentifier = "cellID"
override func viewDidLoad() {
super.viewDidLoad()
tableView.register(ProductTableViewCell.self, forCellReuseIdentifier: cellIdentifier)
}
override func tableView(_ tableView: UITableView, numberOfRowsInSection section: Int) -> Int {
return hitsSource?.numberOfHits() ?? 0
}
override func tableView(_ tableView: UITableView, cellForRowAt indexPath: IndexPath) -> UITableViewCell {
guard let cell = tableView.dequeueReusableCell(withIdentifier: cellIdentifier, for: indexPath) as? ProductTableViewCell else {
return UITableViewCell()
}
guard let hit = hitsSource?.hit(atIndex: indexPath.row) else {
return cell
}
cell.setup(with: hit)
return cell
}
override func tableView(_ tableView: UITableView, heightForRowAt indexPath: IndexPath) -> CGFloat {
return 80
}
override func tableView(_ tableView: UITableView, didSelectRowAt indexPath: IndexPath) {
if let hit = hitsSource?.hit(atIndex: indexPath.row) {
didSelect?(hit)
}
}
}
```
## Create a basic search experience
All the auxiliary parts of the app are ready. You can now set up the main view controller of the app.
In your Xcode project, open the `ViewController.swift` file and import the `InstantSearch` library.
```swift Swift icon=code theme={"system"}
import UIKit
import InstantSearch
class ViewController: UIViewController {
override func viewDidLoad() {
super.viewDidLoad()
// Do any additional setup after loading the view.
}
}
```
Start by creating a classic search interface with a search box and a results list.
Fill your `ViewController` class with a minimal set of InstantSearch components for a basic search experience.
* `HitsSearcher`: component that performs search requests and handles search responses.
* `UISearchController`: view controller that manages the display of search results based on interactions with a search box. UIKit component.
* `TextFieldController`: controller that binds the `SearchBar` with other InstantSearch components.
* `SearchBoxConnector`: connector that encapsulates the textual query input handling logic and connects it with `HitsSearcher` and `TextFieldController`.
* `StoreItemsTableViewController`: controller that presents the list of search results.
* `HitsConnector`: connector that encapsulates the search hits handling logic and connects it with `HitsSearcher` and `HitsController`.
Your `ViewController` class should look as follows:
```swift Swift icon=code theme={"system"}
import UIKit
import InstantSearch
import InstantSearchVoiceOverlay
class ViewController: UIViewController {
let searchController: UISearchController
let searcher: HitsSearcher
let searchBoxConnector: SearchBoxConnector
let textFieldController: TextFieldController
let hitsConnector: HitsConnector>
let searchResultsController: StoreItemsTableViewController
override init(nibName nibNameOrNil: String?, bundle nibBundleOrNil: Bundle?) {
searcher = .init(client: .newDemo,
indexName: Index.Ecommerce.products)
searchResultsController = .init()
hitsConnector = .init(searcher: searcher,
controller: searchResultsController)
searchController = .init(searchResultsController: searchResultsController)
textFieldController = .init(searchBar: searchController.searchBar)
searchBoxConnector = .init(searcher: searcher,
controller: textFieldController)
super.init(nibName: nibNameOrNil, bundle: nibBundleOrNil)
}
required init?(coder: NSCoder) {
fatalError("init(coder:) has not been implemented")
}
override func viewDidLoad() {
super.viewDidLoad()
// Do any additional setup after loading the view.
}
}
```
Add the private `setup` method which configures the `viewController` and its `searchController`. Call it from the `viewDidLoad` method.
Next, make the `searchController` active in the `viewDidAppear` method to make the search appear on each appearance of the main view.
```swift Swift icon=code theme={"system"}
import UIKit
import InstantSearch
import InstantSearchVoiceOverlay
class ViewController: UIViewController {
let searchController: UISearchController
let searcher: HitsSearcher
let searchBoxConnector: SearchBoxConnector
let textFieldController: TextFieldController
let hitsConnector: HitsConnector>
let searchResultsController: StoreItemsTableViewController
override init(nibName nibNameOrNil: String?, bundle nibBundleOrNil: Bundle?) {
searcher = .init(client: .newDemo,
indexName: Index.Ecommerce.products)
searchResultsController = .init()
hitsConnector = .init(searcher: searcher,
controller: searchResultsController)
searchController = .init(searchResultsController: searchResultsController)
textFieldController = .init(searchBar: searchController.searchBar)
searchBoxConnector = .init(searcher: searcher,
controller: textFieldController)
super.init(nibName: nibNameOrNil, bundle: nibBundleOrNil)
}
required init?(coder: NSCoder) {
fatalError("init(coder:) has not been implemented")
}
override func viewDidLoad() {
super.viewDidLoad()
setup()
}
override func viewDidAppear(_ animated: Bool) {
super.viewDidAppear(animated)
searchController.isActive = true
}
private func setup() {
title = "Voice Search"
view.backgroundColor = .white
navigationItem.searchController = searchController
searchController.hidesNavigationBarDuringPresentation = false
searchController.showsSearchResultsController = true
searchController.automaticallyShowsCancelButton = false
searcher.search()
}
}
```
Embed the main view controller in the navigation controller.
Open the `Main` storyboard file.
Select the view in the **View Controller Scene**.
In the Xcode menu select **Editor > Embed In > Navigation Controller**.
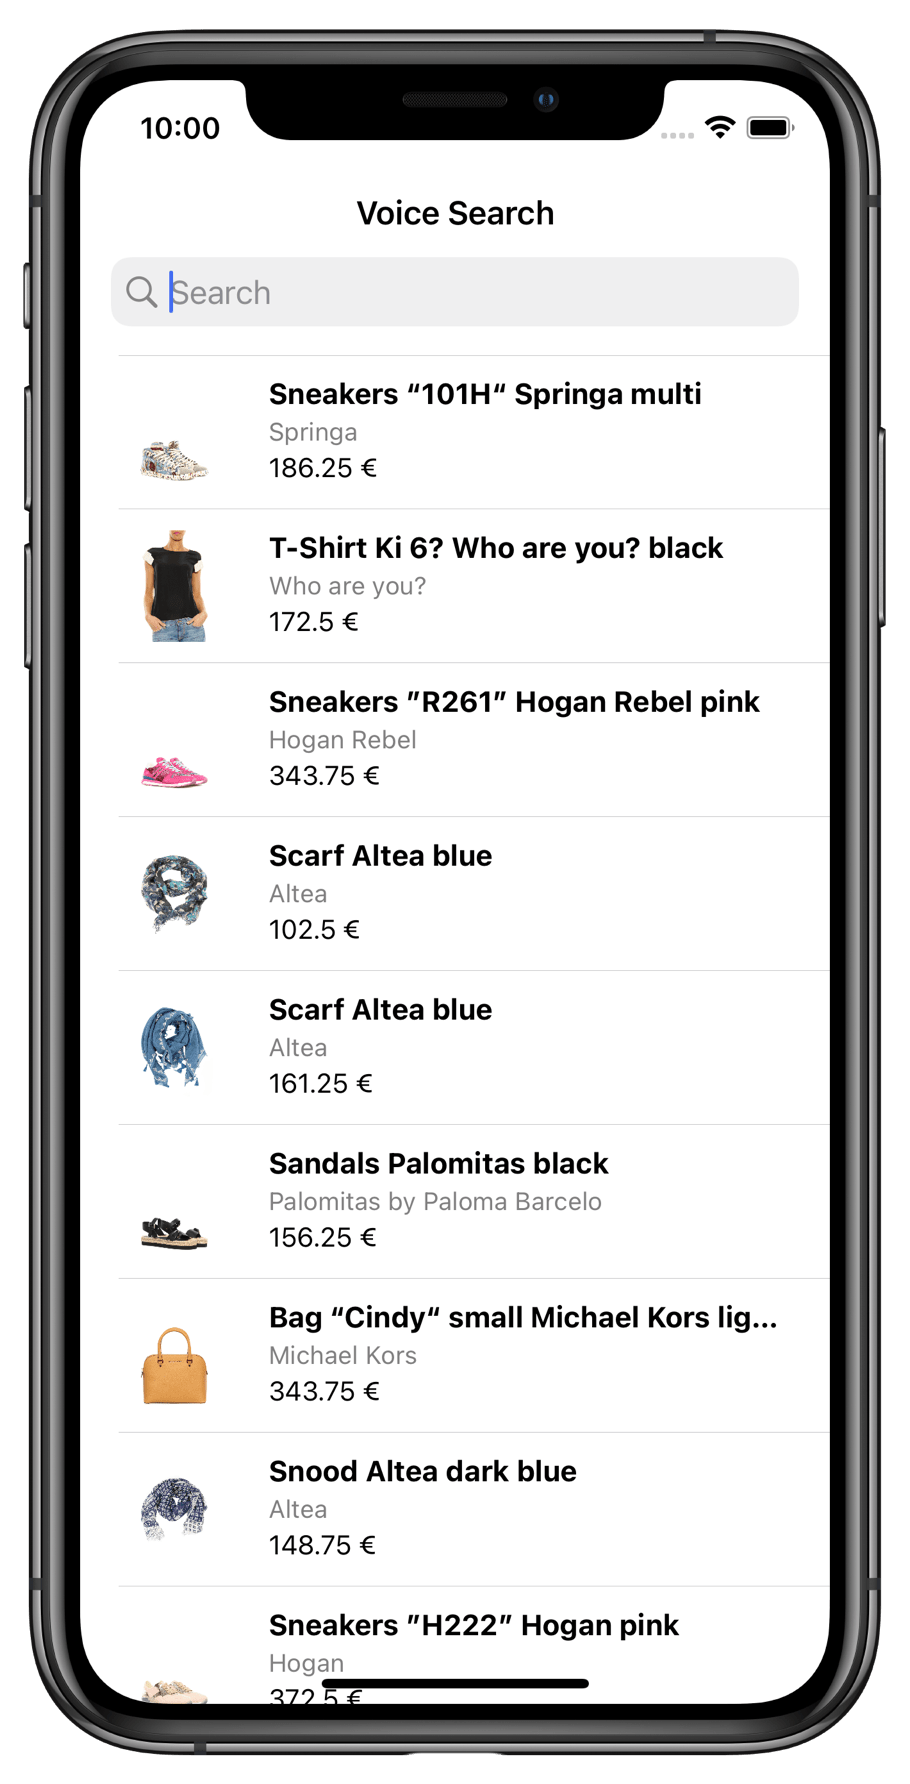
 Build and run your app. The basic search experience is ready: you can type your search query and get instant results.
 ## Create a voice search experience
To integrate voice search:
By default, the `VoiceOverlay` library uses the [AVFoundation framework](https://developer.apple.com/av-foundation/) for voice capturing and the [Speech framework](https://developer.apple.com/documentation/speech) for speech to text transformation.
Both libraries come with the iOS SDK.
These frameworks require the microphone and speech recognition permissions, respectively, from the operating system.
The `VoiceOverlay` library takes care of the permission request logic and appearance,
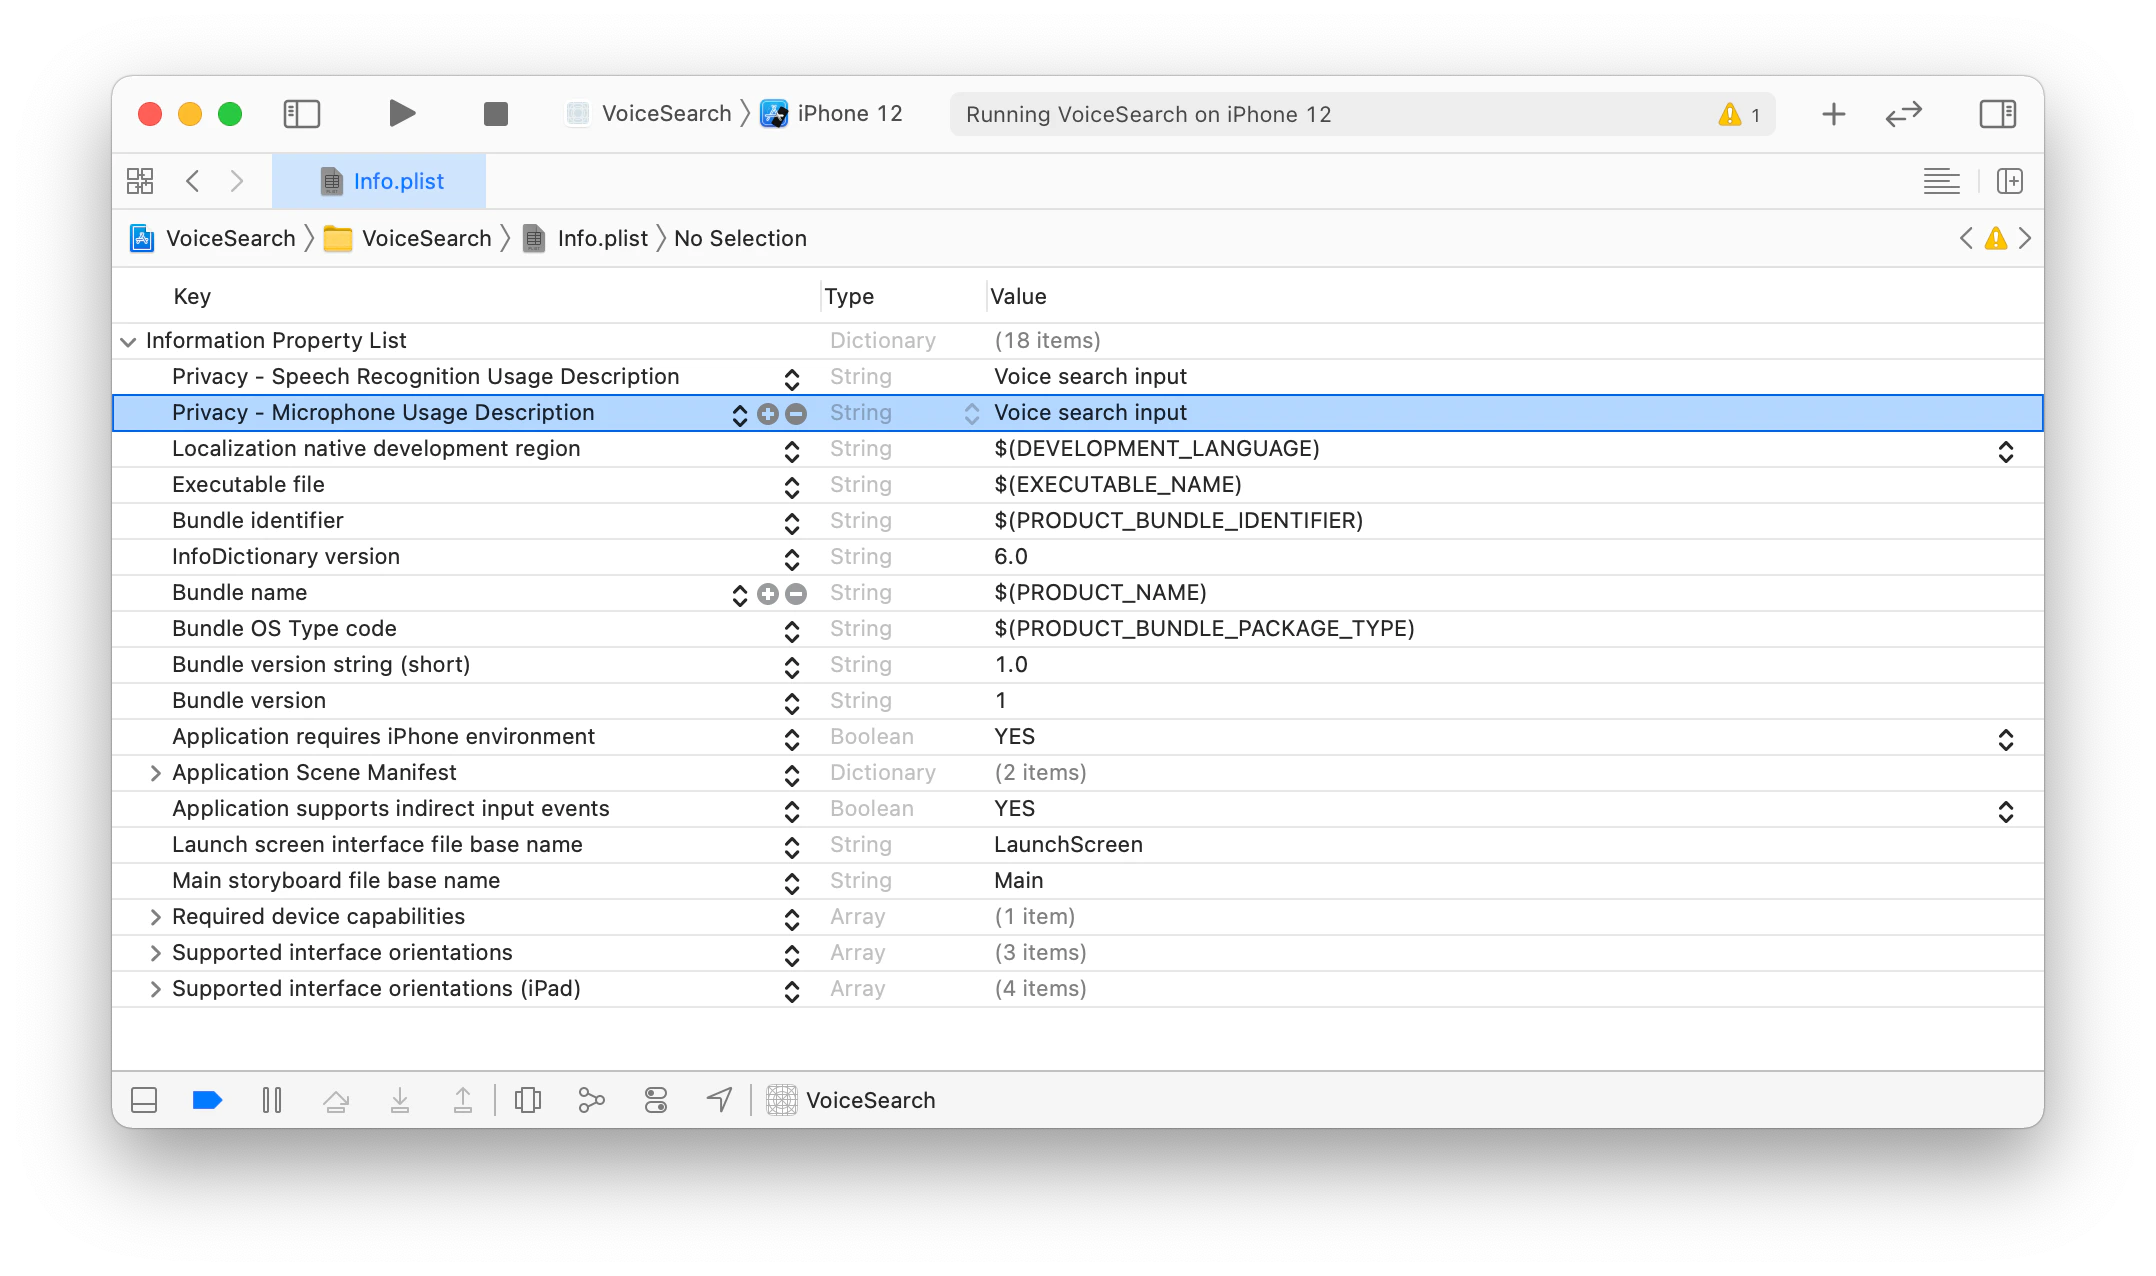
all you have to do is to provide the reason you need these permissions in the `info.plist` file .
Open the `info.plist` file of your `VoiceSearch` target in the Xcode editor,
and add the following keys:
* `Privacy - Microphone Usage Description`
* `Privacy - Speech Recognition Usage Description`
with values : `Voice input`.
In the end your `info.plist` should look as follows:
## Create a voice search experience
To integrate voice search:
By default, the `VoiceOverlay` library uses the [AVFoundation framework](https://developer.apple.com/av-foundation/) for voice capturing and the [Speech framework](https://developer.apple.com/documentation/speech) for speech to text transformation.
Both libraries come with the iOS SDK.
These frameworks require the microphone and speech recognition permissions, respectively, from the operating system.
The `VoiceOverlay` library takes care of the permission request logic and appearance,
all you have to do is to provide the reason you need these permissions in the `info.plist` file .
Open the `info.plist` file of your `VoiceSearch` target in the Xcode editor,
and add the following keys:
* `Privacy - Microphone Usage Description`
* `Privacy - Speech Recognition Usage Description`
with values : `Voice input`.
In the end your `info.plist` should look as follows:
 Add `import InstantSearchVoiceOverlay` at the top of your `ViewController.swift` file.
```swift Swift icon=code theme={"system"}
import UIKit
import InstantSearch
import InstantSearchVoiceOverlay
```
Declare `VoiceOverlayController` in the `ViewController`:
```swift Swift icon=code theme={"system"}
class ViewController: UIViewController {
let searchController: UISearchController
let searcher: HitsSearcher
let searchBoxConnector: SearchBoxConnector
let textFieldController: TextFieldController
let hitsConnector: HitsConnector>
let searchResultsController: StoreItemsTableViewController
let voiceOverlayController: VoiceOverlayController
// ...
}
```
Add a private method which handles the presentation of errors.
```swift Swift icon=code theme={"system"}
private func present(_ error: Error) {
let alertController = UIAlertController(title: "Error",
message: error.localizedDescription,
preferredStyle: .alert)
alertController.addAction(.init(title: "OK",
style: .cancel,
handler: .none))
navigationController?.present(alertController,
animated: true,
completion: nil)
}
```
Implement the `searchBarBookmarkButtonClicked` function of the `UISearchBarDelegate` protocol in the extension of the view controller.
This function binds the voice input callback to `SearchBoxInteractor`, encapsulated by the `SearchConnector` in your class declaration.
```swift Swift icon=code theme={"system"}
extension ViewController: UISearchBarDelegate {
func searchBarBookmarkButtonClicked(_ searchBar: UISearchBar) {
voiceOverlayController.start(on: self.navigationController!) { [weak self] (text, isFinal, _) in
self?.searchBoxConnector.interactor.query = text
} errorHandler: { error in
guard let error = error else { return }
DispatchQueue.main.async { [weak self] in
self?.present(error)
}
}
}
}
```
Customize the search box bookmark button in the `setup` method. Set the view controller as a delegate of the search box.
```swift Swift icon=code theme={"system"}
private func setup() {
title = "Voice Search"
view.backgroundColor = .white
navigationItem.searchController = searchController
searchController.hidesNavigationBarDuringPresentation = false
searchController.showsSearchResultsController = true
searchController.automaticallyShowsCancelButton = false
searchController.searchBar.setImage(UIImage(systemName: "mic.fill"), for: .bookmark, state: .normal)
searchController.searchBar.showsBookmarkButton = true
searchController.searchBar.delegate = self
searcher.search()
}
```
In the end, the code of your `ViewController` should look as follows:
```swift Swift icon=code theme={"system"}
import UIKit
import InstantSearch
import InstantSearchVoiceOverlay
class ViewController: UIViewController {
let searchController: UISearchController
let searcher: HitsSearcher
let searchBoxConnector: SearchBoxConnector
let textFieldController: TextFieldController
let hitsConnector: HitsConnector>
let searchResultsController: StoreItemsTableViewController
let voiceOverlayController: VoiceOverlayController
override init(nibName nibNameOrNil: String?, bundle nibBundleOrNil: Bundle?) {
searcher = .init(client: .newDemo,
indexName: Index.Ecommerce.products)
searchResultsController = .init()
hitsConnector = .init(searcher: searcher,
controller: searchResultsController)
searchController = .init(searchResultsController: searchResultsController)
textFieldController = .init(searchBar: searchController.searchBar)
searchBoxConnector = .init(searcher: searcher,
controller: textFieldController)
voiceOverlayController = .init()
super.init(nibName: nibNameOrNil, bundle: nibBundleOrNil)
}
required init?(coder: NSCoder) {
fatalError("init(coder:) has not been implemented")
}
override func viewDidLoad() {
super.viewDidLoad()
setup()
}
override func viewDidAppear(_ animated: Bool) {
super.viewDidAppear(animated)
searchController.isActive = true
}
private func setup() {
title = "Voice Search"
view.backgroundColor = .white
navigationItem.searchController = searchController
searchController.hidesNavigationBarDuringPresentation = false
searchController.showsSearchResultsController = true
searchController.automaticallyShowsCancelButton = false
searchController.searchBar.setImage(UIImage(systemName: "mic.fill"), for: .bookmark, state: .normal)
searchController.searchBar.showsBookmarkButton = true
searchController.searchBar.delegate = self
searcher.search()
}
private func present(_ error: Error) {
let alertController = UIAlertController(title: "Error",
message: error.localizedDescription,
preferredStyle: .alert)
alertController.addAction(.init(title: "OK",
style: .cancel,
handler: .none))
navigationController?.present(alertController,
animated: true,
completion: nil)
}
}
extension ViewController: UISearchBarDelegate {
func searchBarBookmarkButtonClicked(_ searchBar: UISearchBar) {
voiceOverlayController.start(on: self.navigationController!) { [weak self] (text, isFinal, _) in
self?.searchBoxConnector.interactor.query = text
} errorHandler: { error in
guard let error = error else { return }
DispatchQueue.main.async { [weak self] in
self?.present(error)
}
}
}
}
```
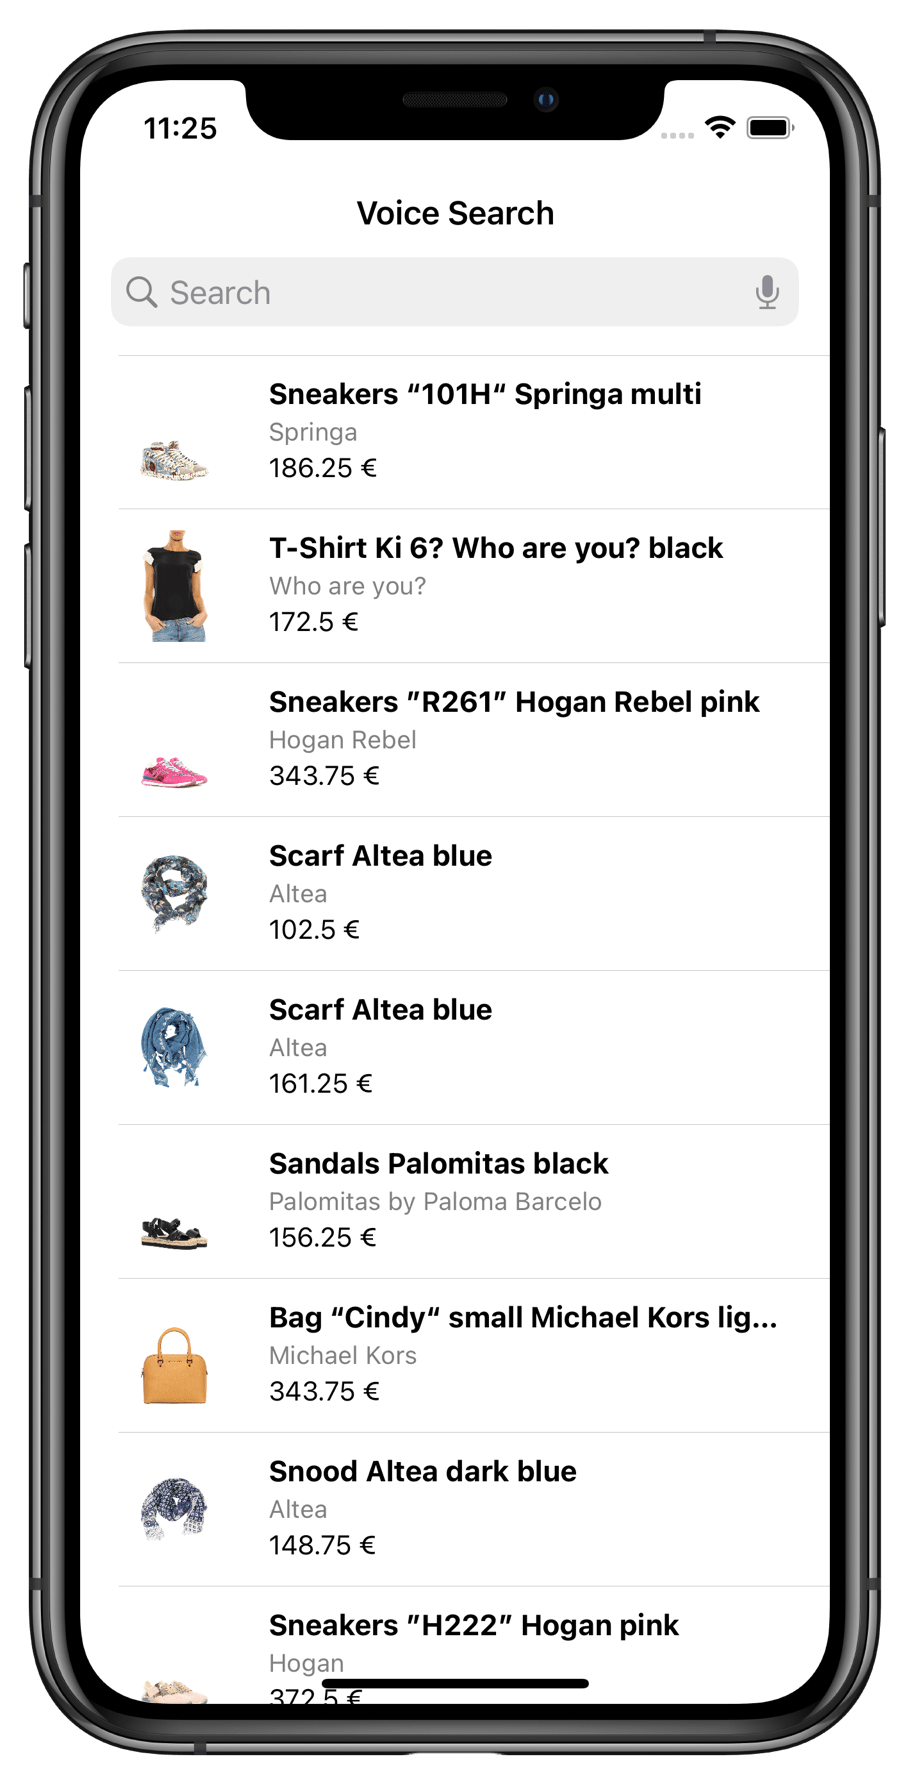
To test your voice search, build and run your app.
You should see the voice input button on the right of the search box.
Add `import InstantSearchVoiceOverlay` at the top of your `ViewController.swift` file.
```swift Swift icon=code theme={"system"}
import UIKit
import InstantSearch
import InstantSearchVoiceOverlay
```
Declare `VoiceOverlayController` in the `ViewController`:
```swift Swift icon=code theme={"system"}
class ViewController: UIViewController {
let searchController: UISearchController
let searcher: HitsSearcher
let searchBoxConnector: SearchBoxConnector
let textFieldController: TextFieldController
let hitsConnector: HitsConnector>
let searchResultsController: StoreItemsTableViewController
let voiceOverlayController: VoiceOverlayController
// ...
}
```
Add a private method which handles the presentation of errors.
```swift Swift icon=code theme={"system"}
private func present(_ error: Error) {
let alertController = UIAlertController(title: "Error",
message: error.localizedDescription,
preferredStyle: .alert)
alertController.addAction(.init(title: "OK",
style: .cancel,
handler: .none))
navigationController?.present(alertController,
animated: true,
completion: nil)
}
```
Implement the `searchBarBookmarkButtonClicked` function of the `UISearchBarDelegate` protocol in the extension of the view controller.
This function binds the voice input callback to `SearchBoxInteractor`, encapsulated by the `SearchConnector` in your class declaration.
```swift Swift icon=code theme={"system"}
extension ViewController: UISearchBarDelegate {
func searchBarBookmarkButtonClicked(_ searchBar: UISearchBar) {
voiceOverlayController.start(on: self.navigationController!) { [weak self] (text, isFinal, _) in
self?.searchBoxConnector.interactor.query = text
} errorHandler: { error in
guard let error = error else { return }
DispatchQueue.main.async { [weak self] in
self?.present(error)
}
}
}
}
```
Customize the search box bookmark button in the `setup` method. Set the view controller as a delegate of the search box.
```swift Swift icon=code theme={"system"}
private func setup() {
title = "Voice Search"
view.backgroundColor = .white
navigationItem.searchController = searchController
searchController.hidesNavigationBarDuringPresentation = false
searchController.showsSearchResultsController = true
searchController.automaticallyShowsCancelButton = false
searchController.searchBar.setImage(UIImage(systemName: "mic.fill"), for: .bookmark, state: .normal)
searchController.searchBar.showsBookmarkButton = true
searchController.searchBar.delegate = self
searcher.search()
}
```
In the end, the code of your `ViewController` should look as follows:
```swift Swift icon=code theme={"system"}
import UIKit
import InstantSearch
import InstantSearchVoiceOverlay
class ViewController: UIViewController {
let searchController: UISearchController
let searcher: HitsSearcher
let searchBoxConnector: SearchBoxConnector
let textFieldController: TextFieldController
let hitsConnector: HitsConnector>
let searchResultsController: StoreItemsTableViewController
let voiceOverlayController: VoiceOverlayController
override init(nibName nibNameOrNil: String?, bundle nibBundleOrNil: Bundle?) {
searcher = .init(client: .newDemo,
indexName: Index.Ecommerce.products)
searchResultsController = .init()
hitsConnector = .init(searcher: searcher,
controller: searchResultsController)
searchController = .init(searchResultsController: searchResultsController)
textFieldController = .init(searchBar: searchController.searchBar)
searchBoxConnector = .init(searcher: searcher,
controller: textFieldController)
voiceOverlayController = .init()
super.init(nibName: nibNameOrNil, bundle: nibBundleOrNil)
}
required init?(coder: NSCoder) {
fatalError("init(coder:) has not been implemented")
}
override func viewDidLoad() {
super.viewDidLoad()
setup()
}
override func viewDidAppear(_ animated: Bool) {
super.viewDidAppear(animated)
searchController.isActive = true
}
private func setup() {
title = "Voice Search"
view.backgroundColor = .white
navigationItem.searchController = searchController
searchController.hidesNavigationBarDuringPresentation = false
searchController.showsSearchResultsController = true
searchController.automaticallyShowsCancelButton = false
searchController.searchBar.setImage(UIImage(systemName: "mic.fill"), for: .bookmark, state: .normal)
searchController.searchBar.showsBookmarkButton = true
searchController.searchBar.delegate = self
searcher.search()
}
private func present(_ error: Error) {
let alertController = UIAlertController(title: "Error",
message: error.localizedDescription,
preferredStyle: .alert)
alertController.addAction(.init(title: "OK",
style: .cancel,
handler: .none))
navigationController?.present(alertController,
animated: true,
completion: nil)
}
}
extension ViewController: UISearchBarDelegate {
func searchBarBookmarkButtonClicked(_ searchBar: UISearchBar) {
voiceOverlayController.start(on: self.navigationController!) { [weak self] (text, isFinal, _) in
self?.searchBoxConnector.interactor.query = text
} errorHandler: { error in
guard let error = error else { return }
DispatchQueue.main.async { [weak self] in
self?.present(error)
}
}
}
}
```
To test your voice search, build and run your app.
You should see the voice input button on the right of the search box.
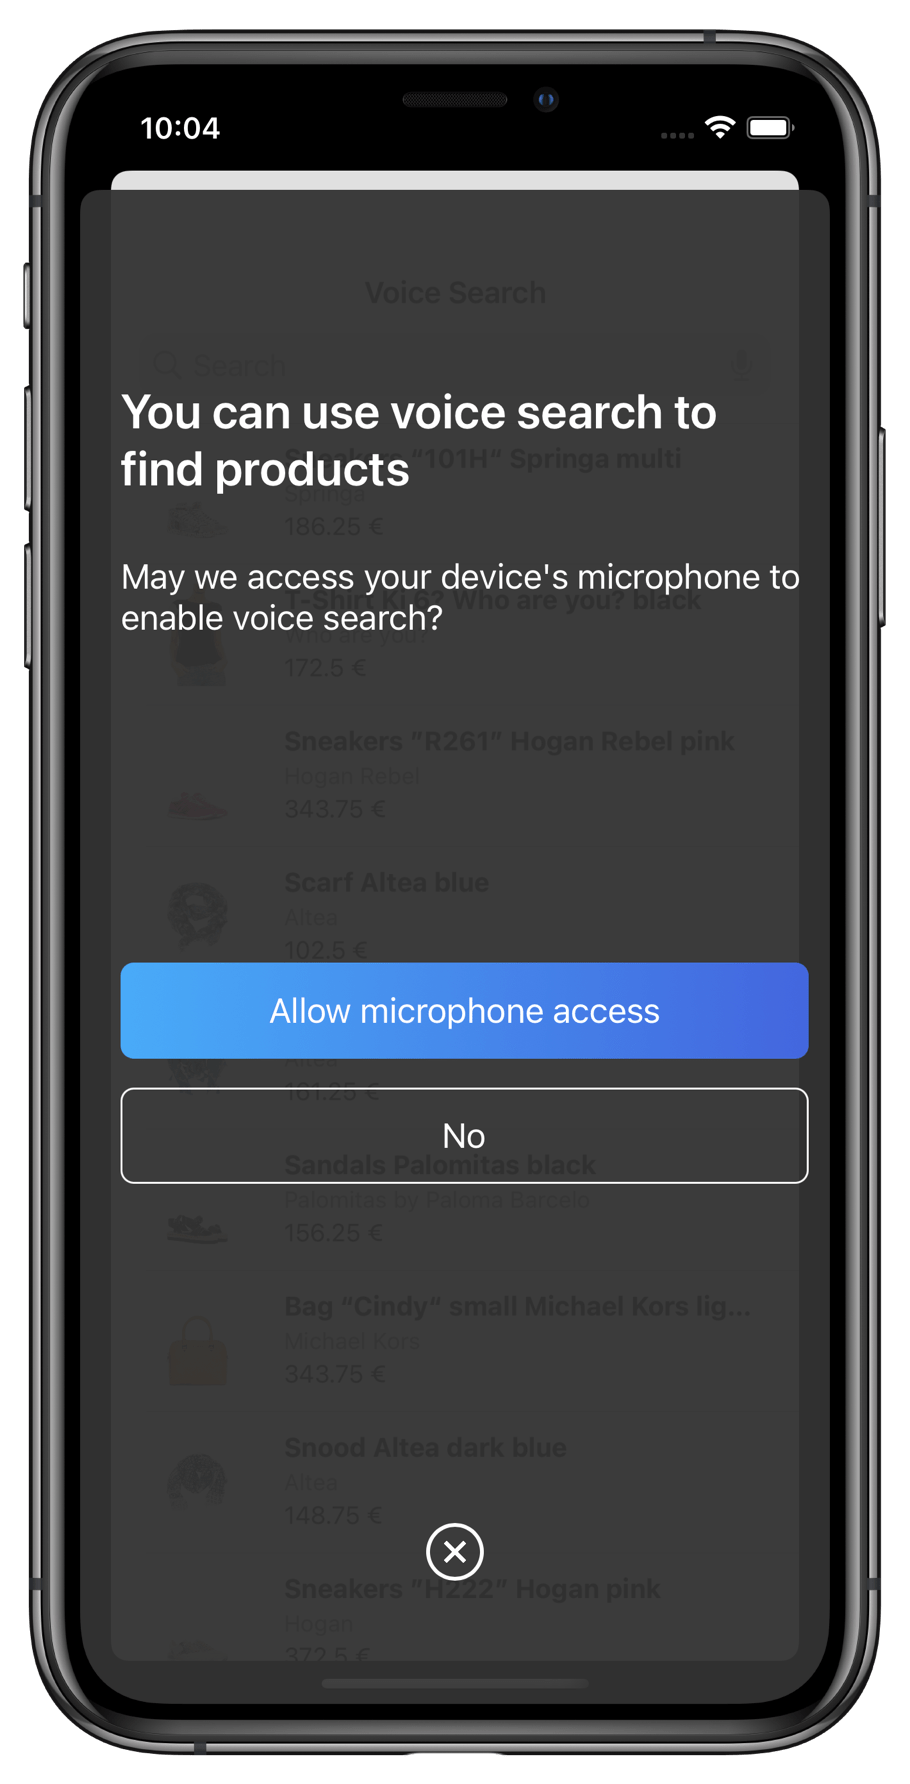
 The `VoiceOverlay` should appear when you tap the voice input button.
At the first launch,
it asks for permission.
The `VoiceOverlay` should appear when you tap the voice input button.
At the first launch,
it asks for permission.
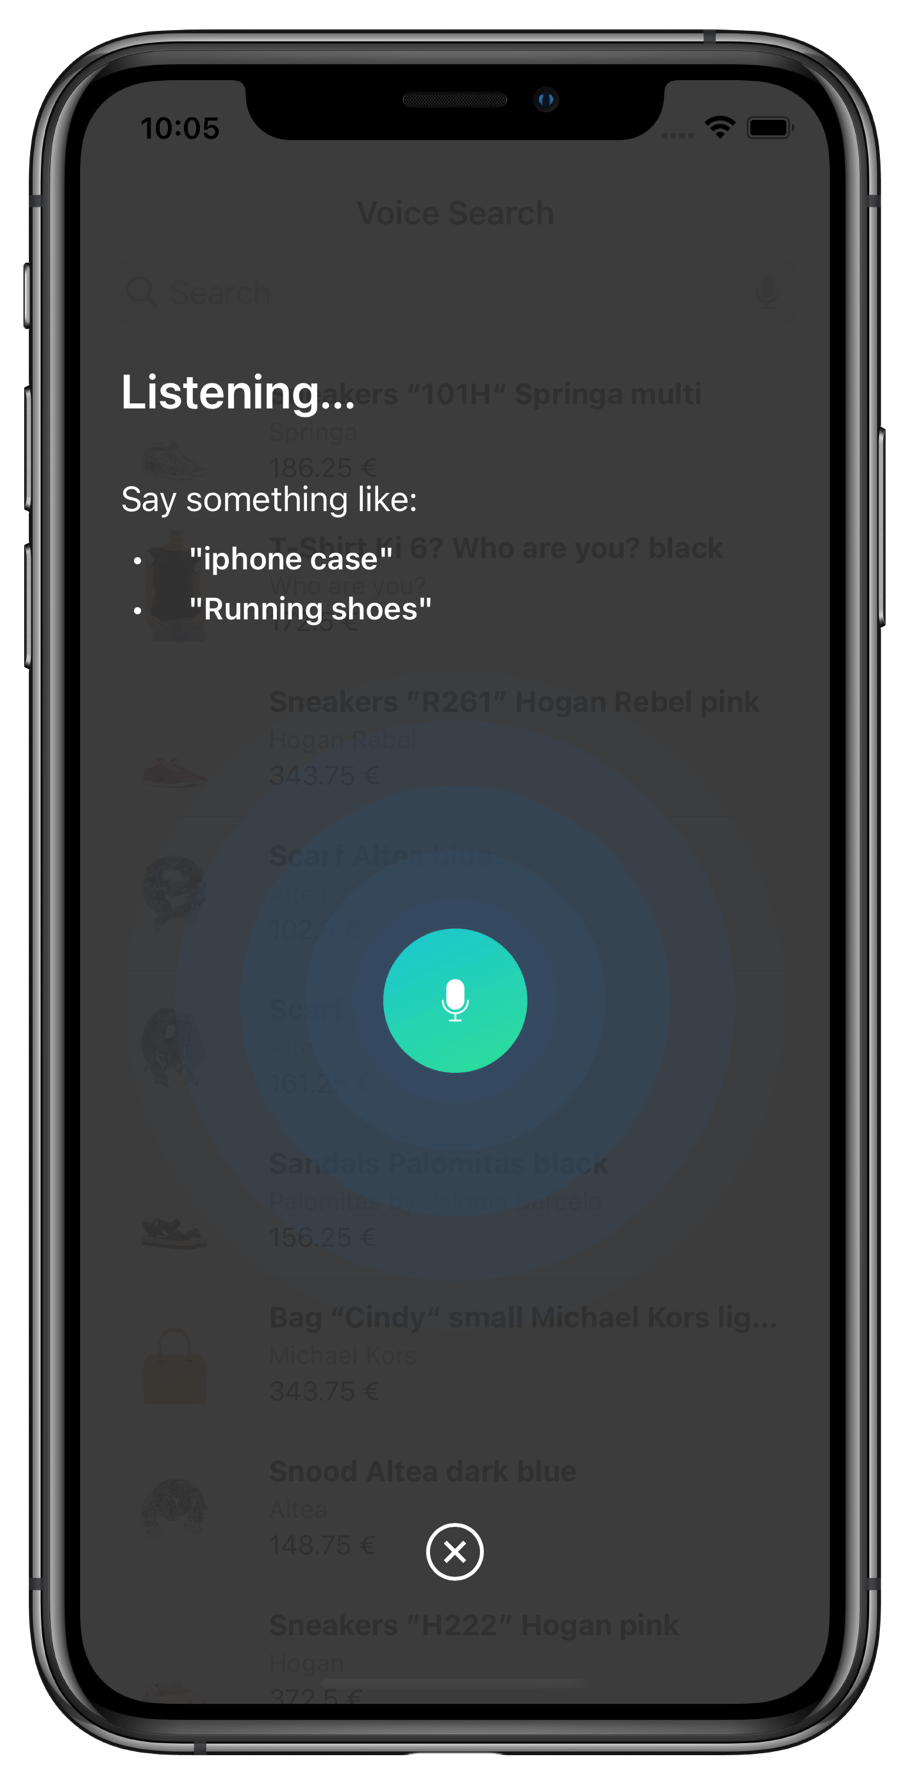
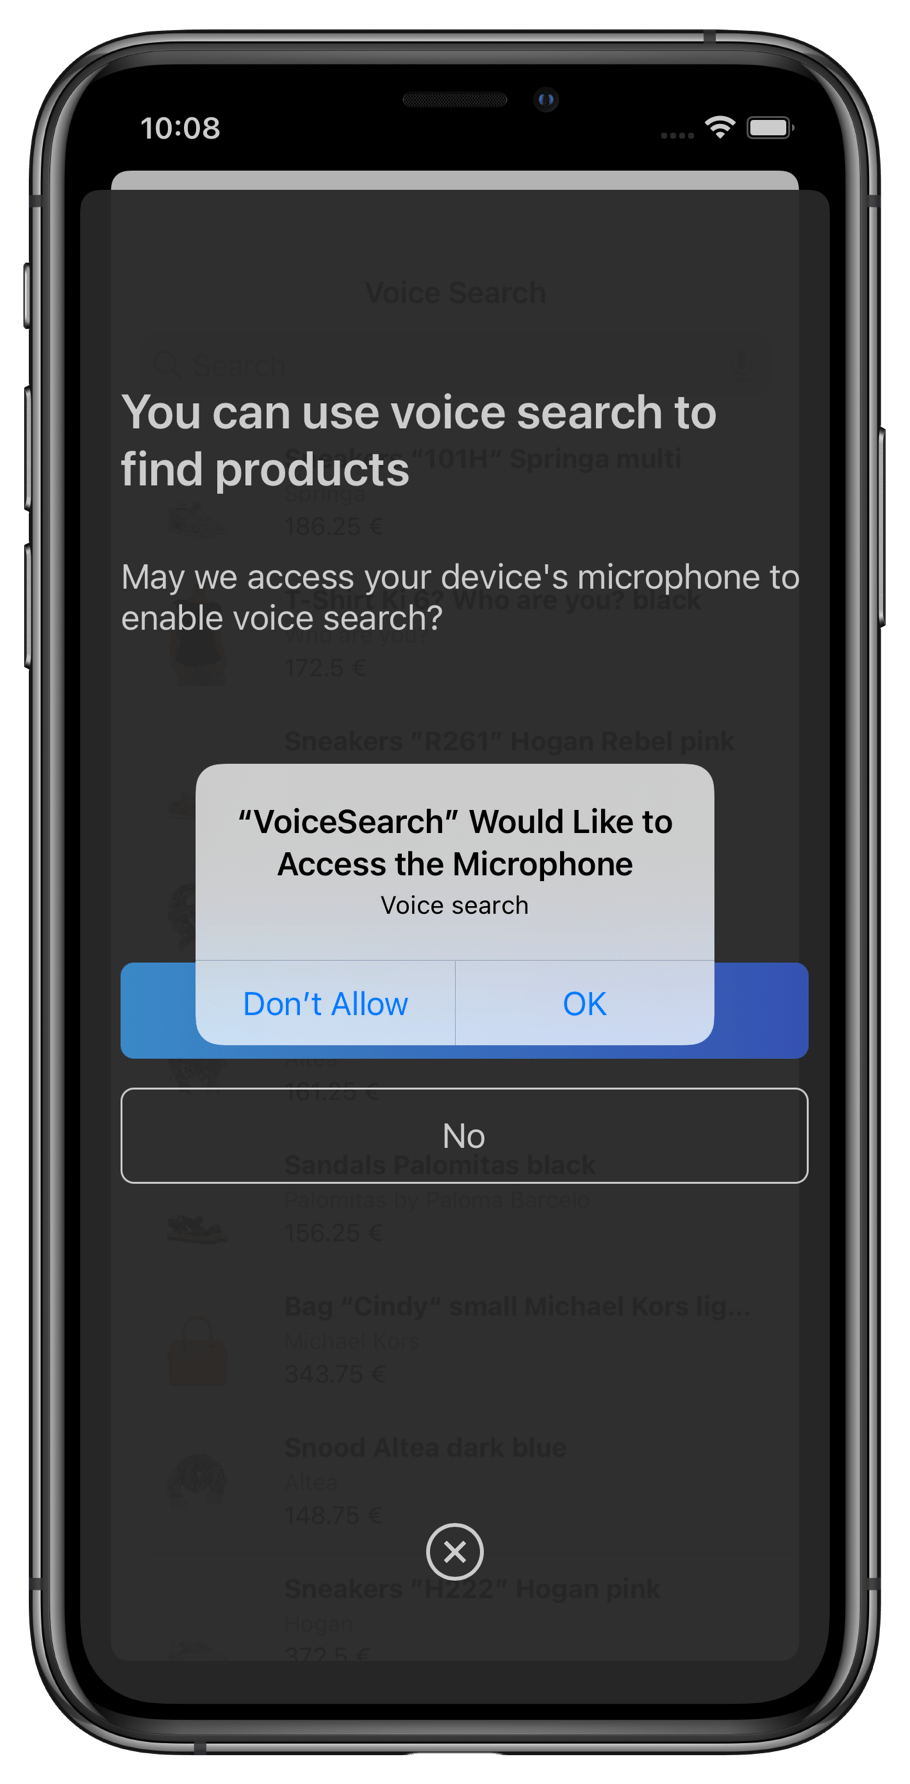 Once you give all the authorizations, the voice input interface appears.
Try to say something and get the instant search results.
Once you give all the authorizations, the voice input interface appears.
Try to say something and get the instant search results.
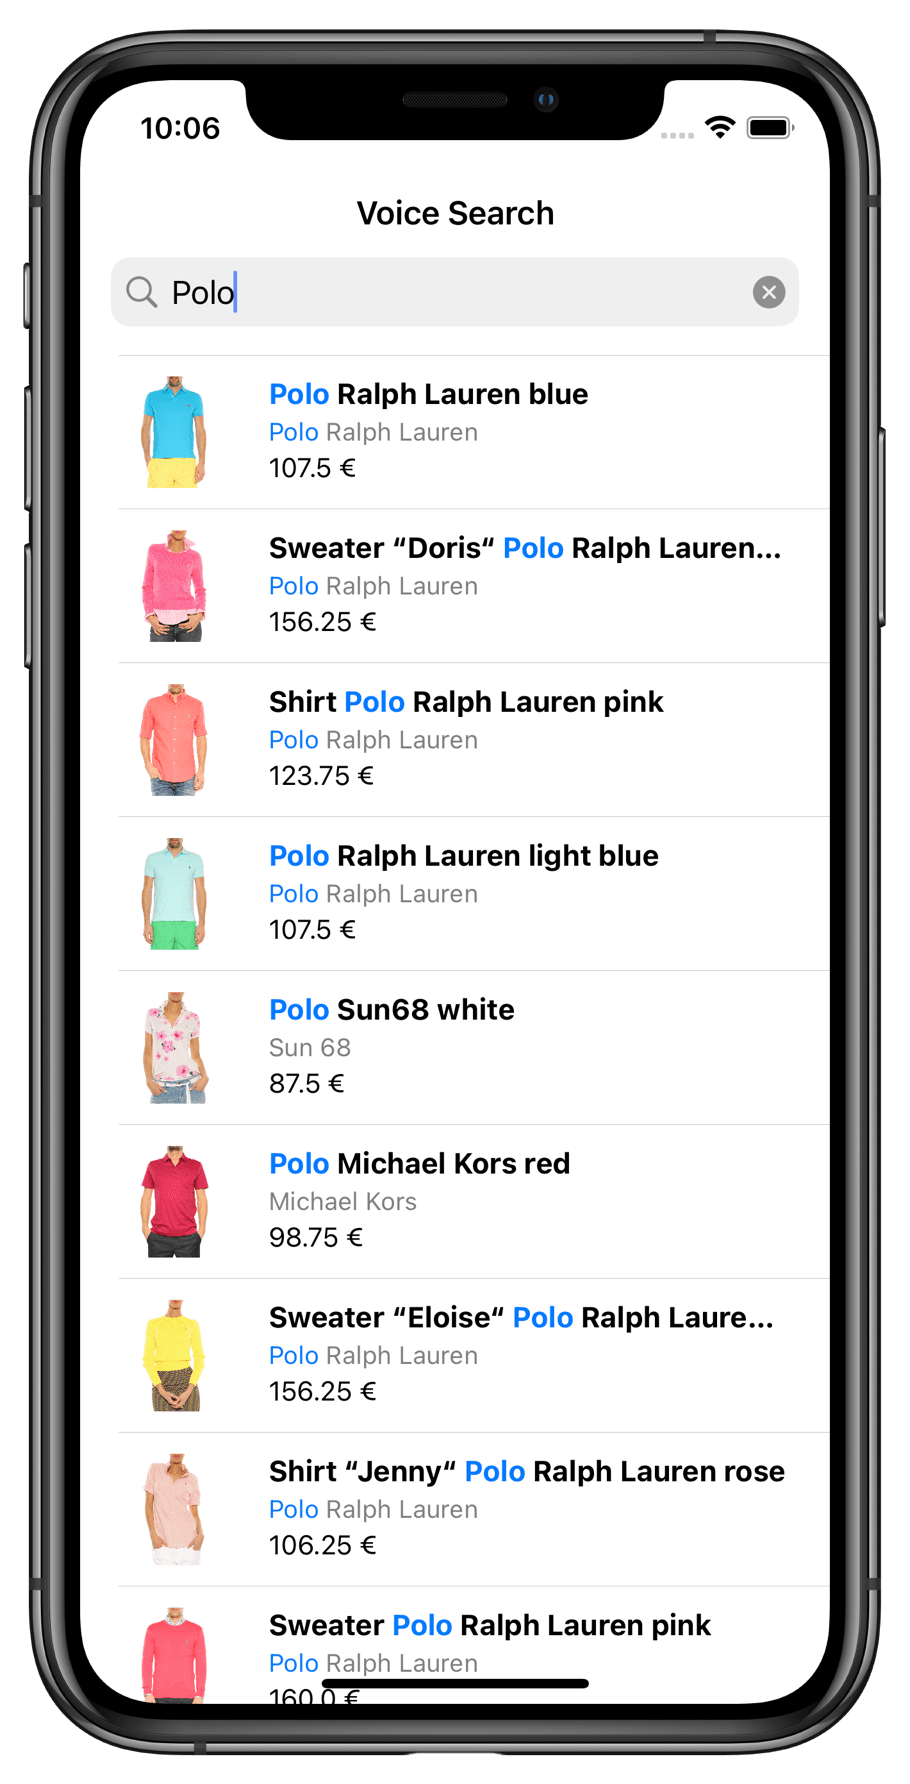 You can find the complete source code in the **Examples** section of the [InstantSearch iOS repository](https://github.com/algolia/instantsearch-ios/tree/demos-v1/Examples/VoiceSearch).
## Conclusion
With a few components and Algolia's libraries, you can build a voice search experience for your iOS app.
You can customize your search experience and make it unique by modifying `InstantSearch` components, as well as the `VoiceOverlay` components.
You can find the complete source code in the **Examples** section of the [InstantSearch iOS repository](https://github.com/algolia/instantsearch-ios/tree/demos-v1/Examples/VoiceSearch).
## Conclusion
With a few components and Algolia's libraries, you can build a voice search experience for your iOS app.
You can customize your search experience and make it unique by modifying `InstantSearch` components, as well as the `VoiceOverlay` components.