This feature isn’t available on every plan.
Refer to your pricing plan to see if it’s included.
Features
Query Categorization gives you access to these features:- Dashboard control lets you set up and check AI model predictions from the Algolia dashboard.
- Automatic filtering and boosting improves the relevance of results without writing code.
- Category predictions: use the Search API to generate real-time category predictions for user queries to customize their search and discovery experience.
Set up Query Categorization
To get started with Query Categorization:- Send click and conversion data to Algolia: this helps the AI model learn user behavior.
- Create a facet hierarchy to define the categories and subcategories your belong to so that the AI model knows how to classify them.
Send click and conversion events
To train the AI model, you must send click or conversion events to Algolia. The model uses this data to predict the categories for new queries. For a query to be eligible for Query Categorization model training, it must:- Be longer than three characters
- Have returned at least 10 records
- Have received events for at least three different records.
Create a facet hierarchy
To enable Query Categorization, use the dashboard to define the facets (categories and subcategories) the AI model will use. These facets should accurately represent your data hierarchy, up to five levels deep. Once you’ve entered your facets, click Save to start the model-building process. Depending on the number of categories and traffic, this can take several minutes to half an hour.Example facet hierarchy of nested categories
Assuming a record structure like this:JSON
hierarchicalCategories.lvl0 as the first level used by the model and hierarchicalCategories.lvl1 as the second level.
Example facet hierarchy of flat categories
Assuming a record structure like this:JSON
group as the first level used by the model and section as the second level.
If your records belong to several categories simultaneously,
and you use arrays to represent each level of depth,
the model expects shared prefixes.
For example, Food is the first level facet value and Food > Fruits is the second level.
Unsupported hierarchical facet formats
The model doesn’t support records structured with only one attribute for all depth levels. For example:JSON
Manage categories
After model training, view the generated categories tree from the Categories Tree View tab in the dashboard. This lets you review and adjust the structure as needed.Exclude categories
From the Categories Tree View tab, you can also exclude non-categories like “Black Friday” or “On sale” to increase the model’s accuracy.Manage events source
You can use different data sources for your events, such as data from a production to improve predictions for a test index (which wouldn’t have had any user interactions). To use a different data source:- Go to the Categories Setting tab in the dashboard.
- In Events source index, select the new data source (it must be a replica or a copy of the existing source index).
- Click Save to regenerate the category tree and make predictions using events from the new data source.
The AI model
After the facet hierarchy has been saved, the AI model performs these tasks:- Build a “categories tree” based on your data.
- Identify top categories for popular queries.
- Predict categories for new queries.
Model output
The AI model assigns a confidence level and a type to each prediction:-
Confidence level:
very low,low,high,very high, orcertain. -
Type:
narrow: the query matches a specific category.broad: the query matches a category with subcategories.ambiguous: the query matches several unrelated categories.none: the model can’t determine a category.
Use predictions at query time
Use Query Categorization predictions to enhance search results in your frontend at query time to:- Expand results: if there are limited results, expand them to include more items from the same category.
- Refine broad search terms: if a query is classified as
broad, suggest different categories to help users narrow their search. - Customize search: offer a tailored search experience by providing a specific layout for some categories.
Query Categorization populates your search results with the predicted categories for the search query.
Algolia normalizes the query used for prediction, not the raw query.
Turn on Query Categorization at query time
To retrieve Query Categorization results at query time, activate the option from the dashboard or in query parameters.- In the dashboard, enable the Categories with Search API toggle in the Categories Settings tab.
-
In query parameters as a JSON object or a URL encoded string. For example,
extensions%3D%7B%22queryCategorization%22%3A%7B%22enableCategoriesRetrieval%22%3Atrue%7D%7DFind Query Categorization parameters in theextensionsfield:JSON
Search response format
The search response shows predictions in the attributeextensions.queryCategorization.
JSON
extensions.queryCategorization is empty if the Query Categorization model can’t categorize a query.
How to override predictions
You can override the AI model’s predictions from the dashboard’s Predictions Explorer tab.- To change the override or replace the predicted categories, click the edit (pencil) icon.
- To revert an override to the predicted categories, click the zap (lightning) icon.
- To remove a prediction, click the trash icon.

Changing the index classification in Categories Settings deletes any override affected by this change.
For example, removing the second facet level from the index classification deletes overrides like
Food > Fruits,
reverting the query to automatic predictions.Automatic filtering and boosting
Automatic filtering and boosting applies filters for user queries based on Query Categorization predictions.- Automatic filtering filters out items that don’t match the predicted category.
- Automatic boosting uses an optional filter to boost items that match the predicted category to the top of search results.
Use automatic filtering and boosting
To use this feature, click Enable Automatic Filtering & Boosting in the Automatic filtering & boosting Settings tab in the dashboard. By default, only automatic boosting is activated. To enable automatic filtering, see Configure automatic filtering and boosting. Once activated, boosts are automatically injected into your search parameters at query time without requiring frontend changes.Exclude queries
From the Automatic filtering & boosting Settings tab, you can also exclude queries that shouldn’t be automatically filtered or boosted. Anything specified here overrides your index’s configuration.Configure automatic filtering and boosting
Adjust the impact of automatic filtering and boosting by modifying two parameters in the Automatic filtering & boosting Settings tab:- The minimum expected confidence level for filtering
- The minimum expected confidence level for boosting
- Boosts predictions with a confidence level equal to or above the confidence level for boosting but below that for filtering.
- Filters on the predictions with a confidence level equal to or above the confidence level for filtering.
high and the filtering confidence level is certain, Algolia boosts high and very high predictions and filters on certain predictions.
The confidence level for boosting must always be lower than the level for filtering.
Override automatic filtering and boosting at query time
You can override the default configuration for automatic filtering and boosting with query parameters:JSON
Detect the impact of automatic filtering and boosting at query time
When automatic filtering and boosting is active for a query, theextensions.queryCategorization.autofiltering section has the following content:
JSON
Preview automatic filtering and boosting
You can preview automatic filtering and boosting for any index from the Automatic filtering & boosting Preview tab of the Query categorization section in the dashboard. If you have category predictions for the selected index, you can preview results for any query with predicted categories to show how automatic filtering and boosting affects results (without activating automatic filtering and boosting on your production traffic).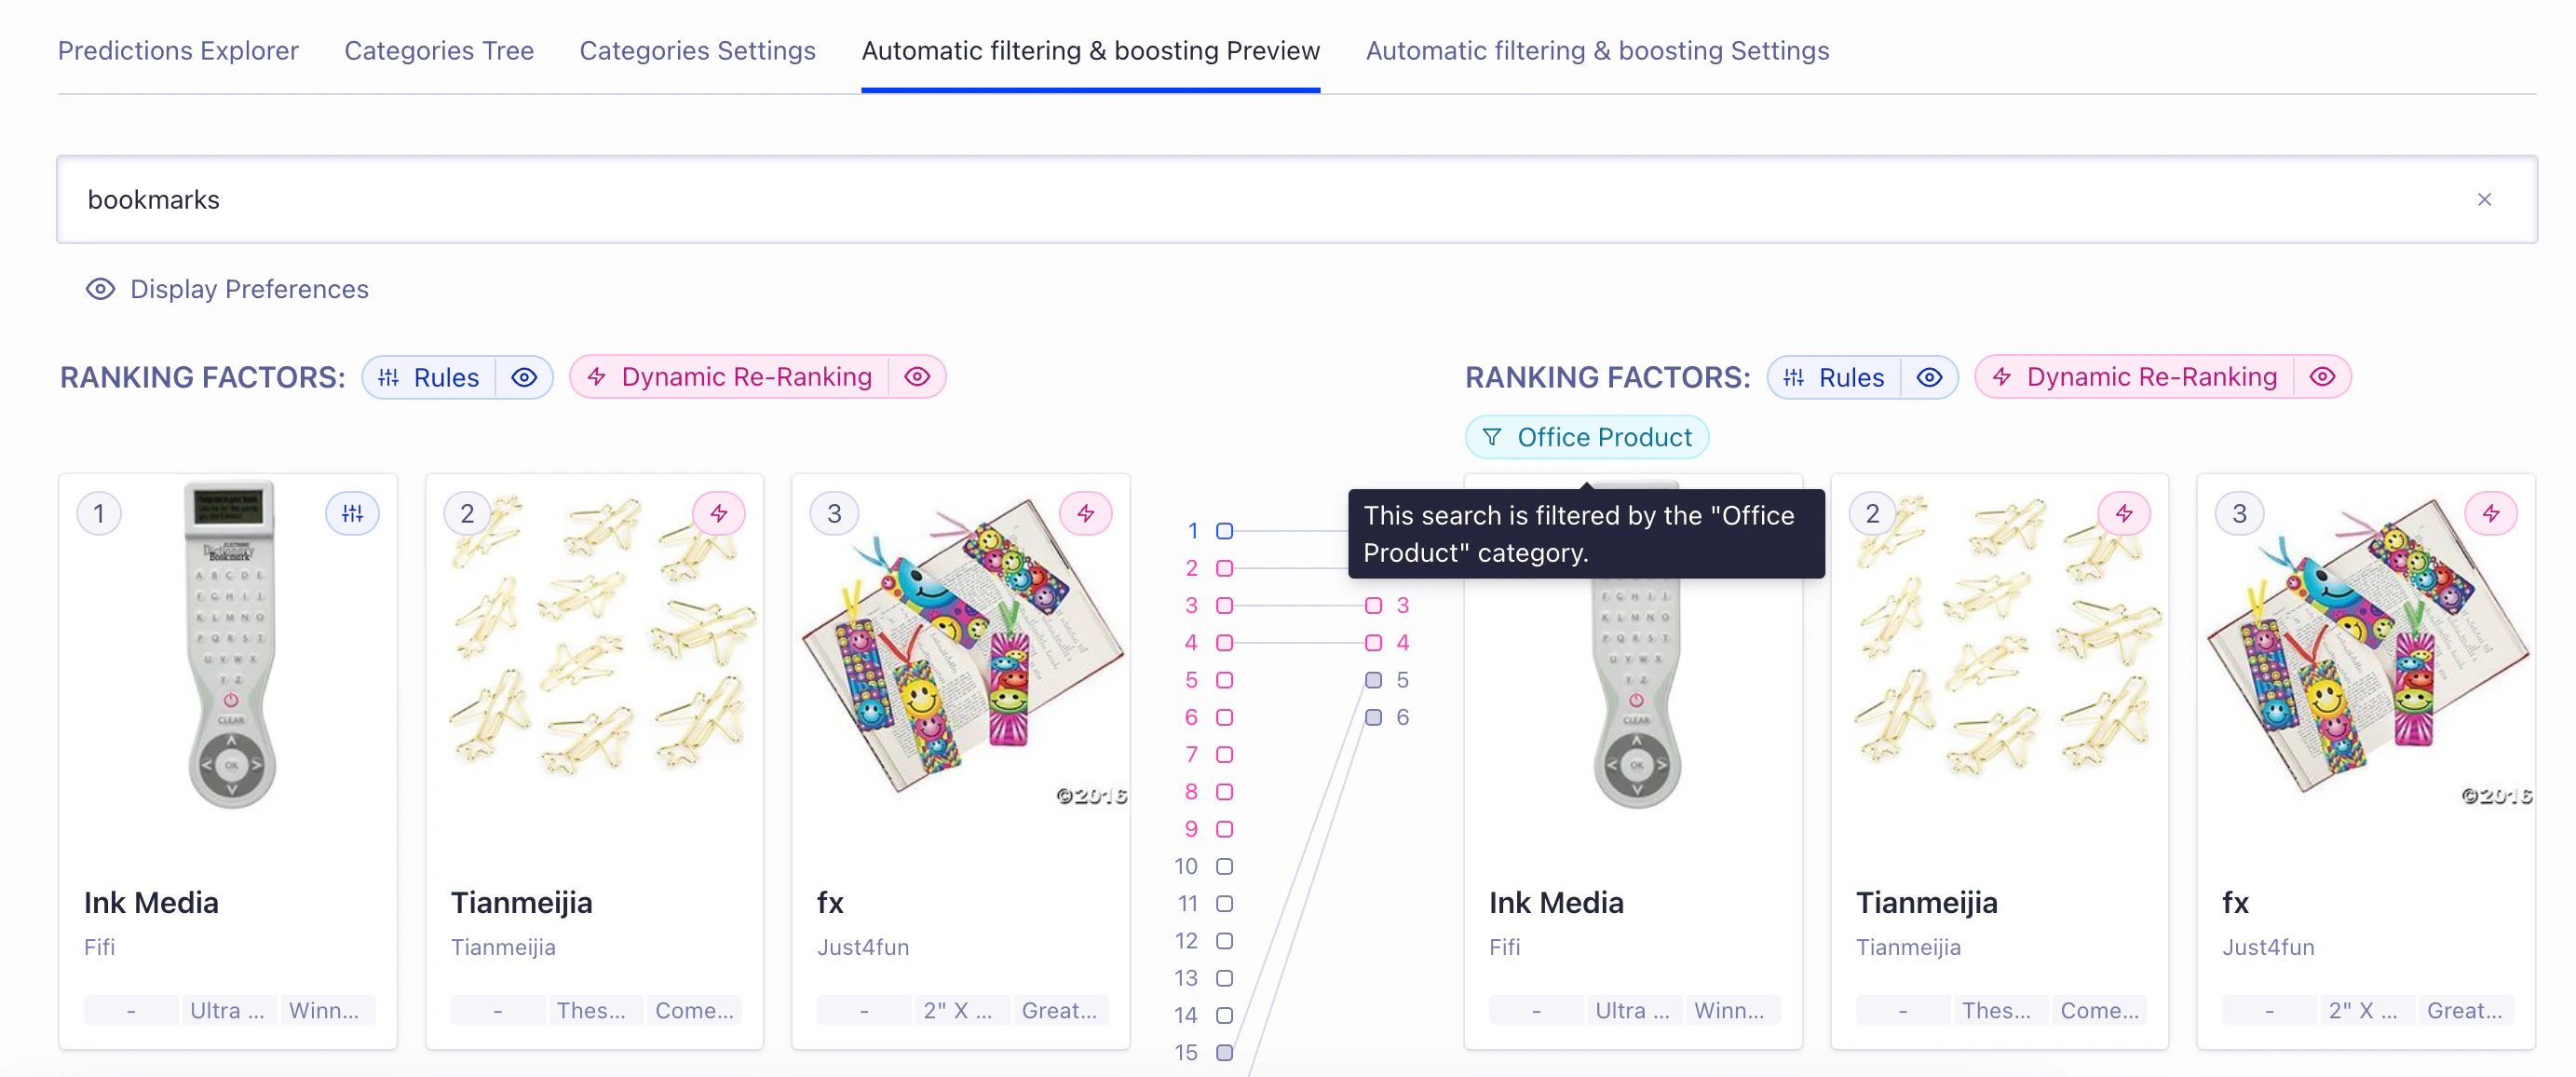
The automatic filtering and boosting preview shows how promotion rules and Dynamic Re-Ranking affect results.
You can turn these features off in the preview with the Rules and Dynamic Re-Ranking options.
A/B test automatic filtering and boosting
You can use A/B testing to test automatic filtering and boosting on an index and accurately measure the effect on your search. To do this, open the Query Categorization page in the Algolia dashboard, select the Automatic filtering & boosting Settings tab, and click Launch an A/B test.Analytics grouped by categories
After setting up the Query Categorization model, you can view queries grouped by their predicted categories in the dashboard’s Grouped Searches tab (under Observe > Analytics). This view doesn’t include browsing queries: “empty” queries generated when a user clicks a filter or other UI element. Compare categories or click them to inspect their queries. Algolia automatically flags queries with low click-through or conversion rates as “underperforming” within each category. For example, Algolia flagsblue jeans and denim as belonging to the same category (pants).
Grouped analytics displays the performance of the category pants (aggregating data for blue jeans, denim, and other queries belonging to the pants category).
You can then compare the performance of the two.
For example, the pants category’s click-through rate is 10%, but the click-through rate for blue jeans is only 4% (identified as underperforming).
You can improve the performance of the query by, for example, adding a synonym or a Rule.
With grouped analytics, you can combine your search analytics to uncover new insights and optimize your search and discovery experience.
It simplifies search analysis and helps manage the long tail of search queries.