

This is the React InstantSearch v7 documentation.
If you’re upgrading from v6, see the upgrade guide.
If you were using React InstantSearch Hooks,
this v7 documentation applies—just check for necessary changes.
To continue using v6, you can find the archived documentation.
If you’re creating a custom InstantSearch widget because you didn’t find a built-in option for your use case,
consider opening a feature request to describe what you’re trying to build.
When to create custom widgets
You can create a new widget when none of the existing widgets fit your functional needs. However, if you’re trying to redefine the UI or DOM output of a widget, extend it instead by using its connector counterpart. Existing widgets and connectors should fit most of your use cases. Look into them before creating custom connectors. For example, to create buttons that set predefined queries, you could useuseSearchBox.
Although you’re not rendering a search box, the connector provides the necessary APIs for this, so there’s no need to re-develop it.
For help, explain your situation and ask questions on GitHub.
You’ll see references to InstantSearch.js and its APIs throughout the guide.
React InstantSearch relies on this core library and bridges them with a thin adapter.
If you’re using TypeScript, install algoliasearch-helper and instantsearch.js as development dependencies to access the necessary types.
Make sure to use the same versions as the ones in your React InstantSearch version.
Once you’re done building an InstantSearch.js connector, you’ll turn it into a Hook.
Build a custom connector
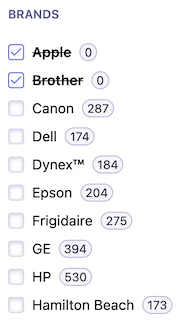
When creating a custom widget, start by writing a connector that encapsulates all the logic of your widget, yet keeps the rendering separate. This guide uses the example of a negative refinement list widget. It’s similar to aRefinementList but, instead of filtering on the selected items,
it excludes them from the search.
For example, selecting the brand “Apple” would results to all matching that aren’t Apple products.
Write the connector function
Create aconnectNegativeRefinementList function that takes a render and an unmount function.
It should return a negativeRefinementList function (the widget factory) that takes widget parameters and returns an object (the widget).
For the sake of simplicity, the only parameter that the widget accepts is attribute.
This lets users specify which record attribute to filter on.
"myOrganization.myWidget" (for example, "microsoft.negativeRefinementList").
If you don’t have an organization, you can use your name.
Compute the render state
At this point, the widget doesn’t perform any custom logic. To make it functional, you need to hook into the InstantSearch lifecycle to update search parameters, extract response data, and expose values for rendering.Widget render state
1
Define the method
Implement the In the returned object from the
getWidgetRenderState method.
This is where you consume data from the API response.It should return an object with the data and APIs you want to expose to the render function.For the negative refinement list, you need to expose:- The
itemsto display in the list. - A
refinefunction to trigger a new search from the UI with new items to exclude.
The widget parameters are also passed under the
widgetParams key. This is necessary for internal purposes.negativeRefinementList function, add a function getWidgetRenderState.2
Initialize stable helper functions
You need to expose a
refine function to toggle exclusions for the given attribute.The refine function must keep the same reference whenever getWidgetRenderState is called so that UI frameworks can consider it stable between renders.
To do so, create a connectorState object outside the widget and attach the refine function to it.3
Extract data from results
You need to be able to consume the facet values from the API response so you can display them on the UI,
let users click them, and so on.Find them on the exposed
results and store them in an items variable.4
Handle no results
You need to handle what happens when there are no search results.
5
Return the render state
Return the
items containing the facet values and the refine function.
You should also return the parameters passed to the widget under the widgetParams key.You can use all this data and APIs in the render function later.Global render state
In InstantSearch, each widget you add registers its render state in one global object. You need to specify how to store your widget render state in this global tree by implementing thegetRenderState method.
You might use multiple negative refinement lists in your application but with different attributes.
For example,
you might want to exclude by brand and by categories.
Here, you want to store each widget’s render state individually so they don’t override each other.
Set up the lifecycle
When you add InstantSearch widgets to your app, they go through several steps in response to internal events. These steps are the InstantSearch lifecycle. You must register lifecycle hooks on your widget to run code at theinit, render, and dispose stages.
Use these functions to call the user-provided render and unmount functions with the correct information.
The lifecycle code shouldn’t change, so you can copy the code from this step without modifying it.
Most of the custom logic happens in
getWidgetRenderState.init step runs when the app starts (before the initial search is performed).
Don’t use this function to add Algolia-related logic.
Instead, use getWidgetSearchParameters, getWidgetUiState, or getWidgetRenderState.
render step runs whenever new results come back from Algolia.
It’s usually triggered by search state changes,
such as when a user submits a new query or clicks on a filter.
During this step, the widget can react to the updated search results by re-rendering with the new information.
This lets the widget remain synchronized with the current state of the search experience.
dispose step runs when removing the widget.
Use it to clean up anything the widget created during its “lifetime” such as search parameters, UI, and event listeners.
This helps prevent memory leaks and ensures the widget doesn’t continue affecting the search experience once it’s no longer in use.
Interact with routing
An important aspect of building an InstantSearch widget is how to make it work with routing. Your custom widget should be able to synchronize its state with the browser URL so you can share a link to your search experience in any given state.Setting the widget UI state
In InstantSearch, routing uses an internaluiState object to derive the route.
As with the render state, you need to specify how to store your widget UI state in the global UI state by implementing the getWidgetUiState method.
As with getRenderState, since you might use the widget multiple times with different attributes, you need to store each widget’s UI state individually so they don’t override each other.
Set the widget search parameters
When initializing InstantSearch state from a URL, you need to convert the URL into search parameters to trigger the first search. To define how to derive search parameters from the UI state, use thegetWidgetSearchParameters method.
This method lets you modify the existing search parameters based on the widget’s configuration and the current UI state.
Sending events to the Insights API
To better understand your users, you could capture when they use the widget to exclude refinements. The Insights API lets you collect such events from the frontend so that you can, later on, unlock features such as Algolia Recommend, Click, conversion, and revenue analytics, and other features. You can set up your widget so it automatically sends the right events to Algolia Insights when using the Insights middleware.sendEvent function to the render function.
This lets you customize events depending on the use case.
Using a custom connector as a Hook
To make a connector more idiomatically consumable in a React context, you need to turn it into a Hook. React InstantSearch exposesuseConnector to use InstantSearch.js connectors as Hooks.
InstantSearch to consume the uiState from your negative refinement and interact with it.
React
Render a custom user interface
An InstantSearch widget is a custom connector with a render function. In a React context, it translates to a component that consumes a Hook and renders a UI. In this example, theNegativeRefinementList component uses the useNegativeRefinementList Hook to build a reactive, stateful UI.
This widget is usable in any React InstantSearch app.
InstantSearch widgets use a standardized class naming convention.
Making the widget reusable
You might want to reuse your widget within your app, share it across multiple projects, or even publish it on npm for others to enjoy. To do so, you can provide APIs to allow customization while abstracting the complexity away. InstantSearch exposes consistent APIs. You can follow the same guidelines and conventions in your own widgets and connectors.Forwarding root props
Forward props to the root element to support styling, accessibility, and testing.Expose standard classes
Widgets expose a class on each DOM element to help you style them. Built-in InstantSearch widgets use the SUITCSS component syntax:- Every class starts with the
ais-namespace (for Algolia InstantSearch). This helps target all InstantSearch elements with selectors like[class^="ais-"]. - Every class has a component name mapped to the widget name. In the example on this page, the widget uses the
NegativeRefinementListcomponent name. Component names are always in Pascal case. - Each element is identified with a descendant name. In the example on this page, each item of the widget uses the
-itemdescendant name. Descendant names are always in camel case. - If an element has multiple states, identify each state with a “modifier”. In the example on this page, the selected item of the widget uses the
--selectedmodifier. Modifiers are always in camel case and prefixed with two hyphens. You should include the modified class on the element in addition to the base component class (for example,ais-NegativeRefinementList-itemandais-NegativeRefinementList-item--selected).
See these conventions in action.
Pass custom classes
Widgets expose standardized class names to let users write custom CSS but you could open the styling API further to allow passing classes directly on each element. This lets users of class-based CSS frameworks like Bootstrap or Tailwind CSS use them without friction or workarounds. In built-in widgets, the convention is to provide a prop that takes an object of named classes.Customize the UI
UI customizability is an important aspect of building reusable InstantSearch widgets. If you need to internationalize your app, control the markup, or change icons, you shouldn’t have to opt out of using widgets and resort to using connectors just to tweak the UI.Translations
In React InstantSearch, widgets expose atranslations prop—a dictionary to customize the UI text and support internationalization.
Templates
If users need to control the markup, they shouldn’t have to reach out to connectors. Instead, you can let them template parts of the UI. For example, users may want to change the rendering of each item to display a custom checkbox that requires additional markup. In React InstantSearch, widgets expose component props that accept React components.Expose standard options
Each widget and connector exposes options specific to its use case. Some options are available across multiple widgets and connectors to address common issues and offer a consistent experience. In addition to root props, classes, translations, and templates, you can expose the following options on widgets and connectors when relevant.Target a record attribute
When a widget needs to target a specific record attribute, expose anattribute option in the connector.
This is the case for most refinement widgets like RefinementList so you can select the specific attribute to refine.
The attribute option typically accepts a string.
For deeply nested objects, you can accept dot-separated values like "brand.name" or an array of strings like ["brand", "name"].
Include or exclude attributes
When a widget manipulates selected refinements, you may want to let users select what attributes to include or exclude. This is the case with widgets likeCurrentRefinements or ClearRefinements so you can hand-pick the attributes to manipulate.
Limit items
When a widget manipulates items, notably facet refinements, you may want to let users limit the number of items to retrieve. Widgets likeRefinementList or Menu expose a limit option, which is directly forwarded to the Algolia search engine with the maxValuesPerFacet search parameter.
Such widgets expose two extra options to let users toggle more facets: showMore, a boolean option to enable the feature, and showMoreLimit, to define the maximum number of items to display if the widget is showing more items.
Transform items
When a widget manipulates items like hits or facets, users may want to change them before rendering. To do so, expose atransformItems option for transforming, removing, or reordering items on the connector.
The transformItems option is a function that receives the items and should return a new array of the same shape.
The default value is an identity function.
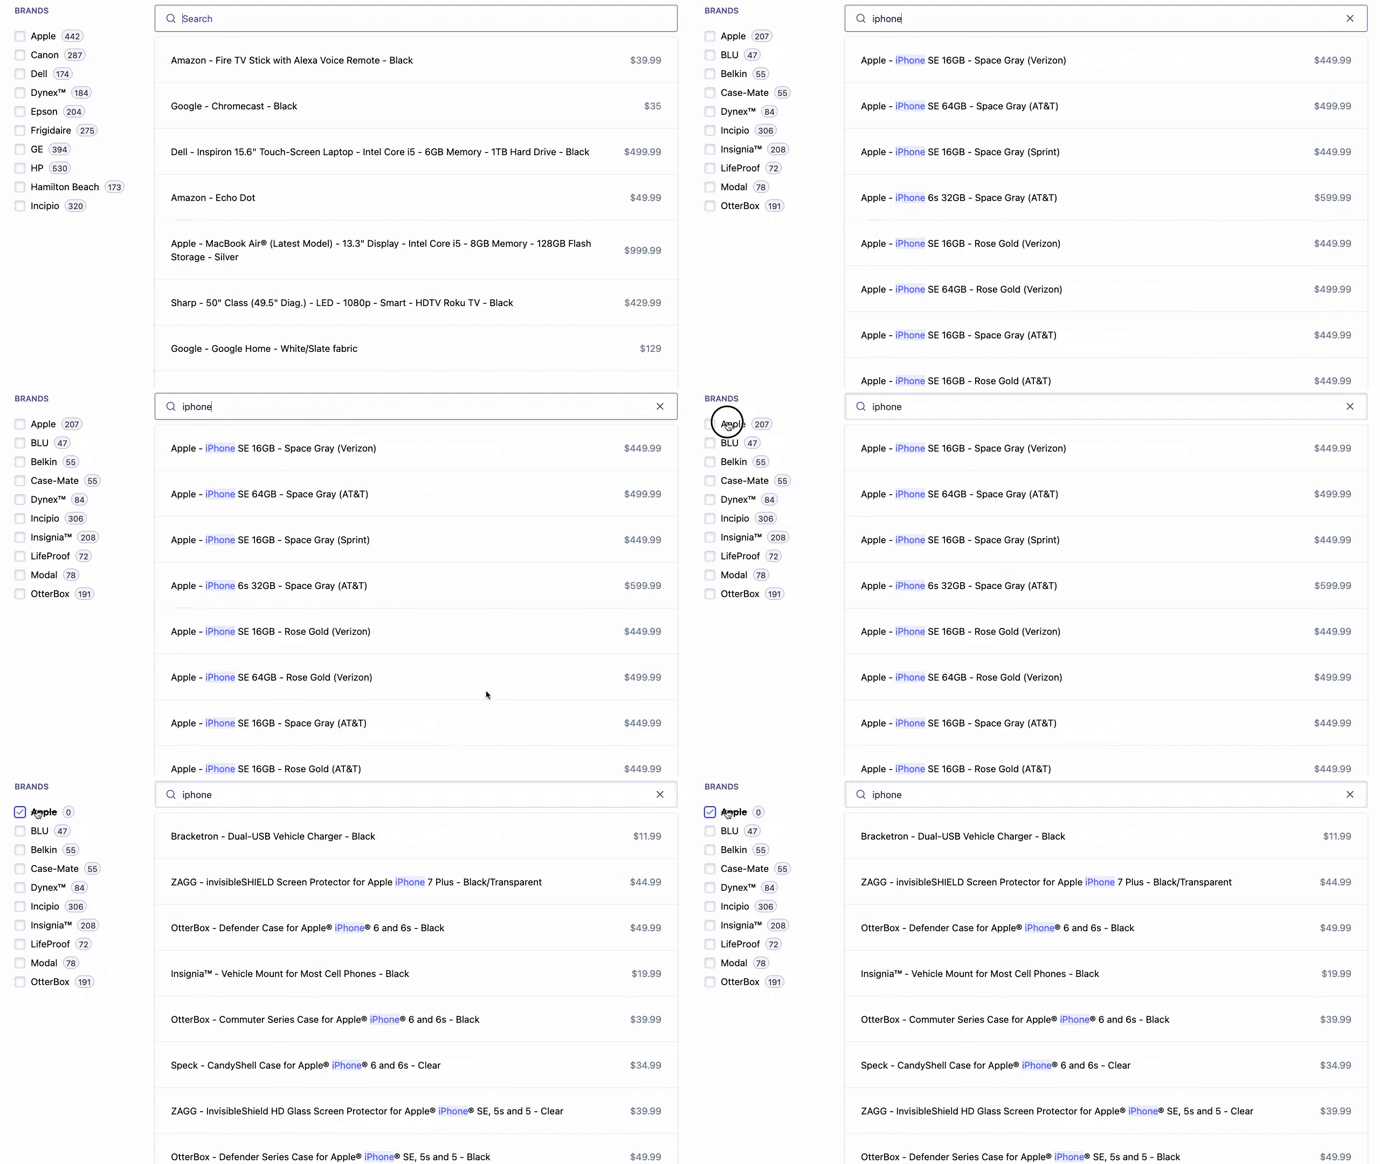
Use the custom widget
You can use a custom widget like any widget provided by the library. It takes the parameters to forward to the connectors, HTML props for the root element, and an object for classes.JavaScript
Next steps
You now have a good starting point to take full control of your InstantSearch experience. You can further improve it by:- Extending the widget’s API with useful parameters such as those in
connectRefinementList. - Open sourcing your custom widget on GitHub and publish it on npm (if you do, let Algolia know.).