Go to Administration > Site Development > Import & Export and click Upload under Import & Export files.
Upload both files from the metadata/algolia/meta folder by clicking Choose File, then Upload.
Do this for both custom-objecttype-definitions.xml and system-objecttype-extensions.xml.
Go back to Administration > Site Development > Import & Export and click Import under Meta Data.
Select custom-objecttype-definitions.xml, click Next, then Import.
Click Import under Meta Data and import system-objecttype-extensions.xml as well.
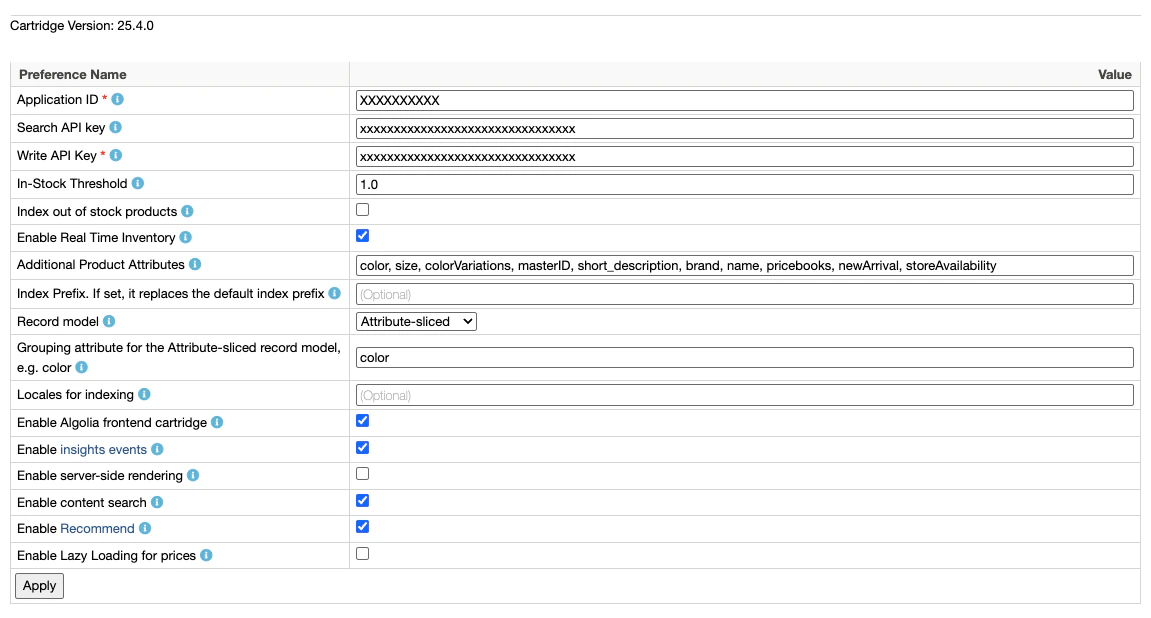
Enable Algolia by checking the checkbox next to Enable Algolia.
Enter your Application ID, Search API Key and Write API Key.
Find them in the Algolia dashboard.
Consider using restricted API keys for increased security.
The Write API key needs addObject, deleteObject, deleteIndex, and settings ACL when indexing with the Search API.
When indexing with the Ingestion API, the key must also include editSettings.
For more information see API key restrictions.
In the Additional Product Attributes field,
enter the additional attributes you want to index.The following attributes are always indexed, so you don’t need to specify them:
name
__primary_category
categoryPageId
url
image_groups
in_stock
price
Consider adding these attributes: short_description and long_description.
Then, expand the list to include attributes specific to your product catalog,
such as, brand, color, or size.The content attributes you want to index are managed using the attributeList job step parameter.
For more information, see Content indexing job configuration.
To use active data for custom ranking, in Active data for custom ranking, select the recommended ProductActiveData attributes to index at the record root: ordersWeek, revenueWeek, conversionWeek, ordersMonth, revenueMonth, or conversionMonth.To index a ProductActiveData attribute that isn’t in the checkbox list, add its ID (without the activeData. prefix) to Additional Product Attributes.
Active data values are returned in search responses by default.
If you use them only as ranking signals, add the same attribute IDs to unretrievableAttributes on every product index the cartridge writes to.
For more information, see Make active data attributes unretrievable.
Choose a record model that fits your needs.
Consider grouping records
if you use the variant-level model.
You need to update your templates, if your site uses a SiteGenesis or SFRA architecture AND
you haven’t enabled the Algolia cartridge.
The Algolia cartridges already include these updates.
If you are using a headless architecture,
see Headless storefronts.
To maintain the integrity of the original SFRA cartridge,
create a new cartridge as a best practice.
You can then move the original templates into this new cartridge and make the necessary modifications.
If you are already using a custom cartridge,
incorporate or adapt these changes into your existing cartridge.
In app_storefront_base/cartridge/templates/default/common/htmlHead.isml,
add the following code on line 32:
HTML
<isinclude template="algolia/headerScripts" />
In app_storefront_base/cartridge/templates/default/components/header/search.isml,
add the following code at the start of the file, and move existing the code to an <iselse> section: