Hi, I’m Jaden! I’m a consultant on the content team here at Algolia. Under my agency the Authors Collective though, I work with newsletters too, and for a recent project I found myself trying to create an Algolia index full of newsletter articles stored in Beehiiv.
Now Beehiiv is great for writing and distributing newsletters, but AFAIK it doesn’t give readers a way to search across back issues other than by forcing me to set up a whole website through them. That limits me elsewhere (since I’m a web developer by trade, I’d like control over my own websites). Plus, the search on that Beehiiv-generated page is lackluster — I wanted more than “find the newsletter where the keyword appears”. Even that didn’t work 100%.
What I really wanted was search that dropped the user directly into the right section inside the right issue — while still presenting that issue as a single search result. That’s a foundational challenge with docs too, so Algolia’s been working on this thorny problem for years and even providing the answer for free in the form of DocSearch. But my content was siloed in Beehiiv, so I would need to get it into Algolia programmatically instead of through a crawler.
This is why I built a lightweight connector that:
Splits each Beehiiv article into section-level records,
Uses Algolia grouping/deduplication to collapse them into one newsletter issue per result,
Updates automatically via Beehiiv webhooks, and
Serves a simple search UI you can embed wherever with an <iframe>.
In this post I’ll walk through how I built it. If you want to jump straight to deploying, check the README.
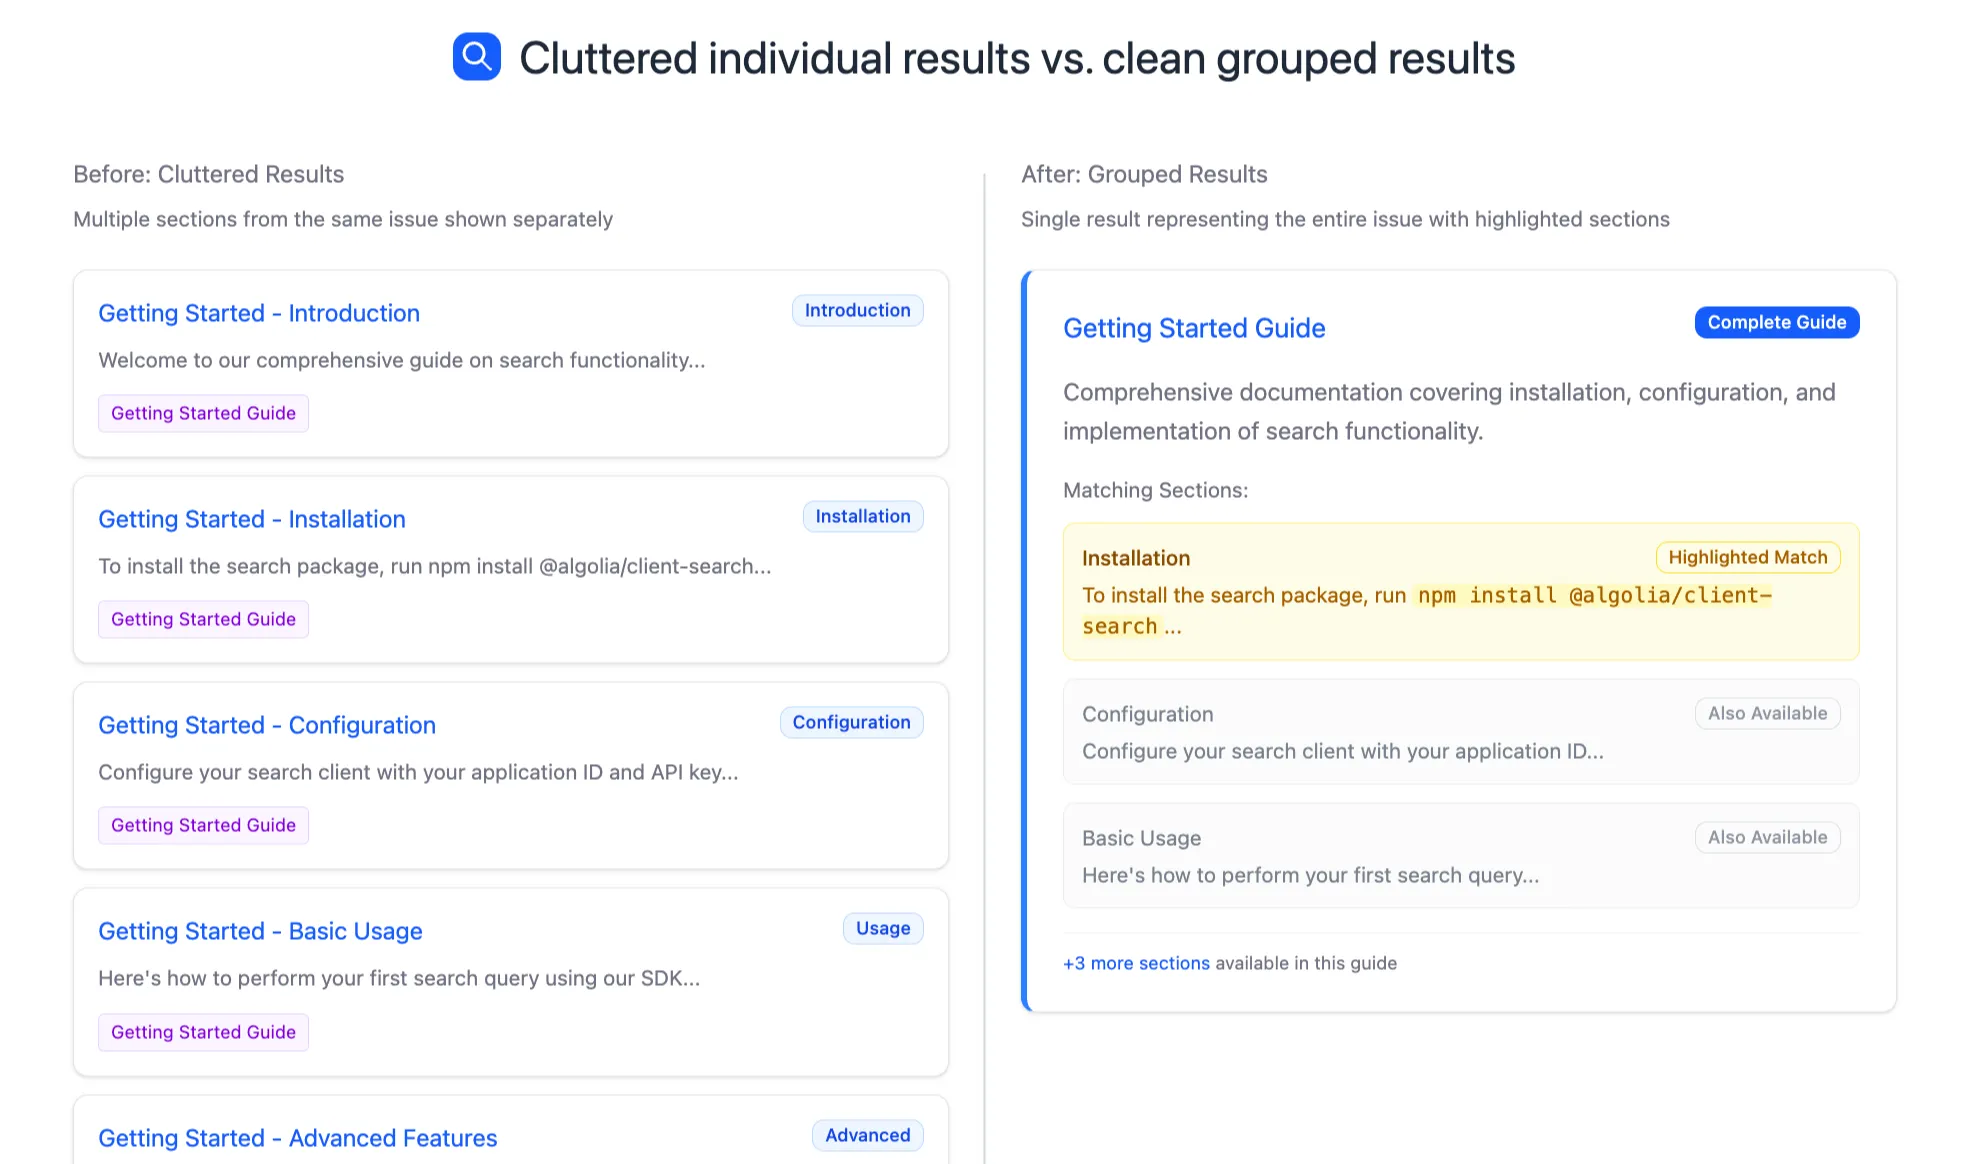
Why not just index whole newsletters?
If you index each issue as a single record, a search for “Web Components” will highlight the issue title, but readers have no idea where in the text that match appears. If you index every section separately, readers get multiple results from the same issue, which clutters the UI.
The solution: index sections, but group by issue. This way, Algolia’s search engine ranks and matches at the section level, while results collapse into one card per issue.
This is how documentation and blog search works, and it’s become standard as the most intuitive way to search through long pieces of content.
Step 1: Design the data model
The core record structure looks like this:
{
  "heading": "1. Problem/Opportunity❓",
  "contents": "BUSINESS IDEA | STARTUP\\nLoom for Pitch Decks \\n \\n [REST OF SECTION, CUT FOR BREVITY]",
  "articleID": "877f2e90-f7e4-4591-baed-7cea617823c1",
  "created": 1745369760,
  "title": "Business Ideas #340: Loom for X, Natural Light...",
  "preview_text": "Plus 🐕 💡 ⌨️",
  "slug": "business-ideas-340-loom-for-x",
  "thumbnail_url": "",
  "subtitle": "Plus How a Pub Conversation Birthed a $250m Business",
  "status": "confirmed",
  "content_tags": [],
  "audience": [
    "free"
  ],
  "authors": [
    "The Half Baked crew"
  ],
  "objectID": "fff46e60-1466-4fb5-a97c-4b8a08eaf6b5"
}
This is a sample record for a newsletter issue from the awesome folks at Half Baked.
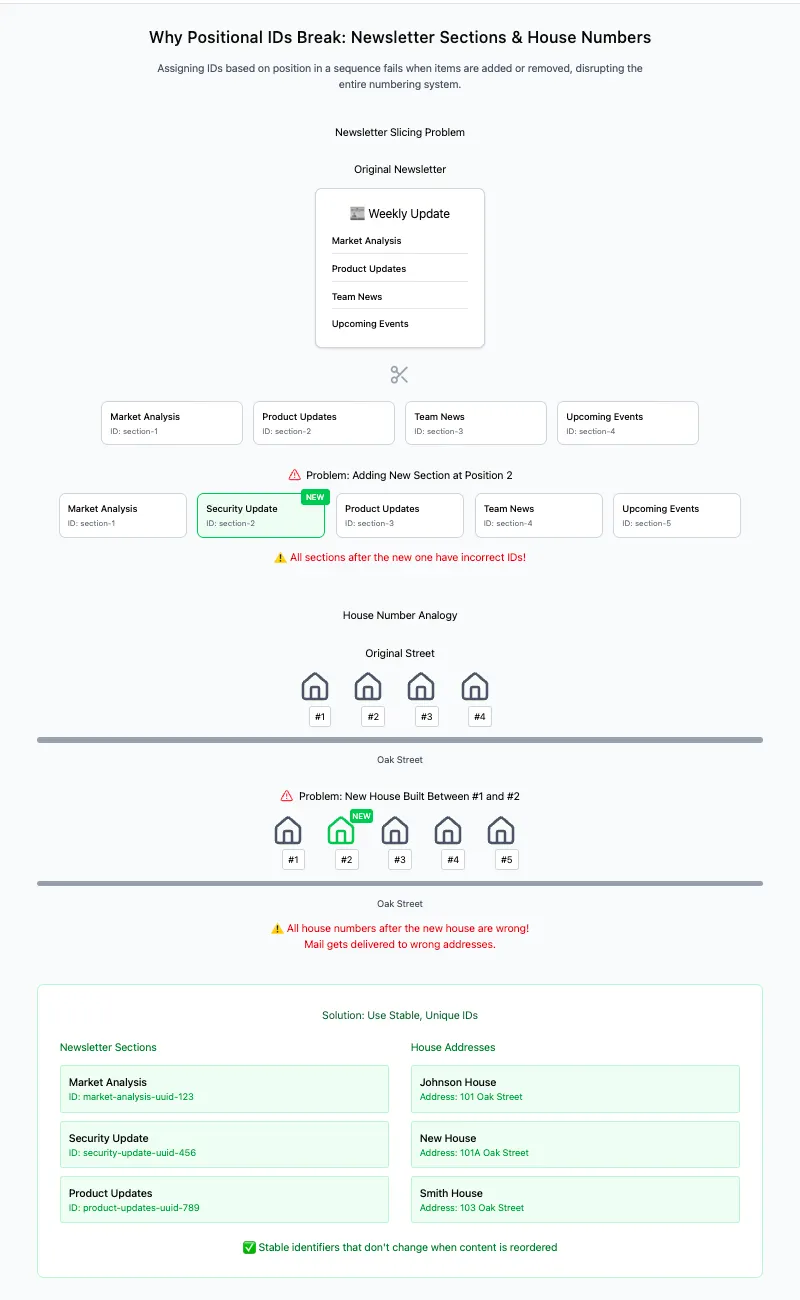
The articleID comes from Beehiiv, so we know that’ll stay consistent. Beyond that though, we can’t really have completely consistent UUIDs to identify each individual section of the article. Why not? Well what would happen if, in a future update of an issue, we removed a section in one place and added another? Now we’d find ourselves in a similar position to urban planners assigning house numbers on a given street. If you just count up in order, the system breaks quickly — added sections means you need to either relabel every section after it or somehow label it with fractions (e.g. section 2.5), and removed sections leave you with empty gaps. The section titles aren’t guaranteed to stay the same either, so we can’t generate a stable ID based on them. All we can do is narrow down how many records we have to create again from scratch by articleID.
A brief explanation of why sequential indexing doesn’t work here
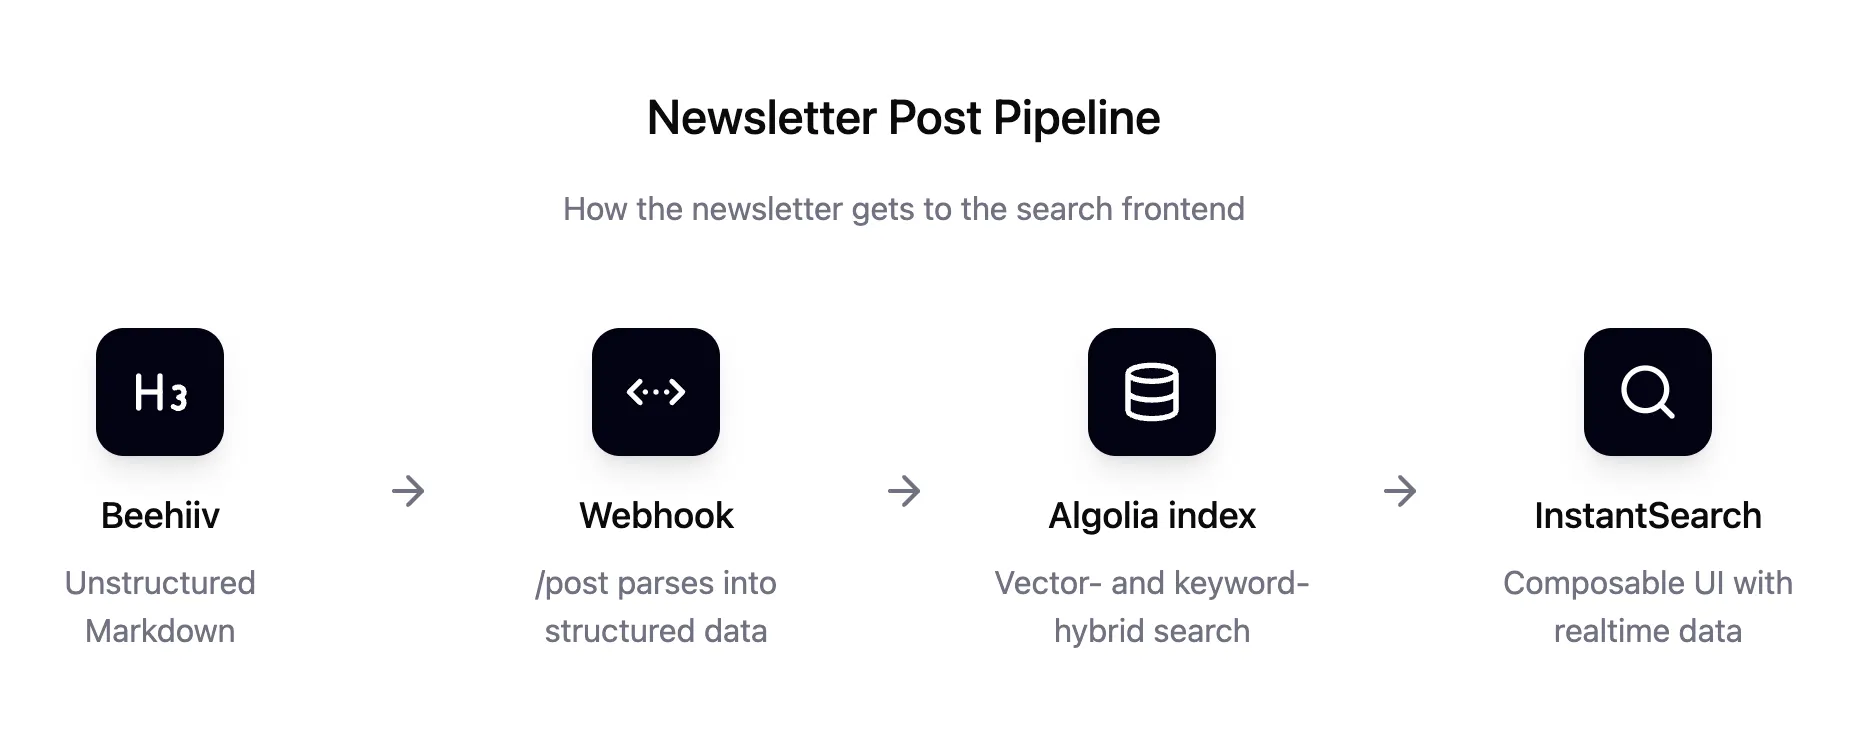
Step 2 — The webhook endpoint
The /post function listens for Beehiiv webhooks (both “new post” and “post updated”). It validates the request, fetches the post’s content from its live URL, runs a transformer function on it, and updates Algolia with the new/modified records. For more details about how it splits up the article into records, take a look at the code here.
Beehiiv doesn’t send delete events, so deletions are a limitation — one to handle manually via re-import. However, most articles aren’t fully deleted but simply archived, so we can make sure to only pass on those records that contain what Beehiiv calls confirmed (or unarchived) data. Deleted individual article sections though are caught automatically, since we’re being notified when articles are updated. We can just delete all records associated with that article, redivide by subheading, and reupload all of them.
To make results feel natural, I made the post function also configure the deduplication settings on the index programmatically unless you explicitly disable it. It sets:
This way, you don’t need to click around the Algolia dashboard. Of course though, this will run every time the /post endpoint is called, so if you’re not ever going to mess with the index settings again, you might as well explicitly disable it after you run it once. That setting will be in the Netlify environment variables you’ll run into later.
Step 3 — Transform Beehiiv exports
Beehiiv lets you download CSV exports containing all your posts, so the next step was to prototype a transformer that parses the CSV, splits post HTML into sections (based on headings/paragraph blocks), and emits those records in the same format at Beehiiv webhook payloads.
Prototyping this transformation locally makes debugging easier than trying to trigger the same webhook payloads over and over again later on. This transformer function was made into an HTML page at /import-csv where you can upload the CSV export. The output gets batched up and sent to the /post endpoint as if they had just come from a Beehiiv webhook.
Step 4 — Deploying on Netlify
Netlify’s “Deploy to Netlify” feature makes a lot of the configuration happen behind the scenes. As long as you have an account, you should be able to just click the button in the README and create your own instance of this site. It’ll ask you for some environment variables (and it’ll describe each one so there’s no confusion).
Then just tell Beehiiv to send the webhook payloads to the /post endpoint of your new Netlify app, and upload the export CSV of your old posts to the /import-csv page. Go to https://your-project.netlify.app/search and everything should be live! Just embed that page in your site (or better yet, steal the code and make it your own). Easy newsletter search in just a few minutes.
With the connector in place, all the messy problem-solving I went through — data modeling, webhook handling, CSV parsing, and index configuration — is already baked into the repo. You don’t have to reinvent any of it. All you need is a Beehiiv account, an Algolia index, and a single click on the Deploy to Netlify button. From there, set up the webhooks, upload your archive, and you’ve got a fully searchable newsletter without ever leaving Beehiiv’s ecosystem.
Algolia's Build plan is entirely free, which means you can build great search solutions too. Sign up for your free account today.


%20(2).svg)

