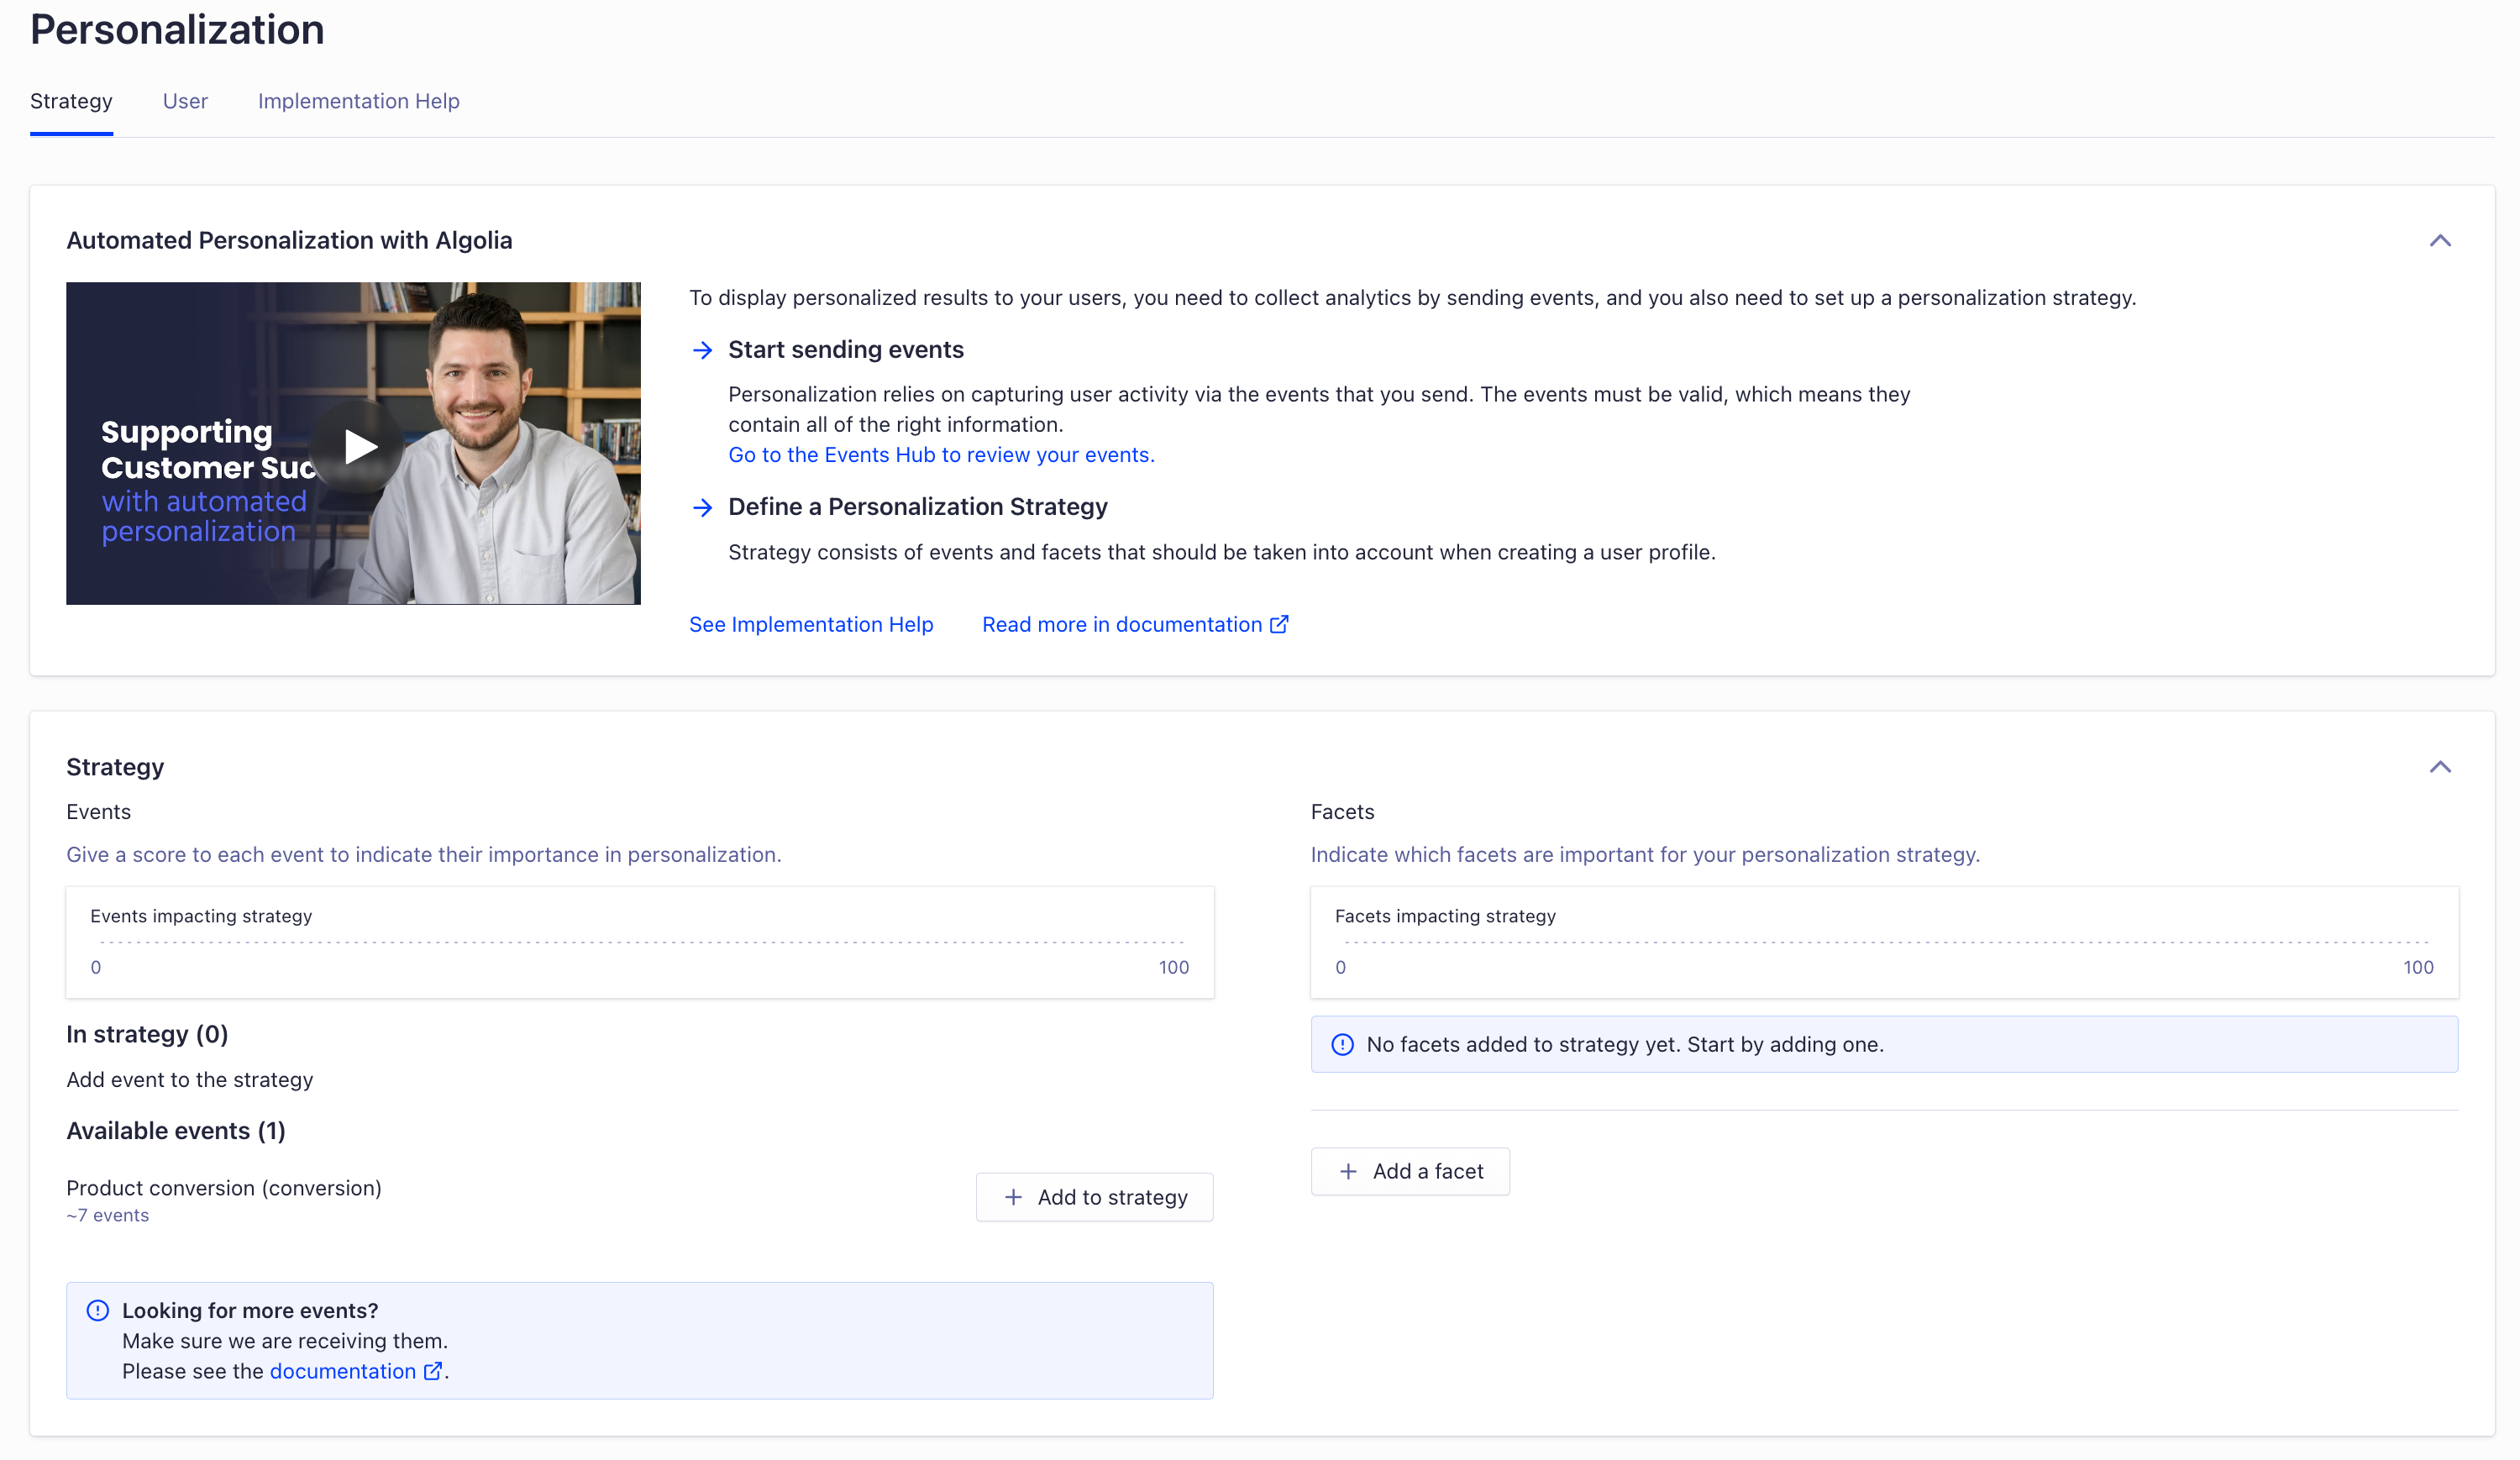
How to personalize search results and recommendations
Online shopping was initially designed as a glorious pathway to convenience — a few clicks and your favorite items are shipped straight to your door, no social interaction or trekking through malls needed!
Since then, e-commerce has since evolved into something else entirely. Now, online shops can feel overwhelming with a seemingly never-ending catalog and minimal interpersonal guidance. As a result, users in e-commerce experiences tend to lean heavily on search to help narrow down what they need, but may experience the cyclical dilemma of digging through thousands of results to find what they’re really looking for. However, personalizing your search experience with Algolia can eliminate this dilemma by personalizing those search results based on the user’s activity and interests. This provides a better search experience for users and also increases engagement with your website’s catalog, which is a win for everyone!
Algolia offers the tools to make implementing Personalized Search features easy for developers. Read on to learn how to leverage Algolia Personalization to create a custom search experience your users will love!
What We’re Building
In this tutorial, we’ll be building an e-commerce application using React and Commerce.js. Luckily, we won’t have to build from scratch — we’ll be using this basic e-commerce application with Recommendations features that we’ve built in this article as our starting point.
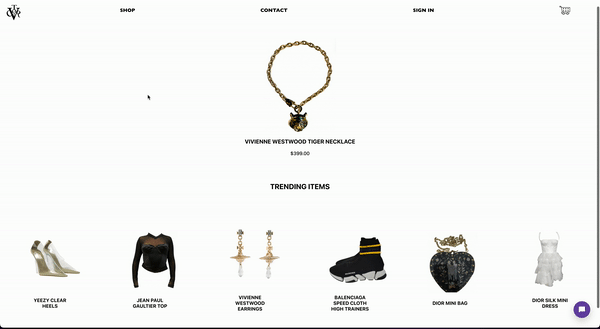
Upon completion of the tutorial, our application will be able to search our store’s product catalog and pull up relevant (and personalized) search results based on user activity:
Before we get started building, make sure you set up the following:
Node: To check if you have Node installed already, run node -v in your command line. If no version pops up, you’ll need to install it — you can find installation directions for your machine here.
ngrok: Create an ngrok account here. You’ll need it to tunnel connections from your local apps so that you can configure webhooks and make API calls.
Chec: Commerce.js uses a platform called Chec to manage your integrations, API Keys, and products. You’ll need to create an account here and then set up a Commerce.js store.
Algolia Recommend Events: To use the full features of your app, set up Algolia Recommend – to do so, you’ll need to generate at least 500 conversion events over 3 days, either manually or through a CSV.
NOTE: You will also need these events to use Algolia Personalization.
Algolia Recommendation Model: Once you have your events set up and aggregated, generate a recommendation model for trending items based on these events so they can surface in your app.
If you’re unfamiliar with the above Algolia concepts and are unsure how to set it up on your own, you’re in luck! We have a full guide that captures the above setup steps as well as setting up other necessary data, like events for recommendations and personalization and generating a recommendations model.
Once you have an e-commerce store running locally that is successfully displaying your products, running the chatbot, and surfacing trending item recommendations on your product detail page, you can proceed to the next step!
Time to Build
Algolia Personalization utilizes a user’s specific tastes, tracked through events, to generate more relevant and personal results for their search experiences. Since searches can mean different things to different types of people, Personalization will ensure that users will see the results that matter the most to them first. In order to leverage the magic of Personalization, we’ll need to follow a few steps first.
Categorize your Products
To provide deeper insights into relationships between your products, you’ll need to create and add categories to your products in Commerce.js. Categories can be any general grouping of how the products relate to one another – in the instance of our vintage consignment store, it can be types of clothes (tops, accessories, shoes), brands (Vivienne Westwood, Dior, Chanel), and even sub-categories within those categories (within shoes, there are sneakers, heels, and boots).
Add categories in Commerce.js and assign them to products
Firstly, we’ll add categories to our products in Commerce.js. Navigate to the Categories page in the sidebar of your Chec dashboard and click the “Add” button in the top right to add new categories. Categories can have parent and sub-categories.
Once you have created all of your desired categories, navigate to your Products within Commerce.js and assign these categories to them. Add as many categories as you’d like to each product — the more categories that are added, the more opportunities for relationships to be built between items!
The updated product listings will automatically sync to Algolia thanks to the webhook you’ve set up in Commerce.js that pushes new products to Algolia for products.create and products.update events. If you do not have this configured, read the instructions in the project’s README to add it in.
We recommend double-checking your products in Algolia to make sure that the categories are being populated for each corresponding item you update in Commerce.js. If you find that products are not syncing to your Algolia index, you can check in on your configured webhook in Chec here.
Define attributes for facets in Algolia
With each product in your inventory categorized, we can assign these categories significance through faceting. Facets are a set of filterable categories that allow users to refine results through multiple categories simultaneously. These categories, called “attributes” in Algolia, will consist of the categories we’ve assigned to our products in Commerce.js.
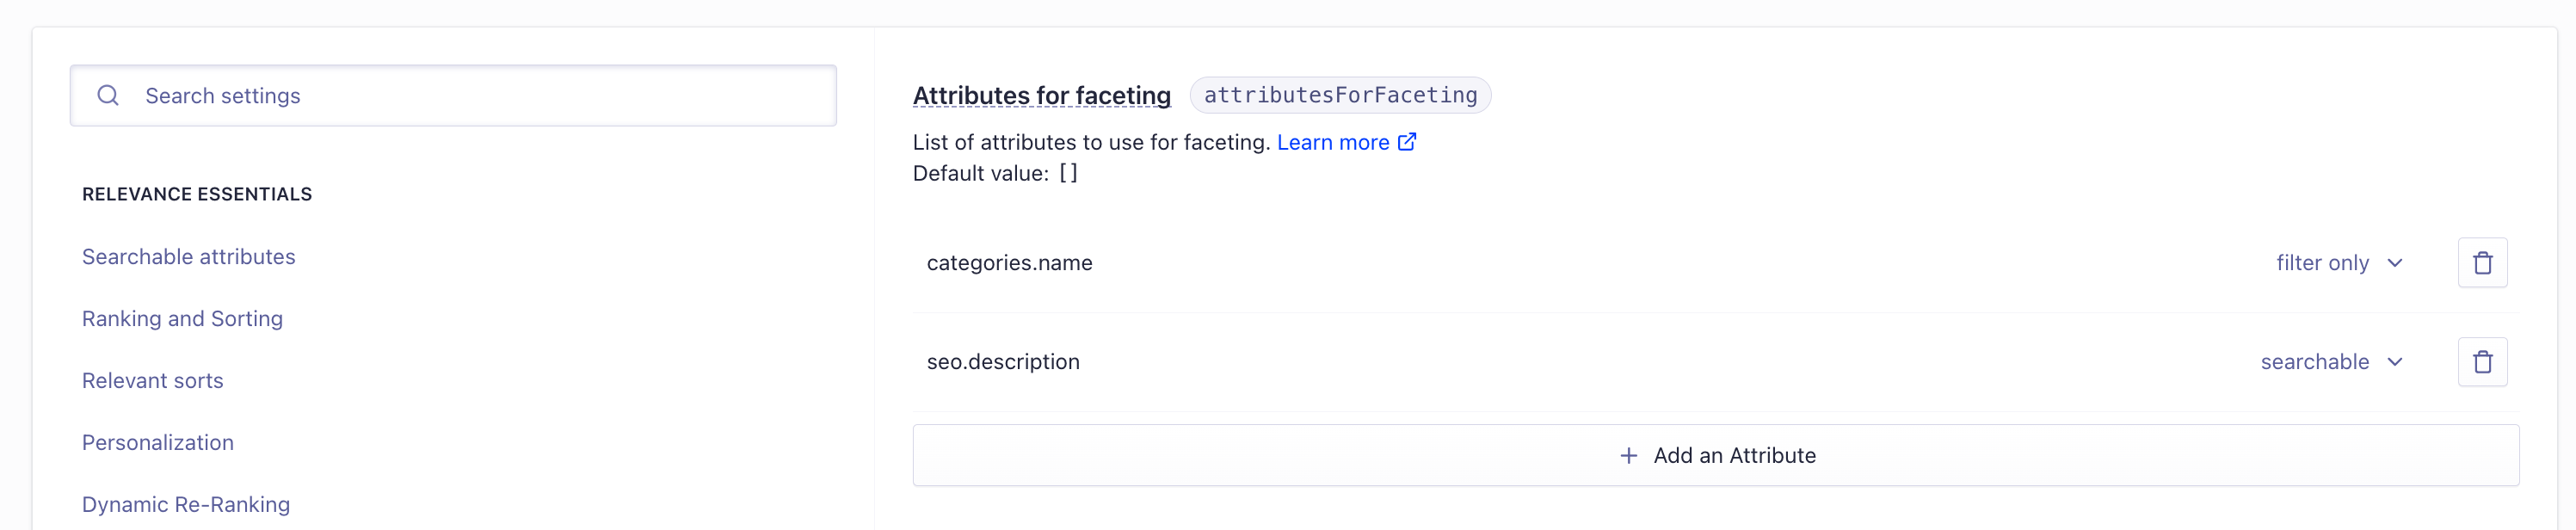
To declare attributes for faceting, navigate to your app’s index in your Algolia dashboard. Then, click on “Configuration” and find the “Facets” link under the “Filtering and Faceting” heading. Under the “Attributes for faceting” heading, click “Add an Attribute” — this will surface a series of properties that every item in your index possesses. Find the categories.name attribute. If you have trouble finding this, double-check your index data to make sure the categories field is populated with objects that contain a name property.
💡 If you’d like to have an additional facet for even more personalized results, we can also add the SEO tags we created for item searches (seo.description) as an attribute.
With each attribute, you can also categorize them by whether they should be “filter only”, “searchable”, or “non-searchable”. You can learn more about these groupings here.
Once completed, your index’s “Attributes for faceting” section should look something like this:
Set up Personalization
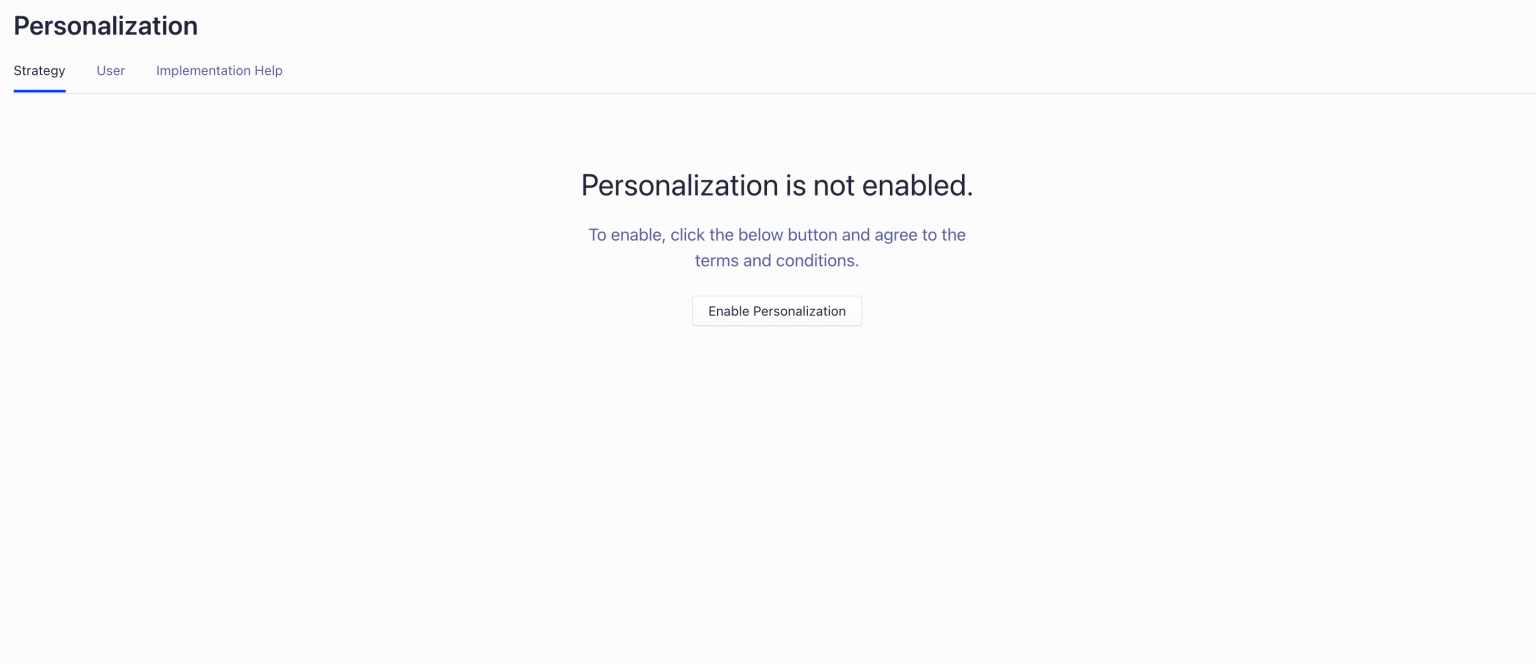
Now, we’re ready to set up Personalization through the dashboard!
Click “Enable Personalization” and follow the flow to accept the terms and conditions.
Once you’ve completed the flow, you’ll see a dashboard that looks like this:
Within this dashboard, you can set up a Personalization strategy to ensure users see results most relevant to the data you have. There are two different elements that influence this strategy:
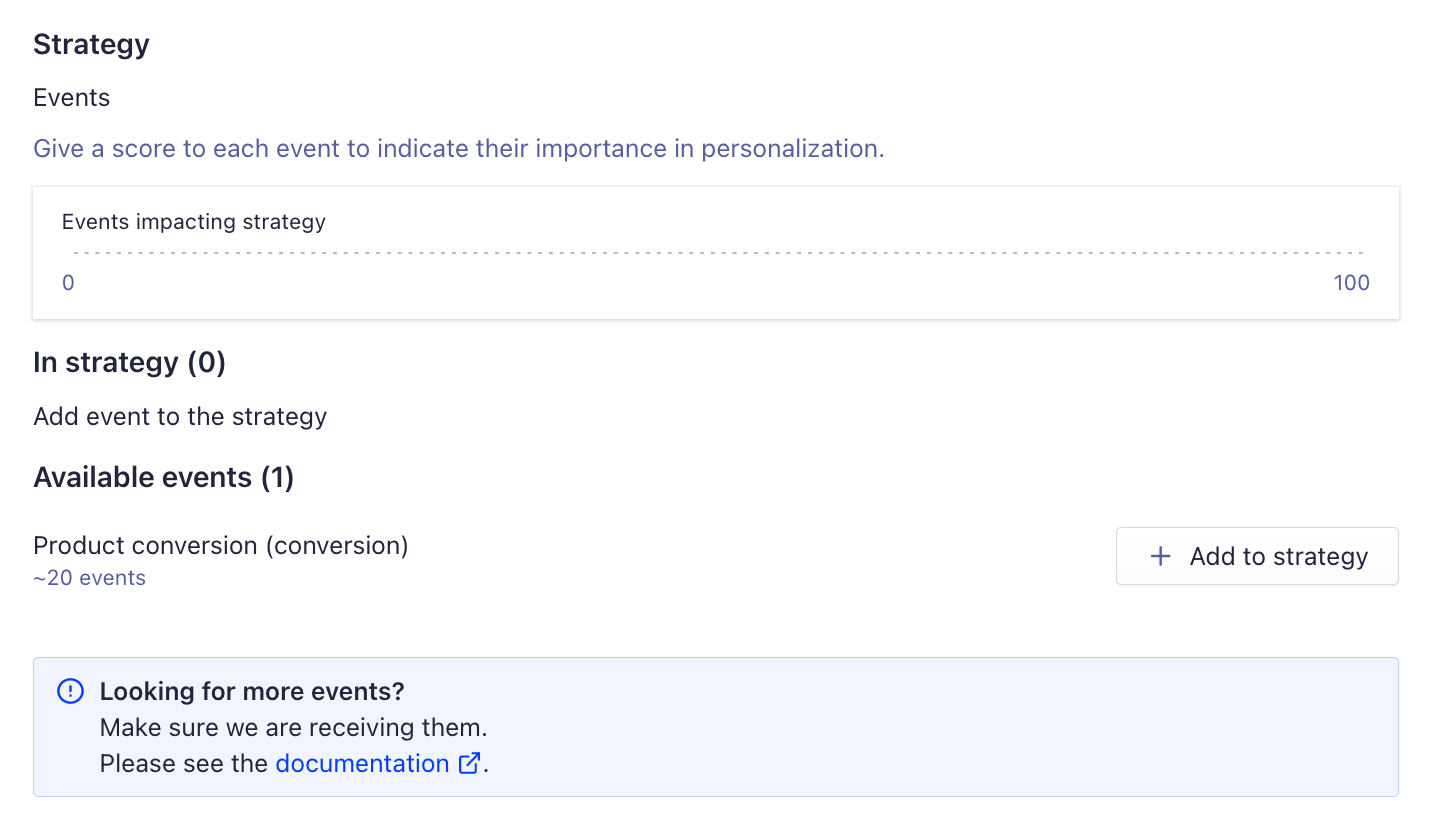
Events: The primary mechanism for learning user affinities. These are collected through the Insights API. In our application, we are currently collecting conversion events triggered by users clicking on products.
Facets: These were configured for your index earlier in this article. Facets consist of categories, groups, and additional details of a product that provide more insight into an item interacted with in an event and what exactly a user likes about that product (examples of this are brand, type of product, or color).
Weigh events and facets
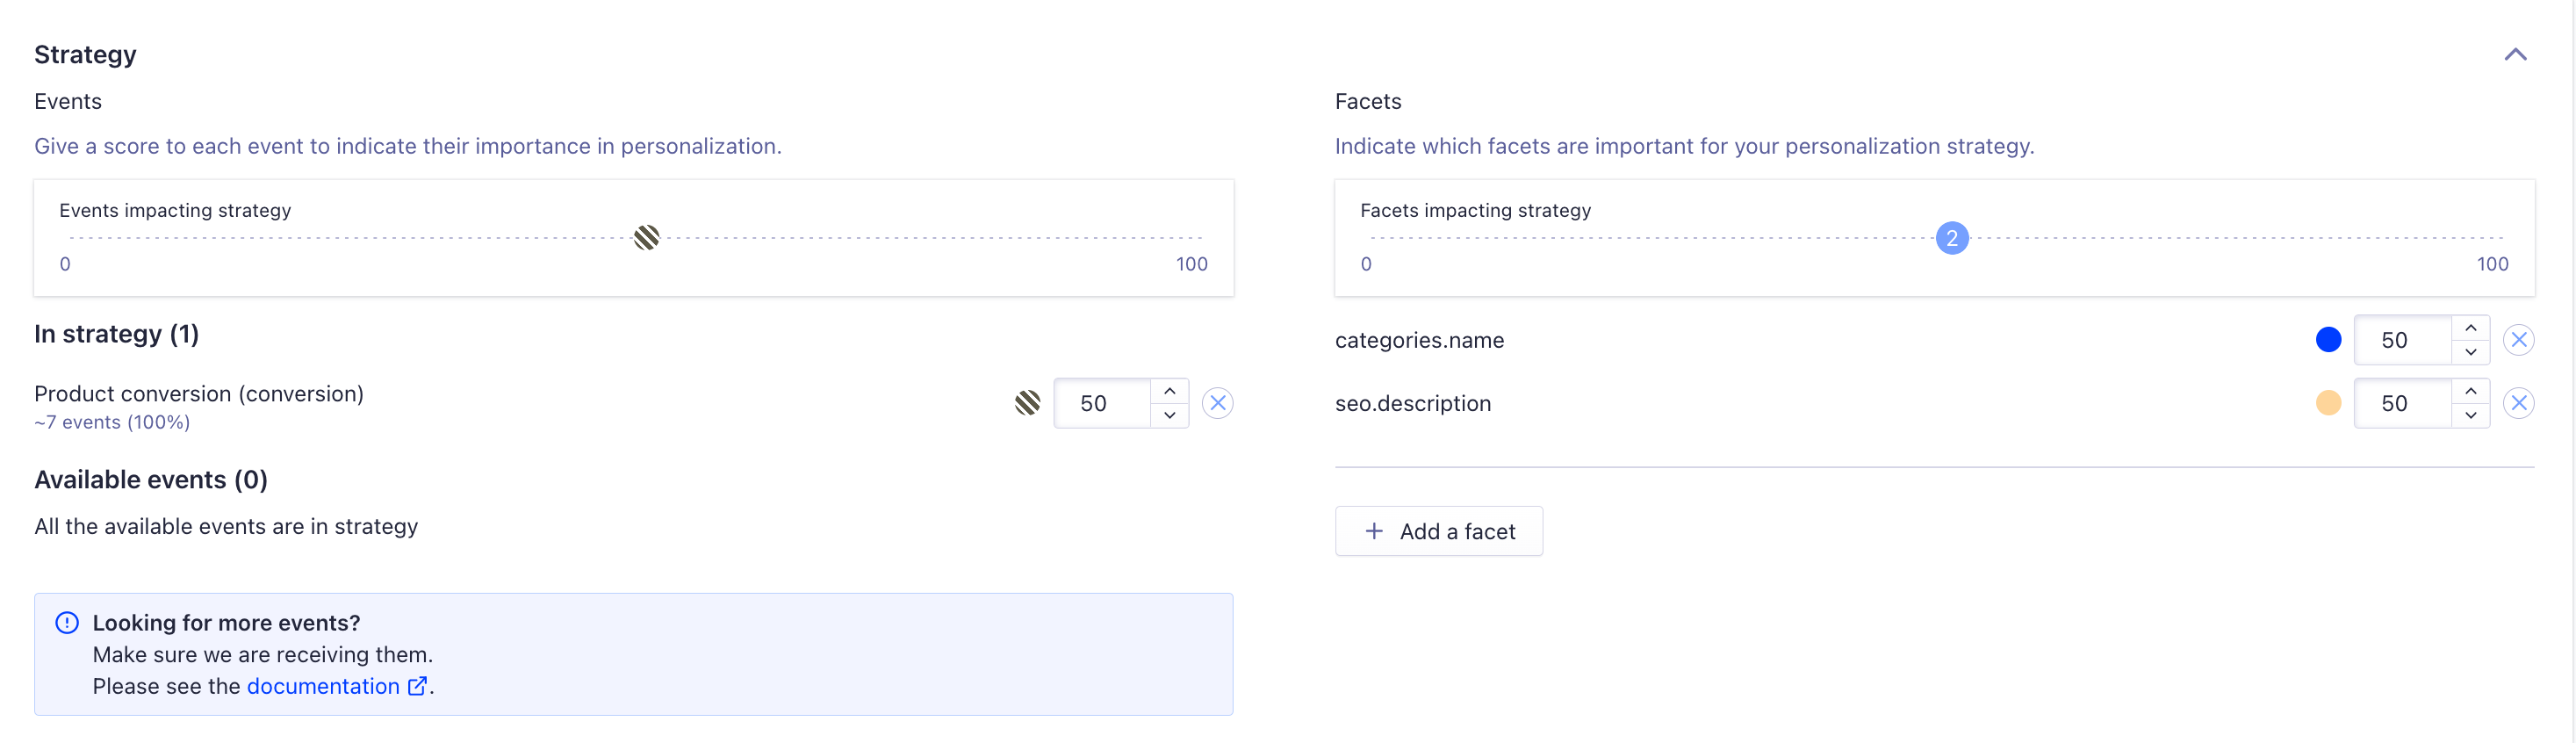
In the dashboard, you’ll be able to weigh the importance of both events and facets to influence your strategy. Weighing allows you to put different levels of importance and add more or less meaning to certain events and facets over others, combining all the weights into one general strategy that will influence Personalization.
To get started with weighing, you’ll need to add the events and facets you’d like to have in your strategy. Any available events for your index will surface automatically under an “Available events” category on the dashboard. If you do not see any events, attempt to re-generate some conversion events with the newly added facets by clicking on various products in your store. To add events to your strategy once they appear under “Available events”, click on the “Add to strategy” button.
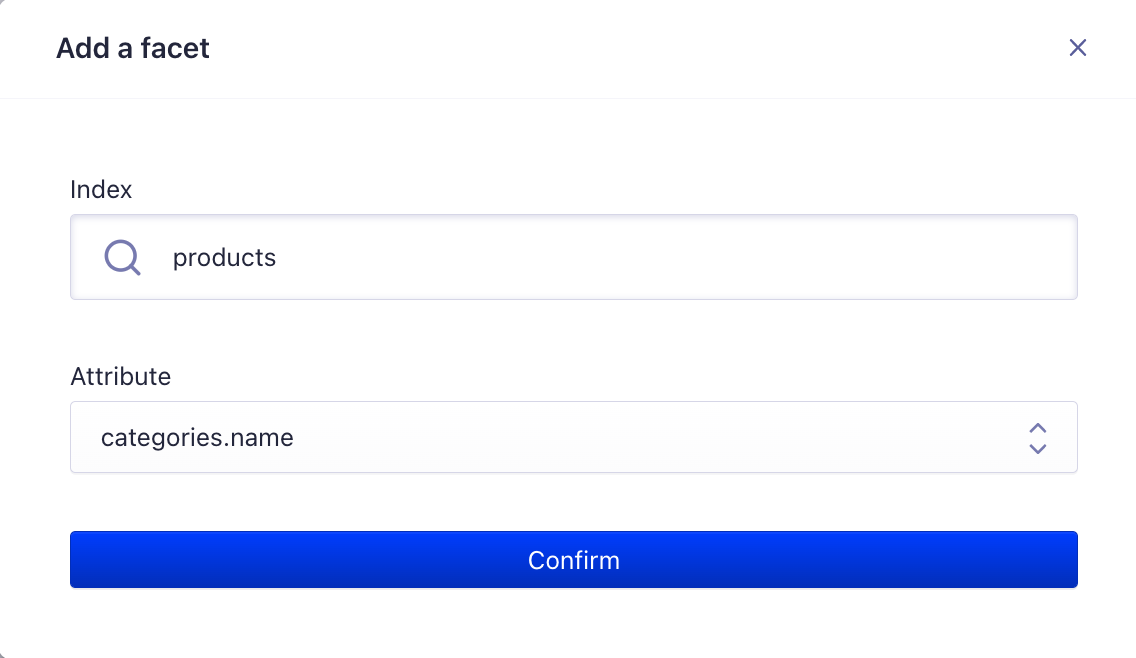
For facets, you can add them by clicking the “Add a facet” button on the right of the dashboard. From there, you can select any attributes for faceting that you added earlier, such as categories.name and seo.description:
Upon adding these events and facets, you will be able to adjust percentages of weight for various facets and events added to your strategy. The higher the weight, the more important that event or facet will be prioritized in your strategy.
In addition to weighing, you can define the impact of a Personalization strategy to influence the relative position boost that user affinities have on the search ranking. For this tutorial, we’ve left the impact at a default 50%.
Explore an in-depth strategy on Personalization impact here.
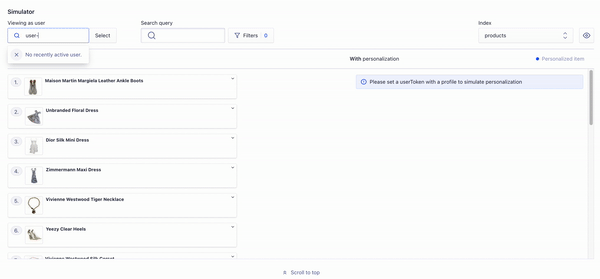
Simulate your strategy
To test various alterations of event, facet, and impact settings, you can simulate your Personalization strategy and search by user ID to view predicted strategy results.
Since we’ve only hard-coded one user for our app, we can search for user-1 to see what might surface with our current strategy:
To gain more insight about about simulations of Personalization strategies, you can view the guide here.
Save settings
Lastly, once you are satisfied with the results of your strategy’s simulation, be sure to hit the “Save Changes” button. If you are not satisfied, you can click “Discard”.
Set up Search
Once the Personalization Strategy has been set up, you can now add elements to your user interface so users can successfully search for products on your site.
Add in SearchBar component
In order to search, users need a place to input search results that links to your Algolia index and queries for results.
To begin, create a file, SearchBar.js, in client/src/components:
// client/src/components/SearchBar.js
import React from "react";
import { SearchBox } from "react-instantsearch-dom";

function SearchBar() {
  return (
    <div className="search__bar">
      <SearchBox
        showLoadingIndicator={true}
      />
    </div>
  );
}

export default SearchBar;
This creates a very simple Search Bar using the <SearchBox> widget from the Algolia InstantSearch library.
The SearchBox allows users to input searches. Upon submission, a query is made to search an Algolia index (in this case, it’s products) that is specified in our InstantSearch components in client/src/App.js, which all of our views are wrapped with. Wrapping these views in InstantSearch tags gives us access to all InstantSearch capabilities and components for all components within the tag.
To view the SearchBar component once it’s been added in, you’ll need to add styling. Create a SearchBar.css file in client/src/components and paste in the contents from this example file. Finally, don’t forget to import the CSS into your SearchBar.js file by adding the following line:
import "./SearchBar.css";
Surface search results in SearchHits
Now that we have a way for users to input searches, how can we surface the results?
This raises the need for another new component that we can redirect searches to, which will surface different products based on the query. To get the results of the search from Algolia, we can again leverage the InstantSearch library — specifically, we can use a component in this library called <Hits>, which will surface these items for us.
Create a file at client/src/components/SearchHits.js, which will house our SearchHits component. Then, add in the following code:
// client/src/components/SearchHits.js
import React from "react";
import { Hits } from "react-instantsearch-dom";
import ProductItem from "./ProductItem";
import aa from "search-insights";
import { Link } from "react-router-dom";

function Hit({ hit }) {
  return (
    <div className="hit">
      <Link
        to={`/products/${hit.id}`}
        state={{ selectedProduct: hit }}
        key={hit.id}
        onClick={() => {
          aa("convertedObjectIDs", {
            userToken: "user-1",
            index: "products",
            eventName: "Product conversion",
            objectIDs: [hit.id],
          });
        }}
      >
        <ProductItem product={hit} />
      </Link>
    </div>
  );
}

function SearchHits() {
  return (
    <>
      <Hits hitComponent={Hit} />
    </>
  );
}

export default SearchHits;
Within the primary SearchHits functional component, we are returning our Hits component from the InstantSearch< library. Hits will display a list of results, or search hits, based on what is inputted within a SearchBox within the same InstantSearch tag — in this case, it’s the SearchBox we just implemented in SearchBar.js.
With the Hits component, you can render each search hit using a custom component. In our code, we have reused the [ProductItem component](https://github.com/hello-ashleyintech/algolia-commercejs-personalizations-app/blob/master/client/src/components/ProductItem.js) that is also utilized to surface products on our main page.
Finally, similarly to our main page’s ProductList component, each ProductItem is wrapped in a Link component that leads to the product’s individual detail page. This allows users to look at the item more in-depth from the list of search results and also tracks conversion clicks using the search-insights library, as we are doing for all product clicks across our website.
Add routes to App.js
Once you have the SearchBar and SearchHits components ready, it’s time to add these components into our app officially and point a route to our SearchHits page!
Head to your client/src/App.js file and import the new components at the top of the file:
import SearchBar from "./components/SearchBar";
import SearchHits from "./components/SearchHits";
Now, let’s surface the search bar on the home page. To do so, add in your SearchBar component above the ProductsList component in your Route configuration for the / path:
<Route
exact
path="/"
element={
  <InstantSearch searchClient={searchClient} indexName="products">
    <Configure clickAnalytics />
    <SearchBar /> // just added this in
    <ProductsList products={products} />
    <Bot />
 </InstantSearch>
/>
Finally, we’ll add a new route that will dynamically surface search results based on the query. To do so, we’ll need a dynamic route that takes in the search query. Add the following within the <Routes> tag in your App.js:
The above will surface a SearchBar, a list of SearchHits from the previous search, and the existing Bot component for our store’s chatbot. Like we’re doing with the views for our other routes, we’re wrapping the contents of the page with an InstantSearch instance so that users can use the library and its search capabilities within the page.
At this point, you should be able to see your search bar on the home page:
Update SearchBar to redirect to SearchHits or home based on routes
At last, we have our SearchBar set up. We also have a page, SearchHits, that will surface search results when a query is submitted.
However, you might notice that no results are showing up (and in fact, nothing is really changing) upon clicking the Search button in your SearchBar. This is because we haven’t yet wired up an onSubmit event for this element.
Let’s dive back into SearchBar.js and get to work!
For our SearchBar, our desired behavior when we submit our search result is for it to redirect to the /results/:query route configured in App.js. However, since we’re implementing this in an event listener, we can’t navigate to this view using <Link> tags like we normally would. Luckily, React offers a useNavigate() hook that we can take advantage of to redirect us to our desired page!
At the top of SearchBar, import the useNavigate hook:
import { useNavigate } from "react-router-dom";
Then, within the SearchBar functional component, add the following before the return():
let navigate = useNavigate();

const routeChangeSubmit = (query) => {
  let queryURI = encodeURIComponent(query);
  let path = `/results/${queryURI}`;
  navigate(path);
};

const routeChangeReset = () => {
  let path = `/`;
  navigate(path);
};
The above initiates a hook instance of useNavigate(). Then, we declare two different route change pathways — one that occurs in the event of an onSubmit() event, and one that occurs in the event of an onReset() event, which happens when a user searches and clicks an “X” button next to the search button.
Within the routeChangeSubmit() pathway, we are taking the query and encoding it so that it does not cause issues with the router URL formatting (this is helpful for cases where users’ search queries contain spaces or other non-URL-friendly characters). Then, we set a path to the desired route for our SearchHits, using the encoded query string as the :query param. Finally, we use the useNavigate() hook to direct the user to that route path, which results in a seamless redirect to the search results. The routeChangeReset() does the same thing, except it redirects to the home page and does not require any URL manipulation since the path is straightforward.
Lastly, we’ll add the onSubmit and onReset events to our SearchBox component within the return():
Both event listeners call the pathways we just added for the respective actions, submitting and resetting the search. Within onSubmit(), we are calling event.preventDefault() to avoid any undesired redirects that might happen. Then, we use the event to pull the search query through event.target[0].value.
However, if the event.target[0].value property is empty (meaning a user has clicked the search button without entering a query), an invalid URL redirect would happen, resulting in a blank page. As a result, the code will check to make sure that value exists, and if it does, it then calls our routeChangeSubmit() pathway and passes in the search query.
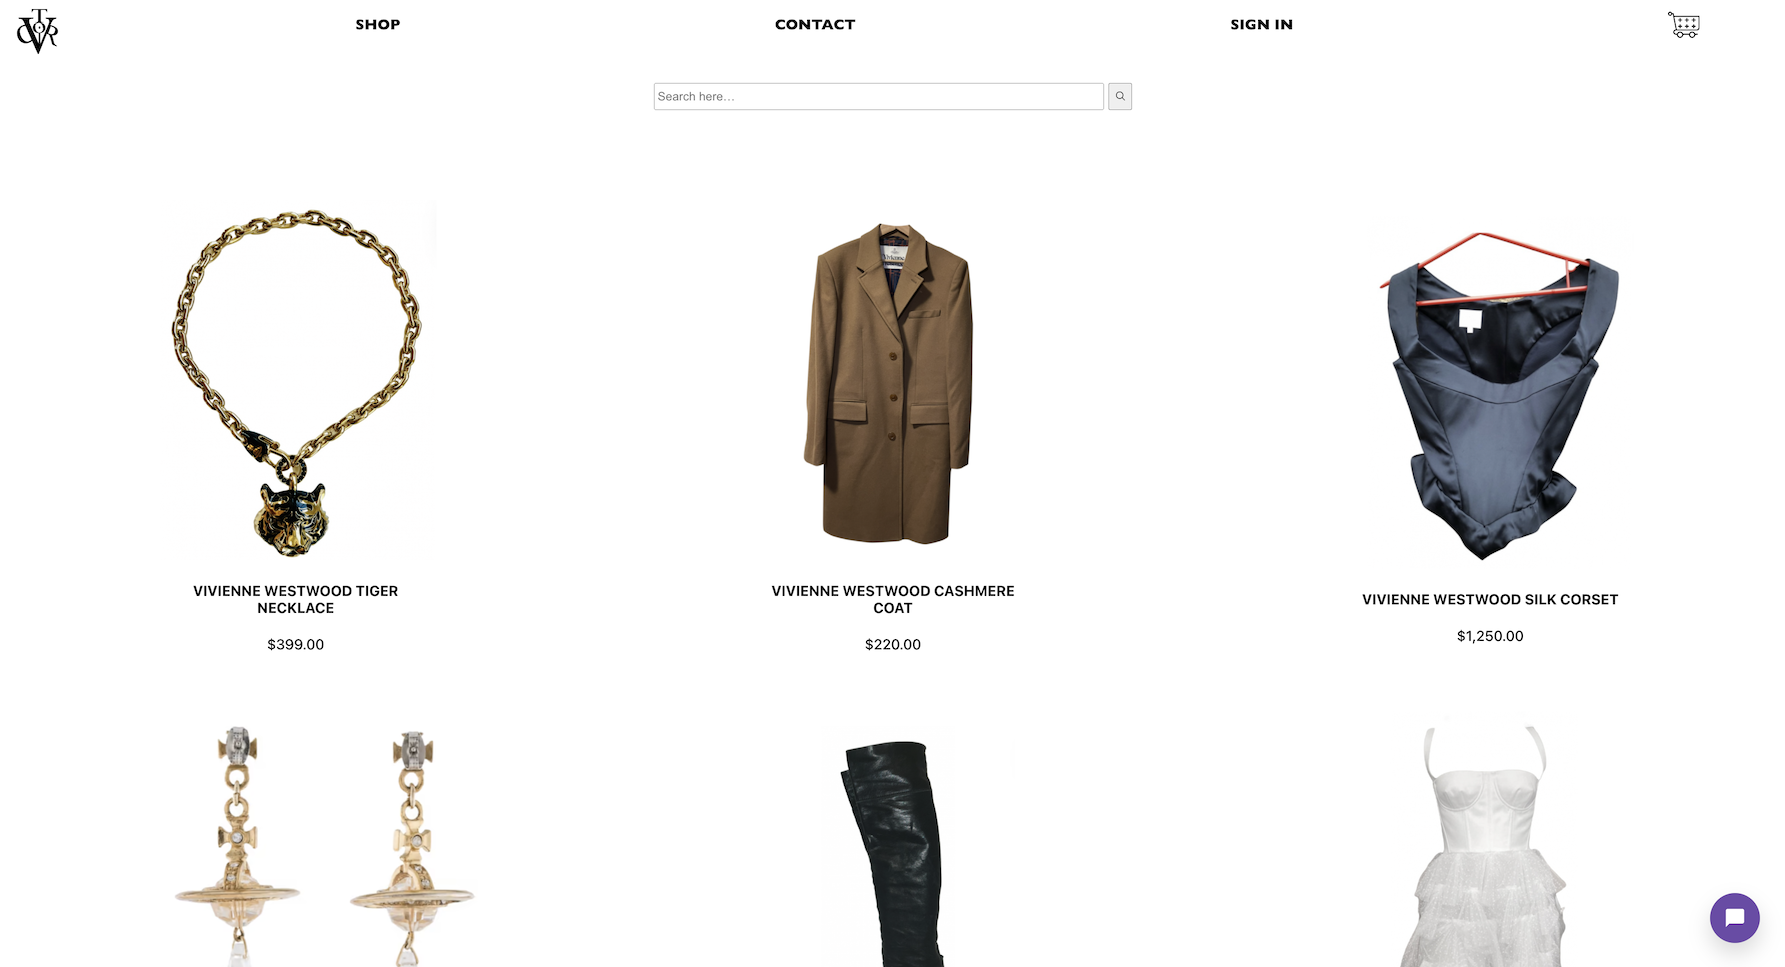
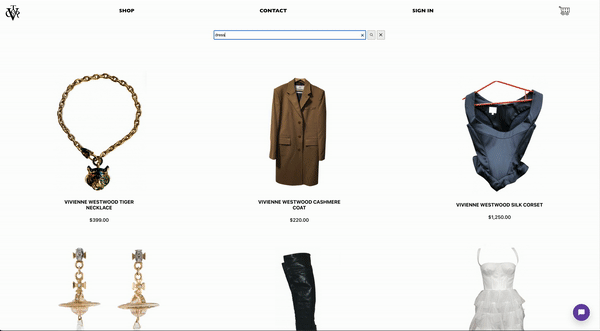
With this code added in, you should be able to search items seamlessly and view corresponding results:
Enable Personalization in the Configure component
Searching is fantastic, but searching with personalization is even better. Luckily, we’ve developed a Personalization strategy with ease using Algolia, and we can quickly incorporate that into our existing search instance!
To add in personalization, we’ll need to add in two parameters to our [Configure components](https://www.algolia.com/doc/api-reference/widgets/configure/react/) (from the InstantSearch library) in our App.js, where all of our search settings are wired up. The two parameters we’ll need to add are:
enablePersonalization: A boolean that will either enable or disable personalization results that happen for a user’s InstantSearch instance.
userToken: A string that is intended to be a unique user ID — if you are using separate user accounts for your application, you’d retrieve the current user’s ID and populate it here. In our app’s scenario, we are only tracking one user’s activity, so we will populate this value with that user’s ID – user-1.
Navigate to client/src/App.js and add in the following parameters to each <Configure> tag for each route that contains a SearchBar (/ and /results/:query).
Here’s an example of what that would look like within the home (/) route:
With this added in for each route’s Configure component, you will now be able to see personalized results on each search!
To learn more about enabling Personalization in production and other methods you can use to enable Personalization (such as enabling it in the dashboard for certain indices), visit this article.
Conclusion
Incredible work, and thanks for following along! 🎉 With this guide, you’ve learned how to add personalized search to your e-commerce experience. If you’d like to view the full project’s code for this tutorial, you can visit the algolia-commercejs-personalizations-app repository.
Algolia’s Personalization features did all the heavy lifting for us — through the Personalization dashboard, you were able to easily create a strategy for custom user search experiences. Additionally, Algolia’s pre-built components from the InstantSearch library provided a straightforward way for you to hit the ground running and implement an easy search solution on your site, with minimal configuration needed.
We hope you’ve learned a lot about the power of Personalization from this tutorial! 💪 If you’d like to hack more on the app we’ve built today, you could look at making a few updates such as:
Adding front-end and back-end testing to make sure your site is always running smoothly
Introducing user accounts — allow users to sign up, log in, and log out of accounts on your site. You can also add in new user-specific features, such as favorites
Generating more types of events and experimenting with different recommendation models and personalization strategies
Creating an experience for adding items to a cart and checking out
The possibilities are endless! ✨ Best of luck with your future hacking!
Gartner 2026 Magic Quadrant for Search and Product Discovery
A leader for the third consecutive year
Algolia is recognized as a Leader in the 2026 Gartner® Magic Quadrant™ for Search and Product Discovery as the market shifts toward AI-powered, agentic discovery.
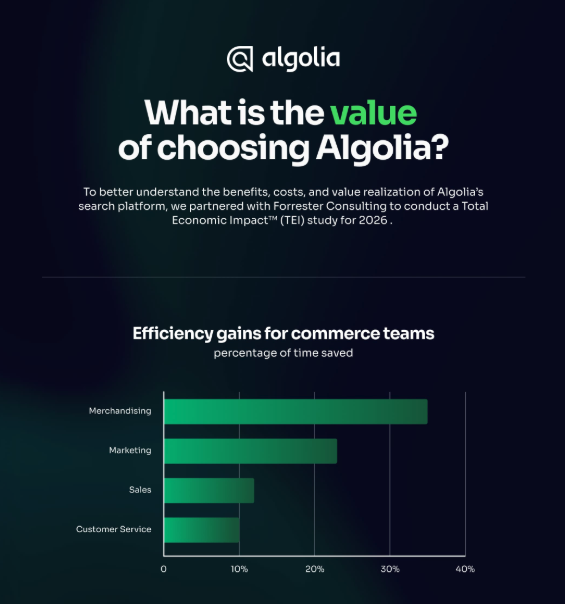
Increased Operating Profit and Improved Efficiency
A Forrester Consulting study found Algolia delivered $3.1M NPV over three years, helping commerce teams improve relevance, automate merchandising, and grow revenue
IDC recognized Algolia as a leader in general-purpose knowledge discovery software, citing the growing role of search in AI-powered workflows and enterprise knowledge experiences
Algolia earned 12 medals across 12 categories in Paradigm B2B’s 2025 Enterprise Combine for Search and Discovery, with customers praising speed, transparency, analytics, and ease of use


%20(2).svg)