Git `rebase` is one of those commands that you may have heard of as a substitute for `merge`. Truth is, it’s more than that — `rebase` is a completely different set of tools that intersect with the goals achieved by `merge`. Confused? Don’t worry! This blog post is about different uses of `rebase`. First, as a way to integrate and exchange your work between two branches (like `merge` does), but also as a history rewriting tool.
From merge to rebase
Merging branch is the most common way to integrate changes between two Git branches. A Git workflow common to services such as GitHub or Gitlab is as follows:
- Create a new “feature” branch called `my-new-feature` from a base branch, such as `master` or `develop`
- Do some work and commit the changes to the feature branch
- Push the feature branch to the centralized shared repo
- Open a new Pull Request for `my-new-feature`
- Wait for your tests to pass and to gather feedback from your peers
From there, everything is great. You end up with a nice, clean branch, such as:
.png)
However, in an imperfect world, here’s what might come next:
- Code reviewers have found a few bugs and typos in your first commits and your tests are not passing
- You make some changes and commit the fixes locally
- You push your updated feature branch to the centralized shared repo (C6 and C7 on the following schema)
- Meanwhile, other commits are merged to the base branch (C8 and C9)
- Your pull request finally gets accepted and is merged into the base branch (C10)
And from there, your history becomes a bit more complex:
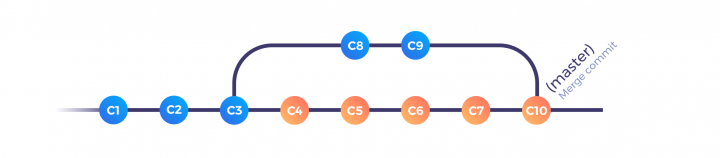
There’s nothing wrong with this workflow; in particular, you don’t have to bother about what your coworkers are doing so you can focus on your own work. Since the critical part where Git combines (or merges) your changes with the ones from the base branch only happens once, you will only need to deal with eventual conflicts once — at the merge step.
However, a few things are also a bit off here. First of all, if you’re working on your branch long enough, you may end up out-of-sync with the base branch for days or weeks. This may not be an issue, but sometimes you would have really appreciated including that specific fix that your team merged, or getting rid of that huge dependency that slows you down every time you compile. Secondly, the history may become too complex to understand once all your coworkers have merged their own branches to the base branch. Lastly — and this one may be a bit more subjective — you probably kept a logical breakdown between the commits of your branch. Having a single merge commit containing all the changes to all your files probably isn’t what you want to expose in the end.
Let’s see how rebasing may help you address all those issues.
Rebasing on the base branch
In September 2016, GitHub introduced a new way to merge pull requests: the “Rebase and merge” button. Also available for other repository managers such as GitLab, it’s the “rebase front door”. It lets you perform a single rebase operation of your Pull Request commits on top of your base branch and then perform a merge. It is very important to observe that those two operations are performed in order, and that the rebase is not a substitution of the merge. Hence rebase is not used to replace the merge, but it completes it.
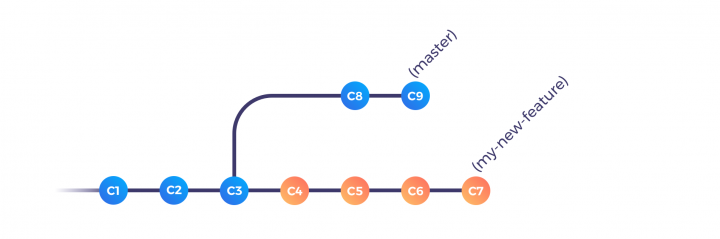
Consider the previous example. Before the final merge, we were in this situation:
You can simulate what happens when you click on the “Rebase and merge” (when there’s no conflict) by performing the following commands:
| |
git checkout my-new-feat |
| |
git rebase master |
| |
git checkout master |
| |
git merge my-new-feat --ff |
view rawmanual-merge-and-rebase.sh hosted with ❤ by GitHub
By doing so, you finally end up with a “linear history”:

As you see, rebasing is not a substitution for the merging step. As explained before, the two operations are not performed on the same branch: `rebase` is used on the feature branch whereas `merge` is performed of the base branch. For now, this operation just prevents having a single merge commit with all the changes in it, and it’s still a single operation that happens at the last step of your contribution (i.e., when you want to share your work).
Until now, we have only interacted with `master` as our base branch. To stay in sync with the changes of the base branch, it’s just a matter of performing the rebase step with the up-to-date base branch. The longer you wait to do this, the more out of sync you’ll be.
The up-to-date version of your base branch is hidden in plain sight. It’s a read-only version of the base branch, prefixed with the name of the remote to which you’re connected, or more simply put: it’s a read-only copy of the branch from your remote instance (such as GitHub or GitLab). The default prefix when you are cloning the repository for the first time is `origin`. More concretely, your `master` branch is the local version of master, whereas `origin/master` is the remote version of this branch, copied on your computer the last time you performed a `git fetch` operation.
We’ve stepped through a lot of theoretical material, but as it turns out, the end result is relatively straightforward; here’s how to sync with changes happening on the remote:
| |
git fetch |
| |
git checkout my-new-feat |
| |
git rebase origin/master |
view rawrebase-on-origin-master.sh hosted with ❤ by GitHub
The first step retrieves the latest changes from the distant copy of `master` into your local `origin/master` branch. The second one checks out your feature branch. The last one performs the `rebase` so that all your commits are now added on top of the latest changes that happened parallel to your own work. By applying those commands on our very first example, here is what would have happened:
.png)
As you can see, the feature branch now includes all the latest changes, so you’re able to work in sync with the rest of your team. By working with the above workflow, you’ll be able to deal with potential conflicts earlier and progressively instead of at the very last moment (when you want to merge your work within the base branch). People often disregard the “Rebase and merge” button because they expect too many conflicts at the very last step of the process (so they prefer to perform a regular merge commit instead). Ultimately, it takes a small active effort to stay in sync with the latest changes.
Rebasing your own work
Until now, we’ve only used `rebase` to apply commits from one branch onto another. This is pretty much the basic use-case of `rebase`: just default options, actions, and results. Furthermore, we are only using `rebase` to integrate changes from a different branch into our own branch. But — it can be used to add/change/remove your commits directly from your own branch too! The “base” on which you rebase can be virtually any commit — even a direct ancestor.
In fact, if you wanted to see what was happening during the rebase we did, you could have used the “interactive mode” of rebase by adding the `-i` or `–interactive` argument. By doing so, Git will open your editor of choice (the one defined in your `EDITOR` environment variable) and list all of the commits that will be affected by the rebase operation, and what should be done with every single one of them. This is where the true power of `rebase` lies.
From your editor, Git lets you reorder, rename, or remove commits, but you can also split single commits into multiples, merge two or more commits together, or change their commit messages at the same time! Pretty much everything you’d like to do with your history is possible with `rebase`. And the awesome thing is that it’s relatively straightforward to tell Git what to do. Every commit is presented on its own line, in a sequential order, prefixed by the command that will get applied to it. Reordering commits is as easy as reordering lines, with the most recent commits at the bottom of the list. Removing commits is just a matter of removing the corresponding line, or specifying the `d` or `drop` command as a prefix. One of your messages contained a typo? Just use the `r` or `reword` command to keep the commit, but change the associated commit message.
To sum up, `rebase` is just a Git command that lets you:
- Select one or multiple sequential commits
- Base them on any commit of your repository
- Apply changes to this commit sequence as they are added on top of the new base commit
To better illustrate this, consider the following series of commits:
| |
$ git --no-pager log --oneline |
| |
57f15b4 (HEAD -> master) add D and E files |
| |
61681da add B file |
| |
7d4a28d add C file |
| |
f92bb1d add A |
| |
78b3f67 root commit |
view rawgit-log-1.sh hosted with ❤ by GitHub
As you see here, we have a first “root commit” — which will serve as our base commit — followed by 4 commits adding a total of 5 files to the repository. For the sake of the exercise, let’s say this series of commits is your Pull Request, and you aren’t satisfied with it for the following reasons:
- The first commit message is wrong: it should be “add A file”, not “add A”
- File B and C were added in the wrong order
- File D should have been added at the same time as file C, not with file E
- Finally, file E should be added in its own separate commit
All of those changes can be performed with a single rebase. The final history would look like this:
| |
$ git --no-pager log --oneline |
| |
2d6361f (HEAD -> master) add E file |
| |
1e33d62 add C and D files |
| |
180b4bd add B file |
| |
eb6beee add A file |
| |
78b3f67 root commit |
view rawgit-log-2.sh hosted with ❤ by GitHub
Note that, except for our base commit, all commit hashes have changed. This is due to the way Git generates those commit hashes, which are not only based on the changes themselves, but also on the parent commit hash and other metadata.
Anyway, let’s rebase!
Let’s start with a `git rebase -i HEAD~4`. This tells Git to interactively rebase the last 4 commits from HEAD inclusive. `HEAD~4` points to the “root commit” which is the commit upon which we will rebase. After hitting ENTER, your editor of choice will open (or `vi` by default on Unix-style systems). Here, Git is simply asking you what you want to do with the commit you performed.
| |
pick f92bb1d add A |
| |
pick 7d4a28d add C file |
| |
pick 61681da add B file |
| |
pick 57f15b4 add D and E files |
| |
|
| |
# Rebase 78b3f67..57f15b4 onto 78b3f67 (4 commands) |
| |
# |
| |
# Commands: |
| |
# p, pick = use commit |
| |
# r, reword = use commit, but edit the commit message |
| |
# e, edit = use commit, but stop for amending |
| |
# s, squash = use commit, but meld into previous commit |
| |
# f, fixup = like "squash", but discard this commit's log message |
| |
# x, exec = run command (the rest of the line) using shell |
| |
# d, drop = remove commit |
| |
# |
| |
# These lines can be re-ordered; they are executed from top to bottom. |
| |
# |
| |
# If you remove a line here THAT COMMIT WILL BE LOST. |
| |
# |
| |
# However, if you remove everything, the rebase will be aborted. |
| |
# |
| |
# Note that empty commits are commented out |
view rawinteractive-rebase.txt hosted with ❤ by GitHub
As explained earlier, every line represents a single commit, prefixed by the corresponding rebase command that will get applied. All the commented lines are ignored during the rebase and are here to remind you of what to do now. In our case, we will go with the following commands:
| |
reword f92bb1d add A |
| |
pick 61681da add B file |
| |
pick 7d4a28d add C file |
| |
edit 57f15b4 add D and E files |
view rawinteractive-rebase-edited.txt hosted with ❤ by GitHub
Here, we told Git to perform three tasks for us during the rebase:
- Stop at the first commit to let us change the commit message
- Reorder the second and third commit to have them in the correct order
- Stop at the last commit to let us do some manual amending
Upon saving the file and quitting your editor, you’ll be presented with your editor again, and the first commit message will be in front of you. The rebase is happening and you are being prompted to change the first commit message. Let’s change it from “add A” to “add A file”, then save and quit.
The reordering of the second and third commits is done transparently by Git. This leaves us with the last amend we asked to perform. Here, we’re stopped after the “add D and E files” commit. As we wanted to create a single commit with C and D files and a new one only for E, we need to perform the following steps as if we were amending additional commits on the top of our branch:
| |
git reset HEAD~1 |
| |
git add D |
| |
git commit --amend -m ‘add C and D files’ |
| |
git add E |
| |
git commit -m ‘add E file’ |
| |
git rebase --continue |
view rawgit-manual-amend.sh hosted with ❤ by GitHub
These commands (except the last one) make the “add C file” and “add D and E files” commits become the “add C and D files” and “add E file” commit we wanted to have. The last command, though, is just to inform Git that we’re done with the `edit` step. After that, Git will happily tell you that the rebase finished successfully. Great!
We’ve covered pretty much everything you might like to do with your commit history. A few more commands are available and may help you better depending on your use cases.
Handling conflicts
When it comes to using `rebase`, people are often confused about the way to fix conflicts that may happen when rebasing a branch on top of another one. It’s actually convenient to fix conflicts when they do arise with Git, for multiple reasons.
First, when a conflict arises, Git doesn’t try to be smarter than you — it stops the current `rebase` and asks you to fix the conflict. The conflicting files will be marked as “both modified” and the conflicting sections will have some markup to help you find what differs. When you’re done with the modifications, you then `git add` the modified files and run `git rebase –continue` to let the rebase continue.
Second, there are two tools that are very powerful when you are not confident with an on-going rebase, or with a rebase that went wrong. Consider `git rebase –abort` which rewinds history to just before the current Git rebase operation.
With these techniques, changes made using `rebase` can be undone, so the risk of impact of making mistakes is minimal.
Finally, you might find yourself dealing with a long and boring conflict to resolve and even then, it’s possible that the same conflict happens again at a different time. For example, it is common, unfortunately, for the base branch to change while you were working on your own branch. Another scenario is that you aborted a rebase and are now attempting to redo that rebase. To avoid resolving the same conflict again, Git provides a solution which is disabled by default. This feature is named “reuse recorded resolution” or “rerere” and can be enabled with: `git config –global rerere.enabled true`. This way, Git will keep track of all the conflict resolutions you perform. When the exact same conflict happens again, you should see from Git outputs that a recorded resolution was used.
Going further
I hope this article helped you to see what’s possible with the `rebase` command. Of course, the best way to learn Git is to use it, but the second best way is to read about it. If you’d like to read more, I highly recommend the Pro Git book – specifically the section about rebase itself. And, because once in a while we all end up in a bad situation, you should probably take a look at Data Recovery in the Maintenance and Data Recovery section. If you’re not into reading the whole documentation, maybe you’d prefer these Git Flight Rules.
Have additional rebase tips or feedback on this post? I’d love to hear them: @aseure. Thanks for reading – and happy Gitting!


%20(2).svg)