The simplicity of Heroku, for a team consisting only of developers, made it easy for us to get our prototype into production. However, as our product matured and customer expectations grew, we needed more robustness and fine-grained control over our infrastructure. We knew that Kubernetes was the right choice for us. However, the migration was not a simple task.
Here’s the backstory. About a year ago, we decided to prototype a web crawler for Algolia. As you may know, Algolia users make their content searchable by uploading their data to a searchable index, using Algolia’s Search API. Several potential customers asked if we could populate their search index for them, automatically, by crawling their website’s content. In response, we quickly built a web crawler prototype in Node.js and deployed it to Heroku.
We were not disappointed: adding services such as a database server or RabbitMQ was just a single click away. All we had to do was git push to deploy new versions, and our prototype went to production.
In a few months, our web crawler became popular among Algolia customers, and many others started to express a need for it.
However, the crawler required lots of components – some running in the background, others on demand; additionally, some customers required customized components. As the product grew more complex, we asked for help from our infrastructure colleagues.
A good example of this complexity is with IP Whitelisting. One of our customers wanted us to crawl from a fixed IP address so that they could whitelist that IP for high-rate crawling without being throttled by their load balancer. Only two engineers were developing the crawler, so we asked other colleagues to set up an HTTP proxy with a fixed IP address. Yet, as the number of customers grew, many more started asking for the same thing, and our infrastructure team told us it was time for us to take care of it ourselves.
Therefore, we decided to move to a cloud platform that would provide more control over our infrastructure, and eventually allow us to programmatically set up and tear down proxies. That’s how we decided it was time for us to migrate from Heroku to Google Kubernetes Engine (GKE). As a first step, we wanted to get our crawler to work on a GKE cluster, with as few codebase changes as possible. Only then would we make it more robust and maintainable for production.
This was far from being straightforward, as we had initially thought.
In this article, we describe the architecture of our crawler and explain how we made it run on GKE, sharing three challenges that we tackled while migrating. We then conclude with a few lessons learned and benefits brought about by the migration.
Setting things up
Before we dig down into the rabbit hole, let’s do an overview of the web crawler – its architecture, underlying services, and how we make it work locally and in production.
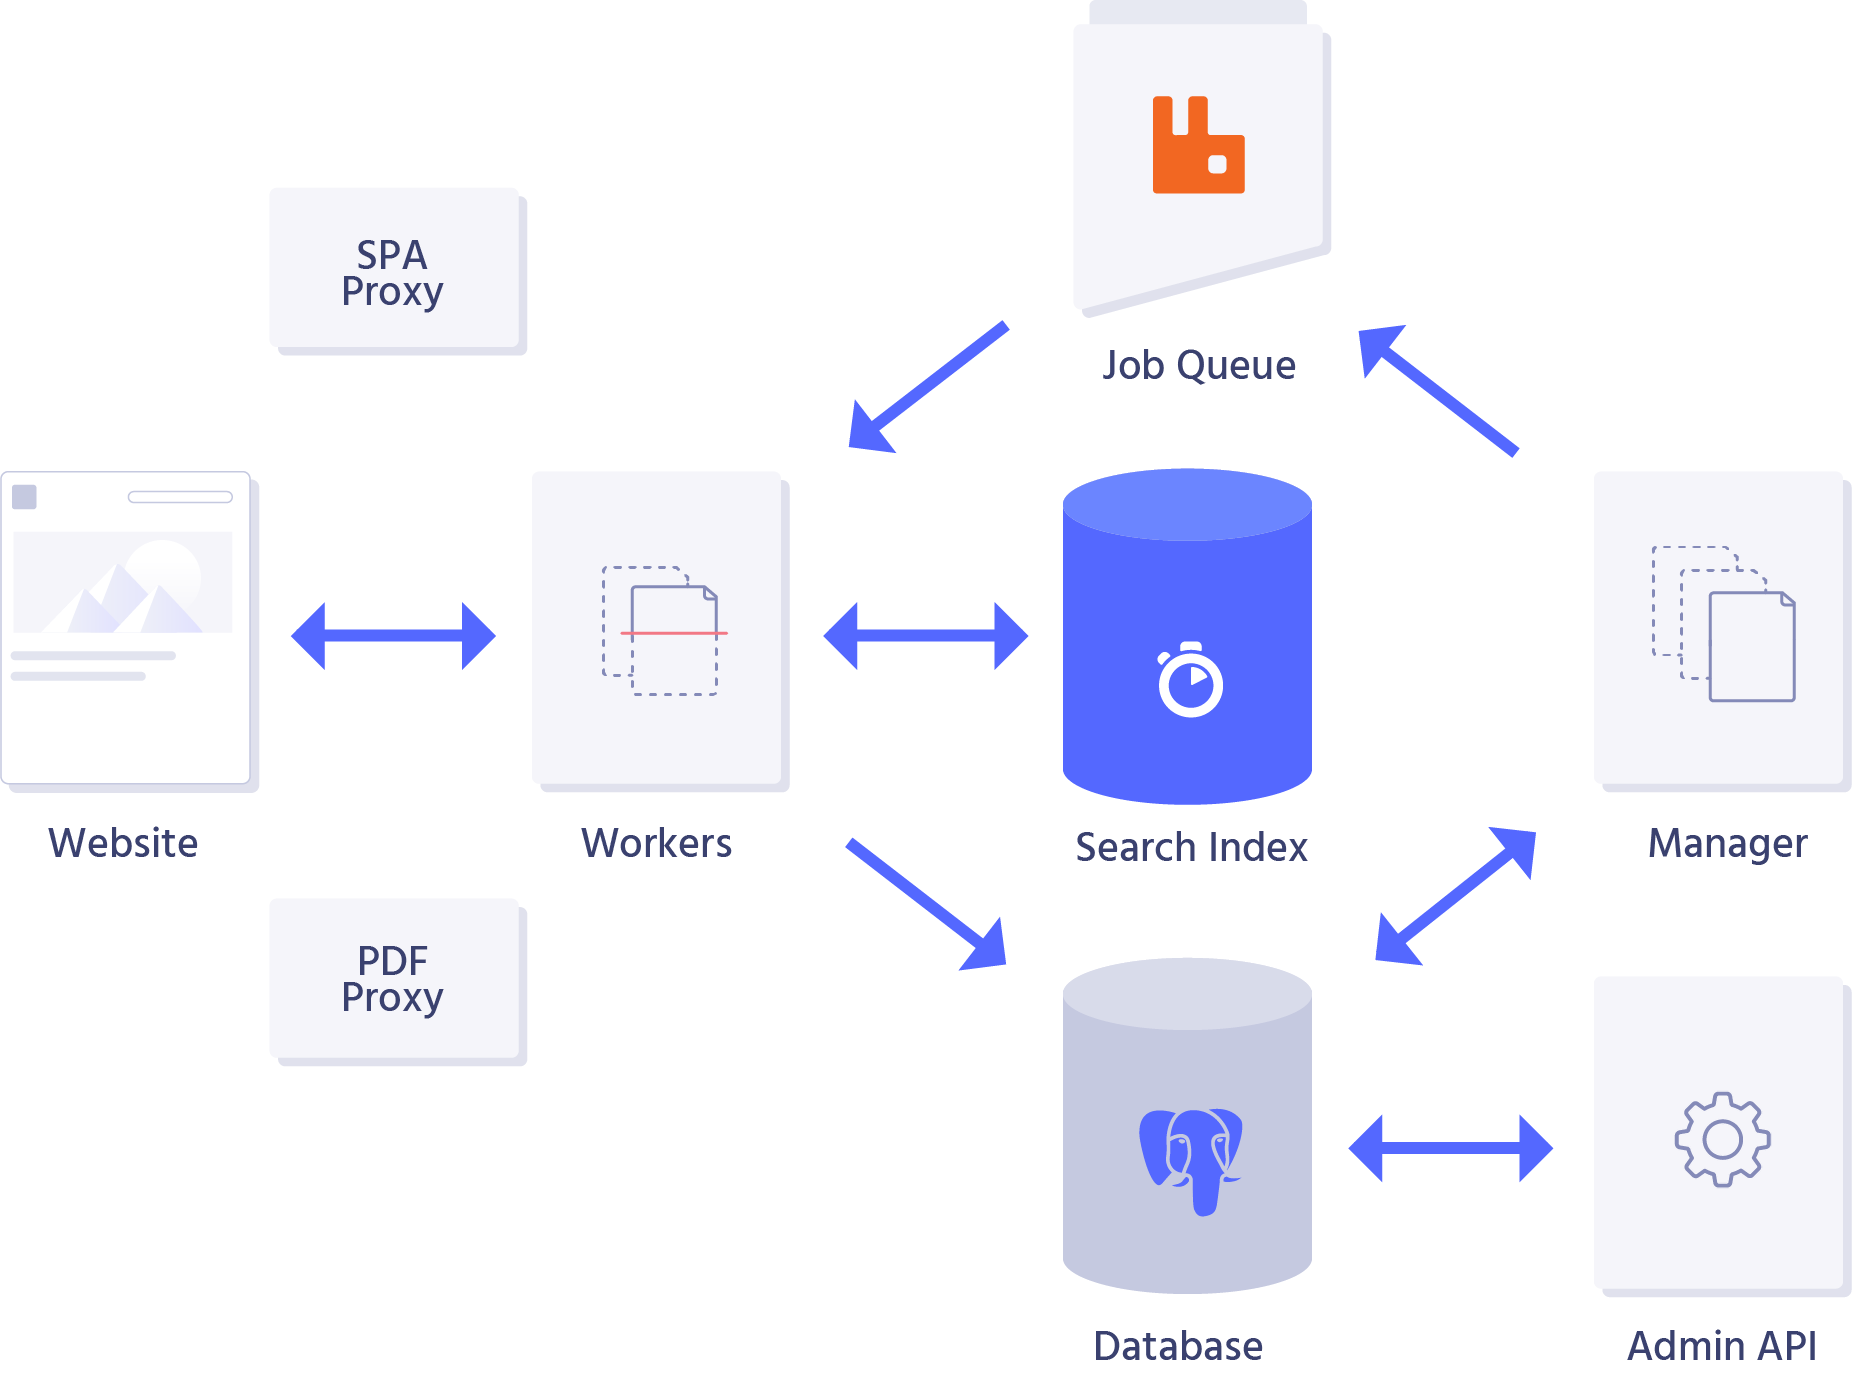
The crawler itself is a set of three components:
- the worker is responsible for fetching a web page, extracting information from its HTML content, and storing this information into an Algolia index;
- the manager is responsible for dispatching URLs to be crawled to workers, with rules and constraints associated with each customer (e.g., rate limiting), as well as any configuration updates that they may have requested;
- the web server is responsible for handling API requests addressed to the crawler (e.g., from the Algolia dashboard) and serving its own management and monitoring dashboard.
These components sit on top of several services:
- a RabbitMQ queue that holds the list of URLs to crawl;
- a PostgreSQL database that holds the state of the crawler, like customer configurations, a list of URLs, and external data to improve the relevance of searched records;
- a Redis store that holds the user sessions of our dashboard;
- a Tika server that acts as a proxy to extract content from PDF files and other types of non-HTML documents;
- and a Rendertron server that acts as a proxy to extract content from single-page applications that require the execution of JavaScript code to render their content in the DOM.
To run all these components and services locally while developing the crawler, we set up a docker-compose file that specifies Docker images and parameters for all of them.
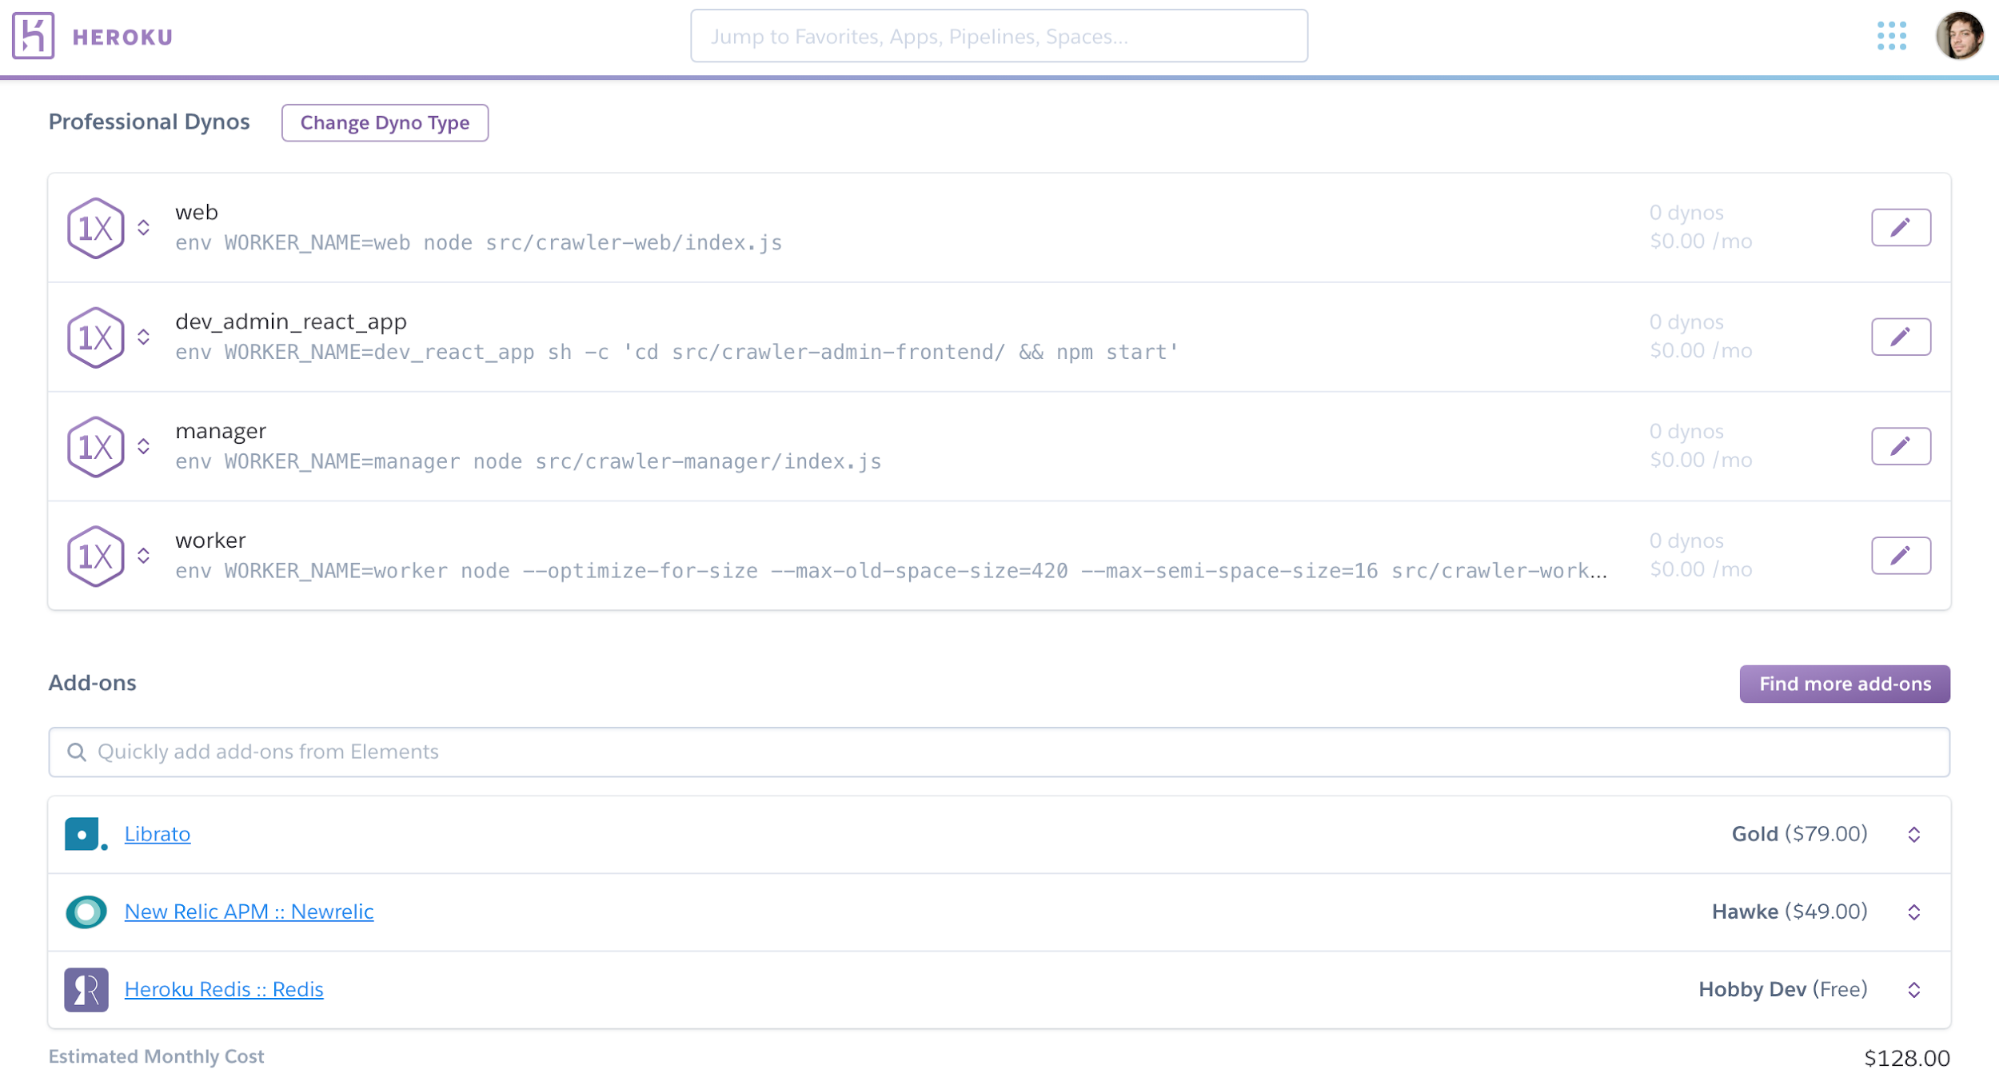
On Heroku, we activated add-ons for each service and wrote a Procfile to specify what command should be executed to start each component. Then, by simply executing git push heroku master, we ensured that the latest versions of our components would be automatically uploaded and started in our Heroku dynos. It was a breeze.
Kubernetes is a system that can dispatch pods based on developer-defined services and deployments. Our first goal was to make our components and services run the same way as in our existing docker-compose.yaml file. We would only have to convert that file to the Kubernetes format and find the right command to start them.
After spending a few hours trying to do that with kompose, without much success, we decided to ask for help. A coworker helped us in three ways: setting up a cluster on GKE, providing us with examples of Kubernetes definition files for deployments and services, and recommending that we use services managed by Google (namely, PubSub and CloudSQL) instead of running our own RabbitMQ and PostgreSQL docker containers as pods. This was all excellent advice, but too soon. To better understand how Kubernetes works, and to feel more confident with it, we decided to solve one problem at a time: first, get our services to run in containers by mirroring our docker-compose definition, and only then, consider replacing them by Google-managed services.
We therefore started writing Kubernetes definition files for each service.
Implementation – Let’s first get Kubernetes to run
We defined them like this:
| |
--- |
| |
apiVersion: apps/v1beta1 |
| |
kind: Deployment |
| |
metadata: |
| |
name: rabbitmq |
| |
spec: |
| |
replicas: 1 |
| |
template: |
| |
metadata: |
| |
labels: |
| |
app: rabbitmq |
| |
spec: |
| |
restartPolicy: Always |
| |
terminationGracePeriodSeconds: 60 |
| |
containers: |
| |
- name: rabbitmq |
| |
image: rabbitmq:3-management |
| |
imagePullPolicy: Always |
| |
ports: |
| |
- containerPort: 5672 |
| |
- containerPort: 15672 |
| |
--- |
| |
apiVersion: v1 |
| |
kind: Service |
| |
metadata: |
| |
name: rabbitmq |
| |
# => exports env var RABBITMQ_SERVICE_HOST (IP address) |
| |
spec: |
| |
type: NodePort |
| |
ports: |
| |
- port: 5672 |
| |
name: 'main' |
| |
# => exports env var RABBITMQ_SERVICE_PORT_MAIN=5672 |
| |
- port: 15672 |
| |
name: 'ui' |
| |
# => exports env var RABBITMQ_SERVICE_PORT_UI=15672 |
| |
selector: |
| |
app: rabbitmq |
view rawgke-01-rabbitmq.yml hosted with ❤ by GitHub
To summarize:
- a deployment is the description of a piece of software that can be deployed, run on a given number of instances, and stopped;
- a service is a deployment that may handle requests from other parts of the system.
For example, to run RabbitMQ on Kubernetes, we need to:
- define a deployment by specifying a Docker image that runs a RabbitMQ server;
- and define a service that exposes two ports: one for AMQP queries, and an optional one to serve the management UI.
We defined our crawler’s components the same way as deployments, apart from the web server that needed to be defined as a service. Because these components aren’t public Docker images on DockerHub, we also had to write a Dockerfile to generate an image from our source code, upload the image to our Google Registry, and then refer to its identifier from our three deployments. To do that, we had to learn how to use the gcloud and kubectl command-line interface (CLI) tools.
After defining our deployments and services in YAML files, we needed them to connect to each other. For example, our three crawler components expect environment variables containing the URLs of all the services it needs to connect to. In Heroku, we had a list of global environment variables that all our dynos shared. We could edit them from the Heroku dashboard or through their CLI. That said, most of our add-ons (e.g., managed PostgreSQL database) automatically set environment variables to provide direct access to their data, so we didn’t need to do much.
In the Kubernetes world, environment variables are set at the deployment level. It means each deployment file should contain the values of necessary environment variables. Furthermore, given the fact that Kubernetes can dynamically kill and restart deployments on different nodes (e.g., physical machines of the cluster) at any time, their IP address and port can change. Consequently, we can’t provide hard-coded values to the environment variables of our components.
Fortunately, we learned that Kubernetes dynamically generates cluster-wide environment variables for all services, with the form <SERVICE-NAME>_SERVICE_HOST and <SERVICE-NAME>_SERVICE_PORT. We also discovered that it was possible to inject the value of environment variables into others, by using the following YAML syntax:
| |
env: |
| |
- name: JS_PROXY_URL_PREFIX |
| |
value: "http://$(RENDERTRON_SERVICE_HOST):$(RENDERTRON_SERVICE_PORT)/render/" |
view rawgke-02-env-vars.yml hosted with ❤ by GitHub
Confidential environment variables, like passwords, needed a different process. For that, we used Kubernetes Secrets.
Secrets are Kubernetes entities that can hold confidential values. They are recommended for storing password, certificates, and any other kind of private information: these values are never added in plain text in YAML files, and accessing them requires special permissions.
To be stored as environment variables, Secrets must also be declared in the YAML files of the deployments where they are required. Yet, they aren’t structured the same way as environment variables: we needed to mount a volume to load Secrets, then import their values as environment variables.
| |
volumes: |
| |
- name: volume-service-account |
| |
secret: |
| |
defaultMode: 420 |
| |
secretName: service-account-for-crawler-deployments |
| |
containers: |
| |
- name: crawler-web |
| |
# [...] |
| |
volumeMounts: |
| |
- mountPath: /crawler-secrets |
| |
name: volume-service-account |
| |
readOnly: true |
| |
envFrom: |
| |
- secretRef: |
| |
name: crawler-creds-slack |
| |
optional: true |
| |
env: |
| |
# [...] |
view rawgke-03-secret.yml hosted with ❤ by GitHub
We later learned that it was possible to share environment variables across several deployments using ConfigMaps. These are Kubernetes entities that can hold several named values and be imported as environment variables into deployments.
Using ConfigMaps prevented us from duplicating configurations, but we couldn’t find any way to include Secrets, or any other entities, that would wrap the value of other environment variables (e.g., using the $() syntax, as seen above) in a Config Map. Therefore, we ended up using ConfigMaps for invariable configuration values, Secrets for passwords and keys, and inline environment variable definitions for the ones that depend on other environment variables.
Furthermore, as we wanted our YAML files to provision two different clusters (e.g., production and staging) on separate domain names, we ended up turning some of those into templates and writing a script that rendered them into final YAML files, using sed. We’re pretty sure there’s a more standard way to achieve this, but this method was a good compromise for us, given the time we were able to spend on this migration.
At that point, we had written 10 YAML files and 5 bash scripts to define our components and services. We were finally ready to provision our GKE cluster and see them run. The command to upload our YAML files and to get them to run on our cluster was: kubectl apply -f ..
To give you an example of the kind of scripts we wrote, here is the list of commands we were running to restart all components after deploying an update that may contain database migrations:
| |
#!/usr/bin/env bash |
| |
|
| |
echo "ℹ️ This script will stop the crawler, apply db migrations, and then restart the crawler." |
| |
|
| |
MANAGER_IMAGE="latest" |
| |
WORKER_REPLICAS=$(kubectl get deployment crawler-worker -o=jsonpath='{$.spec.replicas}') |
| |
echo "(i) Found ${WORKER_REPLICAS} worker replicas" |
| |
|
| |
echo "Shutting down crawler-manager, crawler-web and crawler-worker..." |
| |
kubectl scale deployment crawler-manager crawler-web crawler-worker --replicas=0 |
| |
|
| |
echo "Setting up and running the db-migrate job..." |
| |
sed "s,_DOCKER_IMAGE_,${MANAGER_IMAGE},g" ./on-demand/db-migrate.template.yml >./on-demand/db-migrate.yml |
| |
./k8s-run-job.sh db-migrate |
| |
rm ./on-demand/db-migrate.yml |
| |
|
| |
echo "Restarting crawler-manager, crawler-web and crawler-worker..." |
| |
kubectl scale deployment crawler-manager crawler-web --replicas=1 |
| |
kubectl scale deployment crawler-worker --replicas=${WORKER_REPLICAS} |
| |
|
| |
echo "✅ Done." |
view rawgke-04-restart.sh hosted with ❤ by GitHub
Not so fast. A colleague warned us that, in order to make our dashboard accessible from the Internet, we had to define an Ingress resource to connect our “web” Service to Google’s HTTP Load Balancer.
He provided an example that ended up looking like this:
| |
apiVersion: extensions/v1beta1 |
| |
kind: Ingress |
| |
metadata: |
| |
name: crawler-ingress |
| |
annotations: |
| |
kubernetes.io/ingress.class: "gce" # we use Google's load balancer for ingress traffic |
| |
spec: |
| |
# access thru ip address |
| |
backend: |
| |
serviceName: crawler-web |
| |
servicePort: 8000 |
| |
# access thru domain name |
| |
rules: |
| |
- host: crawler.algolia.com |
| |
http: |
| |
paths: |
| |
- backend: |
| |
serviceName: crawler-web |
| |
servicePort: 8000 |
| |
path: /* |
view rawgke-05-ingress.yml hosted with ❤ by GitHub
After a few minutes, our dashboard was finally live!
Unfortunately, we couldn’t log in using our Single Sign-on system before enabling HTTPS access to that endpoint. Let’s dig into that.
Wire an SSL certificate
In the Heroku world, enabling HTTPS/SSL is a piece of cake. All you have to do is click a button.

Heroku would automatically generate a free SSL certificate using Let’s Encrypt, reply to the ACME challenge, and automatically repeat that process every 3 months to renew the certificate without us knowing it. It just worked.
We hoped that Google would also provide an easy way to set that up on our GKE cluster. Think again! GKE’s documentation clearly states that, while it’s possible to associate an SSL certificate with Google’s Load Balancer through kubectl or Google Cloud Console, they don’t provide a way to generate it.
We used Google to find solutions, and we found several projects that promised to generate and renew an SSL certificate for your GKE cluster, and would automatically associate it to our Load Balancer. Unfortunately, all of them included disclaimers such as “do not use in production” or “we do not currently offer strong guarantees around our API stability”. Therefore, we decided that, until Google provides a reliable way to do that automatically, we would manually generate a Let’s Encrypt certificate, then attach it to our load balancer. The only thing is, we needed to remember to do this every few months.
Our crawler was fully functional at that point. The only remaining concern before migrating was the potential loss of data from our PostgreSQL database, as it was still running from a Docker container, without persistent volume nor any backup routine.
Disclaimer: Since our migration, other solutions have made that process easier. We haven’t tried them yet.
Plug into a managed database
Data is a serious matter. Our customers rely on us, so their data should be available at all times, be responsive no matter the scale, have no leaks, and be quickly recoverable in case of incident. These are all excellent reasons to trust a managed database service instead of running the database ourselves from a Docker container that Kubernetes can kill at any time.
As part of the Google Cloud ecosystem, the CloudSQL product had recently promoted their managed PostgreSQL service as “production-ready”, so this was a no-brainer for us: we should plug our crawler into that service. Our colleagues told us that we would have to integrate a so-called CloudSQL proxy to connect to a CloudSQL-managed PostgreSQL server.
To do this, we followed a tutorial provided by Google. In addition to replacing our PostgreSQL Service by a CloudSQL Proxy Service, we had to:
- create a database user;
- store that user’s password securely as a Kubernetes Secret;
- create a service account to access the CloudSQL instance from our components;
- load the secret as a dynamic environment variable in all our deployments that needed to connect to the database.
Despite the help we got, it was not straightforward to integrate this into our system. The tutorial provided by Google explained how to run that proxy in a “sidecar” fashion, meaning that the CloudSQL Proxy would run on the same Pod as the application itself, making it easy to connect to that proxy.
In our system, we have three separate components that need to access the same database, and we felt that attaching a separate CloudSQL Proxy to each of them would have been overkill and harder to maintain. Therefore, we had to take our time to better understand how to configure the deployments. On top of that, it’s sometimes necessary to access our production database from outside the cluster (e.g., from our development laptops for debugging purposes). Since all database connections must go through CloudSQL Proxy, we had two options:
- connect through the CloudSQL Proxy that is running in our production cluster;
- or set up a local CloudSQL Proxy with one dedicated service account per developer.
For security reasons, we picked the second solution. After downloading the JSON key associated with the service account we created for each of us, here’s how we were able to run CloudSQL Proxy on our laptops:
| |
#!/usr/bin/env bash |
| |
|
| |
# This script runs a proxy to give access to our CloudSQL database. |
| |
# While it's running, any postgres client (e.g. psql) can connect thru 127.0.0.1:5432. |
| |
|
| |
# Expected inputs: |
| |
# - CLOUDSQL_INSTANCE_NAME: e.g. "crawler-pgsql" |
| |
# - PGSQL_CREDS_PATH: path where your service account JSON file is stored, e.g. "$HOME/crawler/secrets" |
| |
# - PGSQL_CREDS_FILENAME: name of your service account JSON file, e.g. "crawler-pgsql-service-account.json" |
| |
|
| |
if [ -z "$CLOUDSQL_INSTANCE_NAME" ]; then |
| |
echo "missing env var: CLOUDSQL_INSTANCE_NAME (e.g. \"crawler-pgsql\")"; exit 1; fi; |
| |
|
| |
if [ -z "$PGSQL_CREDS_PATH" ]; then |
| |
echo "missing env var: PGSQL_CREDS_PATH (e.g. \"$HOME/crawler/secrets\")"; exit 1; fi; |
| |
|
| |
if [ -z "$PGSQL_CREDS_FILENAME" ]; then |
| |
echo "missing env var: PGSQL_CREDS_FILENAME (e.g. \"crawler-pgsql-service-account.json\")"; exit 1; fi; |
| |
|
| |
GOOGLE_PROJECT="crawler" |
| |
ZONE="us-central1" |
| |
|
| |
CLOUDSQL_INSTANCE="$GOOGLE_PROJECT:$ZONE:$CLOUDSQL_INSTANCE_NAME" |
| |
|
| |
echo "Connecting to $CLOUDSQL_INSTANCE thru CloudSQL proxy on 127.0.0.1" |
| |
echo "Filepath to service account file: $PGSQL_CREDS_PATH/$PGSQL_CREDS_FILENAME" |
| |
|
| |
docker run -v $PGSQL_CREDS_PATH:/conf -p 127.0.0.1:5432:5432 \ |
| |
gcr.io/cloudsql-docker/gce-proxy:1.11 /cloud_sql_proxy \ |
| |
-credential_file=/conf/$PGSQL_CREDS_FILENAME \ |
| |
-instances=$CLOUDSQL_INSTANCE=tcp:0.0.0.0:5432 |
view rawgke-06-cloudsql.sh hosted with ❤ by GitHub
If you decide to follow that route, make sure that you do not keep the JSON key associated with your service account on your laptop. We recommend using a system like Vault to either store these keys more securely, or even generate a new, short-lived key with every connection.
Disclaimer: It’s now possible to access a CloudSQL database directly from GKE. We haven’t tried this yet.
Conclusion
The migration took time, despite some of the shortcuts that we took, such as mirroring our system’s docker containers first to reach an iso-functional stage, and only then replacing our database container by a managed solution. In the end, we’re glad to have taken a step-by-step approach. It allowed us to better understand how Kubernetes works, and to master the tools that we use to maintain our GKE cluster. It also prevented us from having to tackle more than one problem at a time, which could have become a major source of frustration and demotivation given the complexity of GKE and the infinite number of ways problems can be addressed in that ecosystem.
It took us several weeks to get our crawler up and running sustainably on GKE, and to finally shut down our Heroku dynos and add-ons. While the migration was more tedious and less straightforward than we had anticipated – despite the help we got from colleagues who had experience with Kubernetes and Google Cloud products – at the end of the day, we are satisfied by what it brings to the table. For example:
- We now have a better understanding of each of our components’ hardware requirements and their behaviors in isolation. Migrating to Kubernetes has made them more robust on a dynamic infrastructure (e.g., nodes can be turned off and re-allocated at any time, and at different IP addresses).
- We are currently discovering how to horizontally scale the number of replicas of our “worker” deployments automatically and in a more efficient way than we could have done on Heroku.
- We are confident that we will be able to set up static-IP proxy servers programmatically on our cluster, based on our customers’ need.
The good news is that recent evolutions in Google Kubernetes Engine have addressed some of our difficulties and made this process easier.
By the way, we’re organizing an event about Kubernetes on March 7th in our Paris office with some Google experts. If you’re in Europe at that time, feel free to register!
The author would like to thank Rémy-Christophe Schermesser, Sarah Dayan, Peter Villani, Angélique Fey and Tiphaine Gillet for their contribution to this article. And all the colleagues who helped proofread it. ❤️


%20(2).svg)