These days, ecommerce shoppers expect convenience and want the physical and online worlds to mesh, allowing them to conduct their business on whatever channel they want. This is what a Store Locator is built for, so that users can:
Search products online, then purchase in-store
Browse and compare products in person, then buy online
Shop and buy products online, then pick up the purchase in person
Return previously purchased items in person, rather than shipping them back
Despite that, we observe that too many websites don’t offer an elegant way for their users to find their “nearest store,” whether for testing or purchasing offline, or for picking up a purchase made online.
Learn how to build a store locator
Building a store locator may seem complex as it requires implementing a geo-search, address/POI (Point of Interest) search, and displaying results on a map. To make it as easy as possible for everyone to follow along, we have decided to do a series of three Live Coding Sessions followed by three blog posts. During these events, we’re going to create a responsive Store Locator in React using:
Everything is wrapped using React v17, React InstantSearch, and the Autocomplete UI library to build a modern search and discovery experience in little time.
This guide is divided into three parts
Part 1: Introduction and data indexing
Introduction
Creating the necessary accounts
Pushing data and indexing in Algolia
Scaffolding the project
Part 2: Geo-search implementation using Algolia and Mapbox
Why should retailers care about providing a store locator with BOPIS capabilities?
The SARS-CoV-2 pandemic outbreak gave rise to many challenges. With curfews and lockdowns in most countries, brands and retailers had to redefine themselves and the way they interact with their customers.
One emerging trend to face these challenges is BOPIS, an acronym for “Buy Online, Pick up In-Store,” also called “Click & Collect.” Already present on websites like Apple’s or IKEA’s for years, BOPIS has become an important way for consumers to buy their goods online, and then walk/bike/drive to the nearest store and pick up their order.
Users choose the closest store during the ordering process, and the time they’d like to pick up their items, pay online, and voilà!
Here are some examples from Apple and IKEA:
How-to guide
In this blogpost, we’ll outline the main steps covered during the live coding.
1. Creating the necessary accounts
We’ll be using Algolia, Mapbox, and Twilio as service providers. For the first step, we only need to create Algolia and Clever-cloud (our cloud provider) accounts. In the upcoming sessions, we’ll create the other accounts.
A. Clever Cloud
Clever Cloud is an IT automation platform. They manage all the operational aspects while you focus on writing and pushing your code. It handles automated tasks so that your application will never go down: monitoring, backups, scaling, security updates, blue/green deployments, CI/CD tools integration, and more.
Let’s create our account on clever-cloud.com.
Once we fill out our personal information, we’re good to go. We click on Personal Space and Create… a brand new app. We choose Node.js runtime, as we will write our app in React and Typescript.
We then choose our data-center, add our SSH key (required for pushing, if you haven’t linked your GitHub account), and leave the environment variables as they are. We don’t need add-ons for this project, but as you can see, they support most tech stacks (Postgres, Mongo, Redis, Apache Pulsar, and more.
Now, we can create an Algolia account.
B. Algolia
Algolia provides API platforms for dynamic experiences that enable organizations to predict intent and deliver results. Thanks to the API-first approach in Algolia, developers and business teams can surface relevant content to satisfy the demand for instant results. Algolia makes it easy to build and optimize experiences that enhance online engagement, increase conversion rates, and enrich customer lifetime value.
Now, we head over to Algolia.com and create our FREE account, which allows up to . 10,000 search requests per month. After signing up, we’ll create the app and index our data:
C. Other services
Keep in mind that we’ll need a Mapbox and a Twilio account.
You can create both of them by yourself, or wait until we need them. It’s up to you.
2. Pushing data and indexing in Algolia
Now that we’ve set up our Algolia account, we’ll kickstart the project by indexing the data we want to display in the app. We’ve prepared this data in our GitHub repository (https://github.com/algolia-samples/store-locator-with-algolia-mapbox-twilio/tree/master/dataset), which contains a huge JSON file with all Spencer and William’s store locations.
We click on Raw (to the right of the filename) and save the document to our Desktop. We only need to do this once.
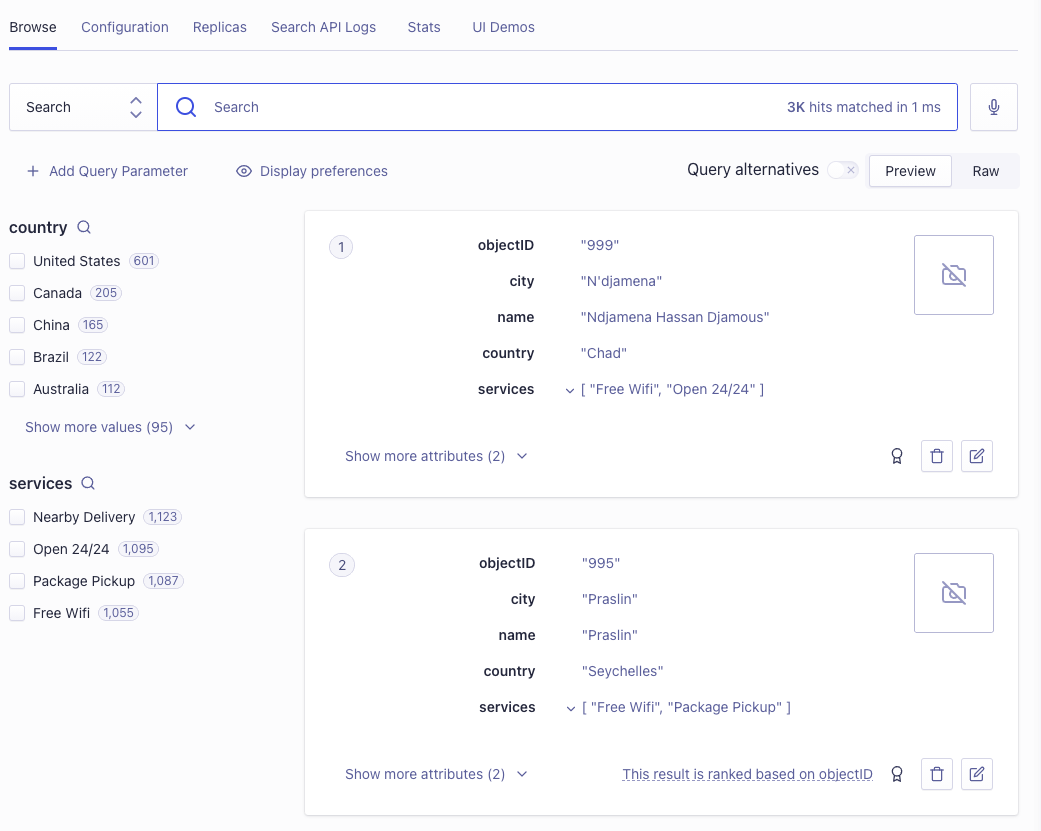
Then we go to our Algolia account, and go to Index > Configure in the Sidebar:
We click on Create Index and name it livecoding-stores.
Once created, a sidebar opens up on the right of the screen. We click on Upload record(s) and drag and drop the JSON we got from the repo.
It’s fast to create the index — our 3000 stores are searchable in just a few seconds. Pretty neat!
After indexing our data, we’ll need to configure our index to tell the engine:
Which attributes you want to make searchable so it doesn’t search in all of them (default behavior)
Which business-relevant attributes to use for the custom ranking
Which attributes to add as facets
On the sidebar, we click on Configure and then click on the button ‘Add a Searchable Attribute’:
We’ll add “City”, “Country”, and “Name” as searchable attributes.
Then we scroll down to select FILTERING AND FACETING > Facets
Here we’ll add as attributes “Country” and “Services” and declare those attributes as facets, then we click on Review and Save Settings.
Algolia is designed to return the most relevant results, blending Textual Relevance with Business relevance. For the Textual part, we’ve configured the searchable attributes, there is more but it’s enough. For the Business relevance, it’s on everyone to provide an attribute that reflects best the popularity of each record indexed: in our case we have an attribute called “popularity” which we know “the higher the value, the more popular is the record”. -> And to configure it we use the setting called “CustomRanking”.
In order to check if everything is working correctly, we go to the top of our screen and click on Browse. We click on the small magnifying glass and type “France”.
We should see some results. Now we’re ready to start coding!
Note: We’ve just set up the minimum to get started, but feel free to go to the Algolia documentation to learn more about best practices for configuring your index and achieving the best relevance:
3. Scaffold the project
“Developers can change the world with a Text Editor”
Jeff Lawson, CEO Twilio
For this project, we’ve decided to build our app using React with Typescript and Tailwind CSS. You might already be familiar with React, but maybe less so with Tailwind.
Tailwind is a modern UI library that provides hundreds of CSS classes that you can use with any UI framework/library. It helps you build a complex but coherent web UI, with more flexibility than a Bootstrap / jQuery framework.
So we open a terminal and install the necessary base for our project.
Then we install Tailwind CSS and its required dependencies. Tailwind isn’t needed in production, so it’s sufficient to add it as development dependency.
Since we can’t change the PostCSS configuration with create react app,we’ll need to override its configuration by using the CRACO tool (Create React App Configuration Override). We’ll also add the package serve for serving the production bundle after generating it with the yarn build script (see below).
Now we need to add the craco command to the “test”, “build”, and “dev” scripts in the package.json file.
Next, we’ll need to create a configuration file for CRACO. We create a file named craco.config.js at the root of our project and add the following code snippet to this file:
This allows us to use Tailwind CSS and autoprefixer as PostCSS plugins.
Now we need to configure Tailwind. Run this command:
This will create a tailwind.config.js file. From here, we just need to edit the line 2 “purge” command:
Tailwind CSS includes hundreds of CSS classes in development mode, to make designing your style fast and easy. This makes the development bundle large by design. In production, you want to reduce any unused classes from the CSS to reduce the size as much as possible. Tailwind CSS checks all files matching the pattern in the purge option and removes any unused CSS classes from the production build.
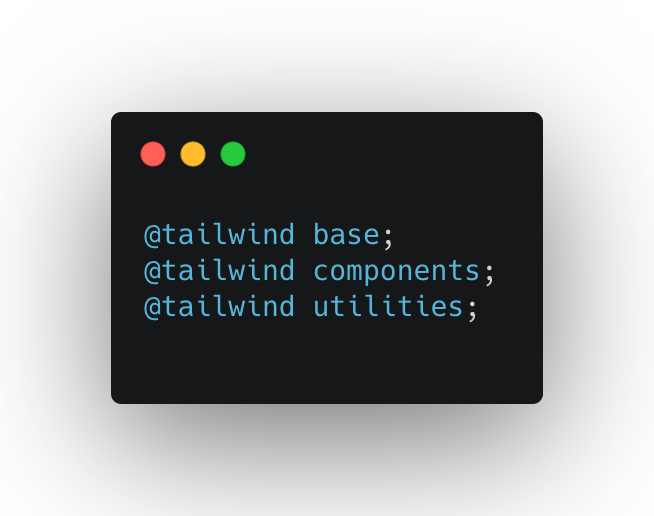
Finally, we open our IDE and edit index.css to add these 3 lines to the top of the file.
We then commit and push our code. We’re ready for our next live streaming!
What have we seen
In part 1, we have:
seen what we’ll be building together during these 3 LiveCoding().sessions
created Clever-cloud and Algolia’s accounts
set-up and configured our Algolia’s index
scaffolded our project with Create React App, CRACO and TailwindCSS
Now that we have the project set up and made our store dataset searchable with Algolia, in the next session we’re focusing on: Implementing Algolia GeoSearch and displaying to results on a map using Mapbox GL. Read Part 2
Gartner 2026 Magic Quadrant for Search and Product Discovery
A leader for the third consecutive year
Algolia is recognized as a Leader in the 2026 Gartner® Magic Quadrant™ for Search and Product Discovery as the market shifts toward AI-powered, agentic discovery.
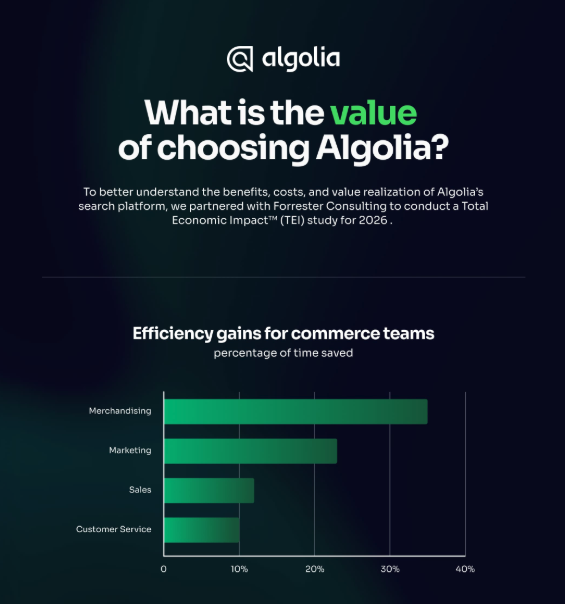
Increased Operating Profit and Improved Efficiency
A Forrester Consulting study found Algolia delivered $3.1M NPV over three years, helping commerce teams improve relevance, automate merchandising, and grow revenue
IDC recognized Algolia as a leader in general-purpose knowledge discovery software, citing the growing role of search in AI-powered workflows and enterprise knowledge experiences
Algolia earned 12 medals across 12 categories in Paradigm B2B’s 2025 Enterprise Combine for Search and Discovery, with customers praising speed, transparency, analytics, and ease of use


.png)
.png)
.png)

.png)
.png)
.png)
.png)
.png)
.png)
.png)
.png)
.png)
.png)

%20(2).svg)